7 Best iPhone Tips and Tricks You Should Know
Want to learn some cool tips about your iPhone? Learn 7 iPhone Tips and Tricks to help you get the most out of your iPhone.
There are a ton of iPhone tips and tricks articles on the internet, so why should you read yet another article on the same subject? Well, because if the article consists of tips and tricks that the writer themselves have discovered and not copy and pasted from other websites, you will find a few helpful tips and tricks and that you didn’t know before. That’s why this article contains only those tips and tricks which I either discovered by myself or by conversing with other iPhone enthusiast users on Reddit. Hence, I am sure that you will find some cool iPhone tips and tricks that you didn’t know before. Also, these tips and tricks for iPhones are really practical and you will find them quite useful. Now that you know why you should read this article, here are the 7 iPhone tips and tricks that will help you get the most out of your iPhone:
iPhone Tips and Tricks That Are Useful
The quality of the GIFs is a little on the lower side. This was a decision I had to make to ensure faster loading time for the article.
1. Easily Moving and Rearranging Apps
Apple introduced the ability to move multiple apps with iOS 11 and I am constantly shocked by the number of people I know who don’t know about it. Most of the iPhone users still move the apps around using the old way which is really time-taking and tiresome. If you know the right way to move apps, you can do it in seconds even if you want to move tens of apps at the same time. This tip will teach you how you can move multiple apps at once, create a folder with multiple apps, and empty and destroy a folder in one motion.
A. Moving Multiple Apps
To move multiple apps, first, tap and hold on any app to get into the wiggle mode. Now, instead of moving the apps one by one, tap and hold any one of the apps and drag it a little bit. Now, with your free finger tap on the other apps that you want to move. You can even tap on a folder and then tap on the apps inside it. You will see that all that apps that you are tapping get stacked under your finger. You can move this stack anywhere that you want to.
One tip to note here is that you don’t need to drag the stack to the edge of the screen to get to the next screen. An easy and faster way to change the page is by swiping on the screen itself when you are holding the stack. Take a look at the GIF above to get a clear understanding. As you can see, my app stack remains in the middle of the screen while I change the page by swiping on it.
B. Creating a Folder with Multiple Apps
Now that you know how to create a stack, you can do multiple things with it. For example, you can create a folder with multiple apps. To create a folder with multiple apps, create a stack of the apps that will go inside the folder but leave one app behind. Now drag your stack onto the app that you left and it will create a folder of all those apps at once.
C. Emptying and Destroying a Folder
To empty a folder easily, all you need to do is create a stack of the apps inside that folder and then drag the stack out. Once, the apps get out of the folder, your folder will automatically be destroyed.
2. Open Links in New Tab in Safari
Did you know that there is an easy way to directly open links in a new tab in mobile Safari? If you didn’t, this tip is going to save you a lot of time and make browsing the internet easier. The trick is also fairly easy to perform. To open a link in new tab, instead of tapping on the link with a single finger, tap on it using two fingers. Whenever you tap on a link with two fingers, it will open in a new tab in Safari. It might take you a few tries before you get the hang of it, however, once you do, browsing will become so much easier. This tip comes especially handy if you are using an iPad as the two fingers interaction with links on a larger screen is easier than on the smaller screens of iPhones.
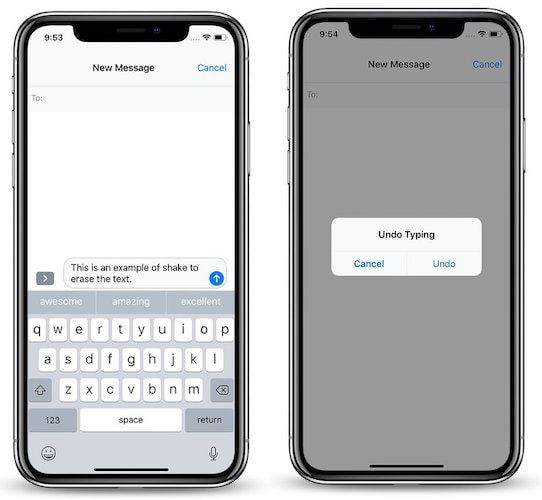
3. Shake to Erase Text in Messages
If you tend to rewrite your messages a lot, this tip is just for you. If you want to delete your entire message in one go, instead of pressing and holding down on the delete button on the keyboard, just shake your iPhone for a bit and it will give you an option to erase the message. That’s how easy it is.
4. Use Animojis as Stickers
One of the biggest and most useless features announced by Apple for the iPhone X was Animoji. I have literally never used Animojis other than the times when I was testing them. However, recently I found out that you can use Animojis as stickers and that has significantly increased my Animoji usage. To use Animojis as stickers, drag and drop them inside the message field. You can also make them bigger or smaller by using a second finger to pinch in or out while dragging the Animojis.
5. Scan Documents Inside the Notes App
While I recommend the Scanbot Scanner app to anyone who needs to scan a ton of documents on a fairly regular basis, for people who only use this feature once in a while, the Notes app has a very handy document scanner which can get the job done. To scan documents using the Notes app, launch the app and then create a new note. Here, tap on the (+) button and select “Scan document”.
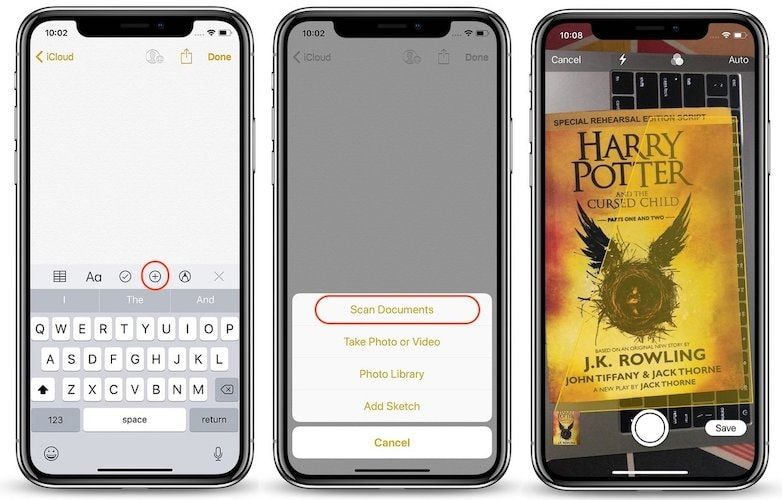
The Notes app will open the camera interface with a yellow box in the middle signifying the scan area. Carefully adjust the document or your iPhone so that the document is aligned inside the yellow box. Now, the Notes app should automatically scan and save the document. However, if it’s unable to do so, you can use the manual capture button and adjust the edges yourself to get a clear scan. The best part is that you can export the scanned documents in PDF format which makes it really easy to share the documents with other people.
6. Stop Music With Timer
One of my favorite features of podcasting apps like Overcast or Castro is the fact that they allow me to set a sleep timer which stops the playback whenever the time runs out. However, there is no such feature inside the Apple Music app. I love to sleep while listening to music, but I don’t want my iPhone to keep on playing the music for the whole night. That’s why I was so happy when I discovered this trick that I am sharing with you. The best part is that you don’t need to install any third-party apps to do that.

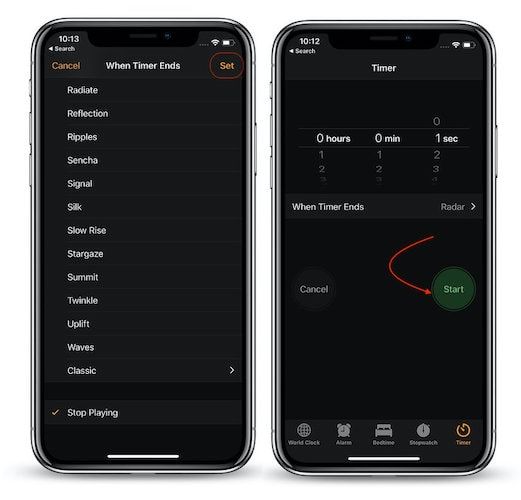
To set a sleep timer on your iPhone, first, open the “Clock” app and then tap on “Timer”. Now, select the time after which you want the music to stop and then tap on “When Timer Ends”. Here, scroll down to the bottom and select the “Stop Playing” option. Lastly, tap on the “Set” button at the top right corner to finish the setup and start the Timer.
That’s it, your sleep timer has started now. As soon as the timer ends, your iPhone will automatically stop any media that you are playing, be it, music or video, .
7. Quick Typing on Default Keyboard
Another quick tip that I want to share with you guys will help you type faster on your iPhone. While typing on your iPhone if you want to type a number or special character, you don’t have to tap on the [123] key, tap on the key that you want to select, and then tap again on the [ABC] key to return to the normal keyboard. Instead, you can tap on the [123] and then slide your finger on the keyboard to select the desired character. As soon as you remove your finger from the character, the keyboard will automatically change to your normal [ABC] keyboard. Just look at the GIF below, it explains the whole process better than I can write it.
7 iPhone Tips and Tricks: Final Thoughts
There are a ton of iPhone tips and tricks and the ones mentioned here are just the tip of the iceberg. I mentioned these specific tips and tricks because I find them useful at least on a weekly if not on a daily basis. If you like this article and want to see more such tips and tricks for iPhones, let us know in the comments section below.