
How to Use Agenda Plugin to Manage Tasks and Projects in Logseq
Here is how you can manage tasks and projects in Logseq using the Agenda plugin.
While Logseq is primarily a note-taking and personal knowledge management app, you can also use it for journaling, whiteboarding, and managing tasks and projects. To help users modify the app, Logseq offers a library of plugins that one can use to add missing features. One of the best Logseq plugins is the Agenda plugin. It is a task manager, project tracker, and calendar, all rolled into one. If you want to use Logseq to manage tasks and projects, Agenda is a must-have plugin. Here is how to use the Logseq Agenda plugin to manage tasks and projects inside Logseq.
Manage tasks and projects in Logseq using Agenda plugin
Agenda is one of the best Logseq plugins, and any Logseq user not using this plugin is missing out on a powerful tool. However, its extensive feature set makes it too complex for new users. We hope to change this with our guide. In this guide, you will learn to install and customize the Agenda plugin, create and manage tasks, projects, and calendar events, use the built-in Pomodoro timer to focus on your work and measure progress over time, link your Google and Apple calendars, and more.
It is a long guide, so buckle up, open Logseq on your computer, and let’s get started. We recommend reading the guide from start to finish to get the best understanding. If you want, you can use the table of content below to move to the section you find more interesting.
Click to Reveal Table of Content
- What is Agenda plugin
- How to install and access Logseq Agenda plugin
- Understanding Agenda's user interface
- Customizing the Agenda plugin
- Use Agenda to create and manage tasks in Logseq
- Create a task in your daily note to capture it in Agenda
- Add time to tasks in Agenda
- Schedule a Task in Agenda
- Create a task or event using the Agenda Calendar View
- Manage and reschedule tasks and events using Agenda Calendar View
- Reschedule tasks in Logseq using the Agenda calendar view
- Reschedule tasks in Logseq using slash command
- Use Agenda to Manage Projects in Logseq
- Import events from Google and iCloud calendars in Logseq
What is Agenda plugin
Agenda is a powerhouse plugin that lets you manage all your tasks and projects inside Logseq. The plugin integrates tasks with the calendar to help you better plan your time. It has a nifty dashboard that keeps track of completed and pending tasks, and seeing its task tracker fill as you complete them is one of the best feelings. Here’s a quick brief of everything you get with the Agenda plugin.
- A beautiful dashboard that tracks your completed and pending tasks
- Calendar view for your tasks (daily, weekly, 2week, and monthly views)
- Task and event creation from calendar view for proper planning
- Separate calendar views for each project, allowing you to focus on the work at hand
- Combined calendar view giving you a full picture
- Google and Apple calendar integration
- Built-in Pomodoro functionality to track the time you spend on each task
- Powerful review function that lets you visualize data in easy-to-read graphs
Now that you know what to expect from the Agenda plugin, let’s get on with our guide.
How to install and access Logseq Agenda plugin
In this section of the guide, we will also show you how to install the Agenda plugin and several methods which you can use to access it.
Install Agenda plugin in your Logseq database
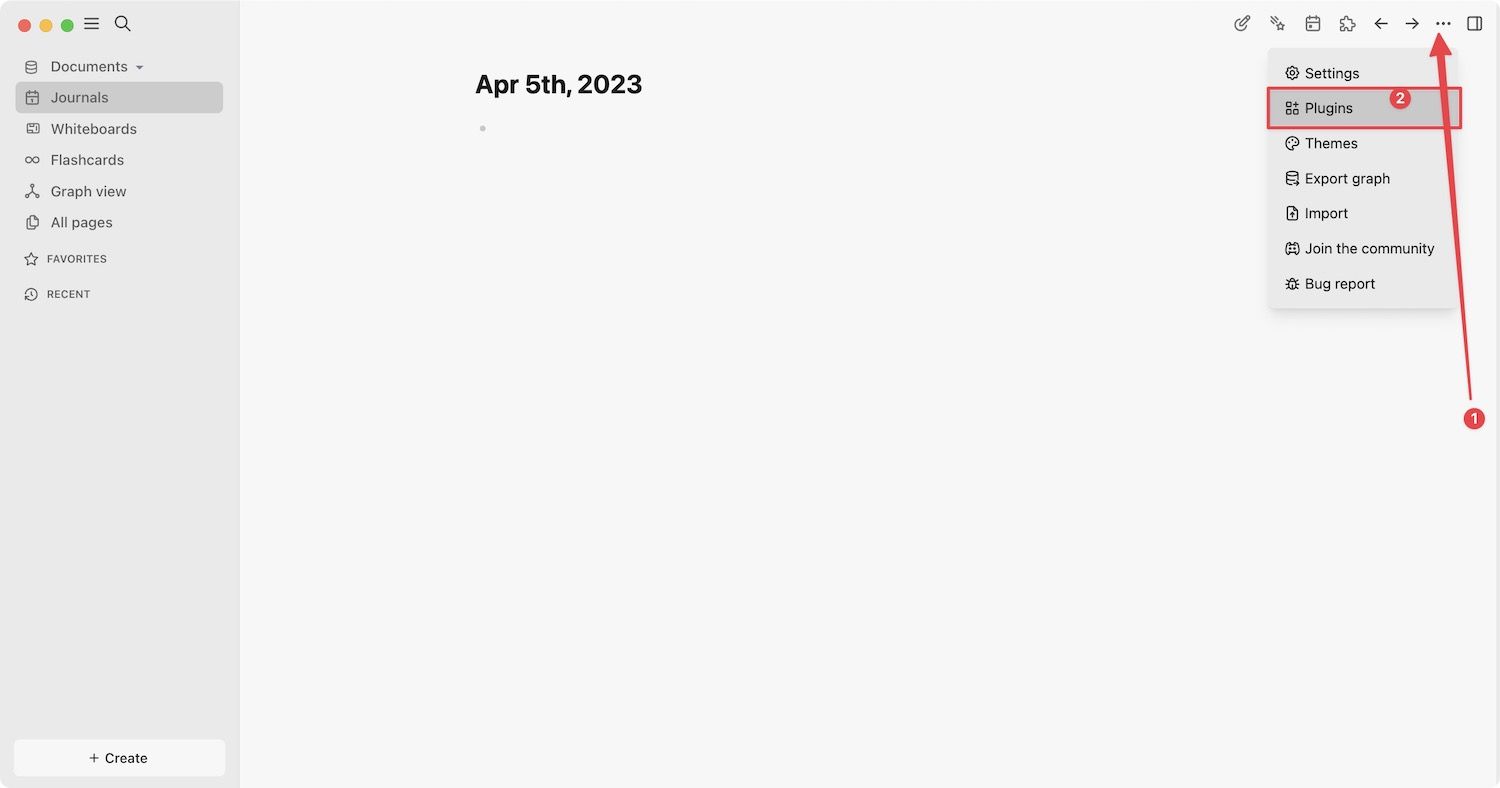
1. Launch the Logseq app on your computer. Click the three-dot menu in the top-right corner and choose Plugins.
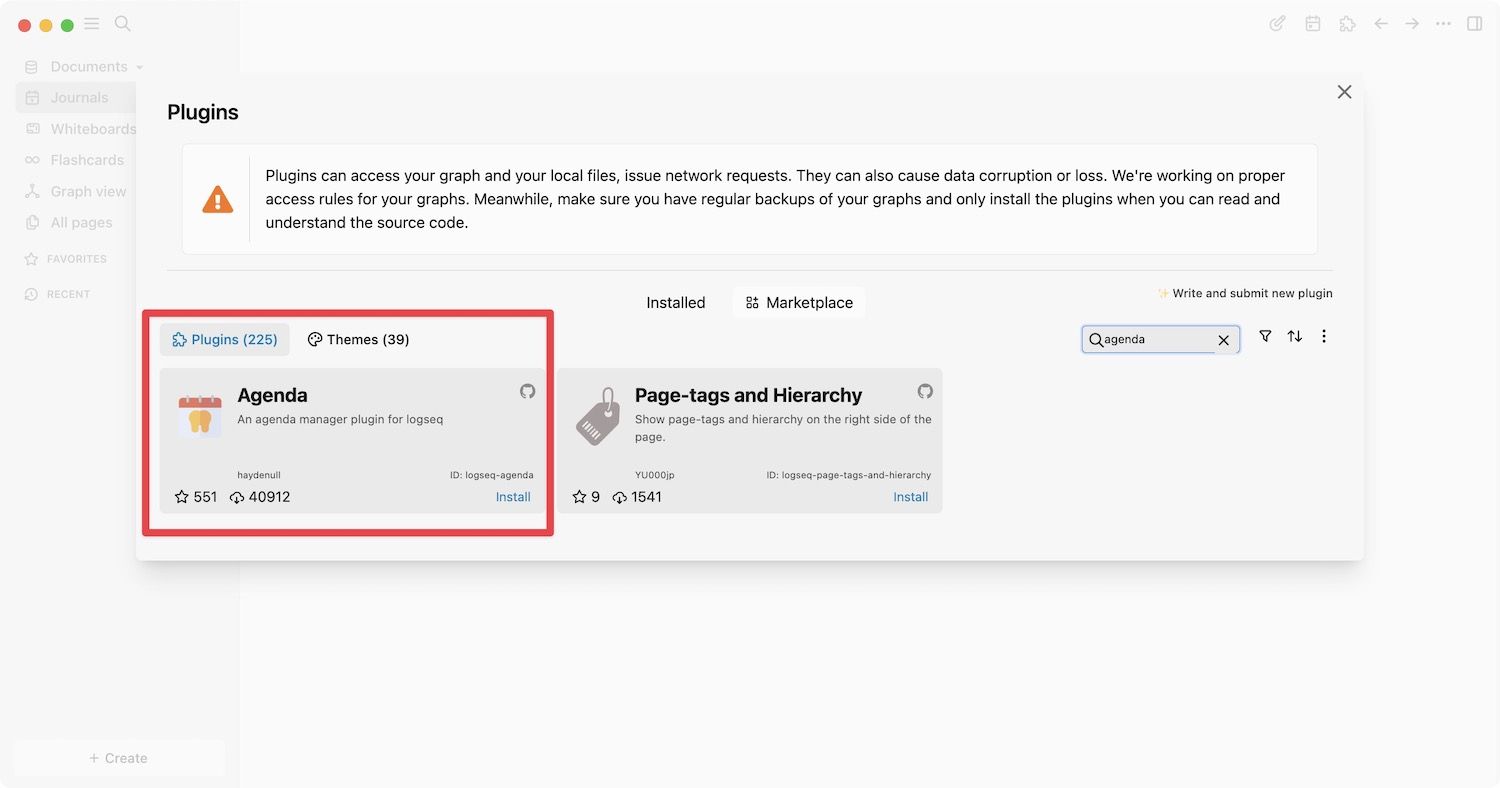
2. Click on Marketplace and search for Agenda.

3. Click the Install button to install the plugin to your Logseq database.
Accessing Agenda plugin in Logseq
Now that you have installed the Agenda plugin, let’s see how you can access it.
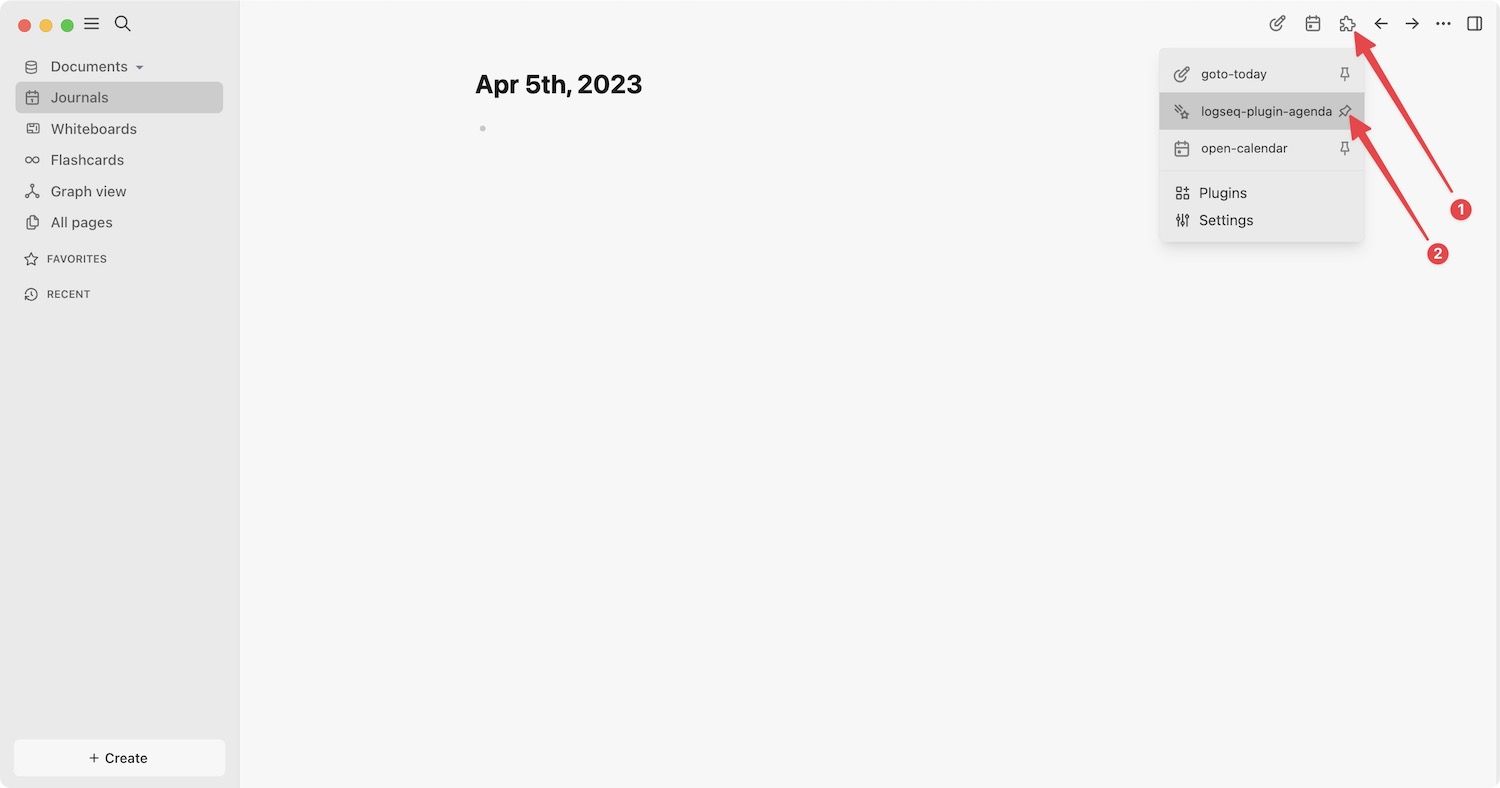
1. The easiest way to access the Agenda plugin is by using its plugin button, which looks like a shooting start. You can click on the icon to open it.

2. If you don’t see the Agenda button in the top toolbar, first click the plugin icon. Now, click the pin icon next to Agenda plugin to add it to the toolbar.
3. You can also access the Agenda plugin using Logseq’s command palette. Use the keyboard shortcut Command+Shift+P (⌘⇧P) on your Mac (or Control+Shift+P) on Windows to open the command palette. Search for Show Agenda and hit enter.
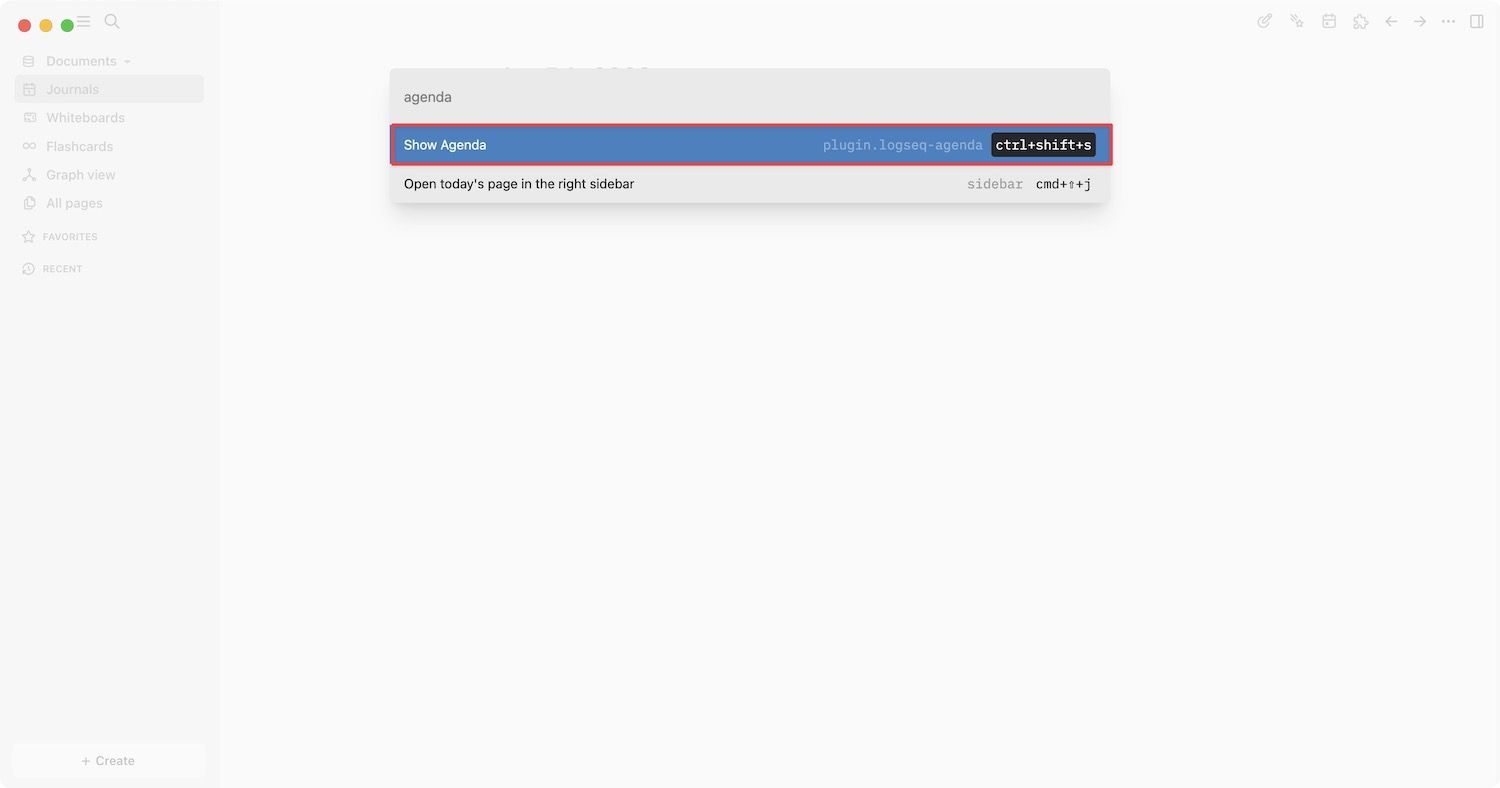
4. The quickest way to open Agenda plugin is by using its keyboard shortcut. Hit Control+Shift+S (⌃⇧S) to open it.
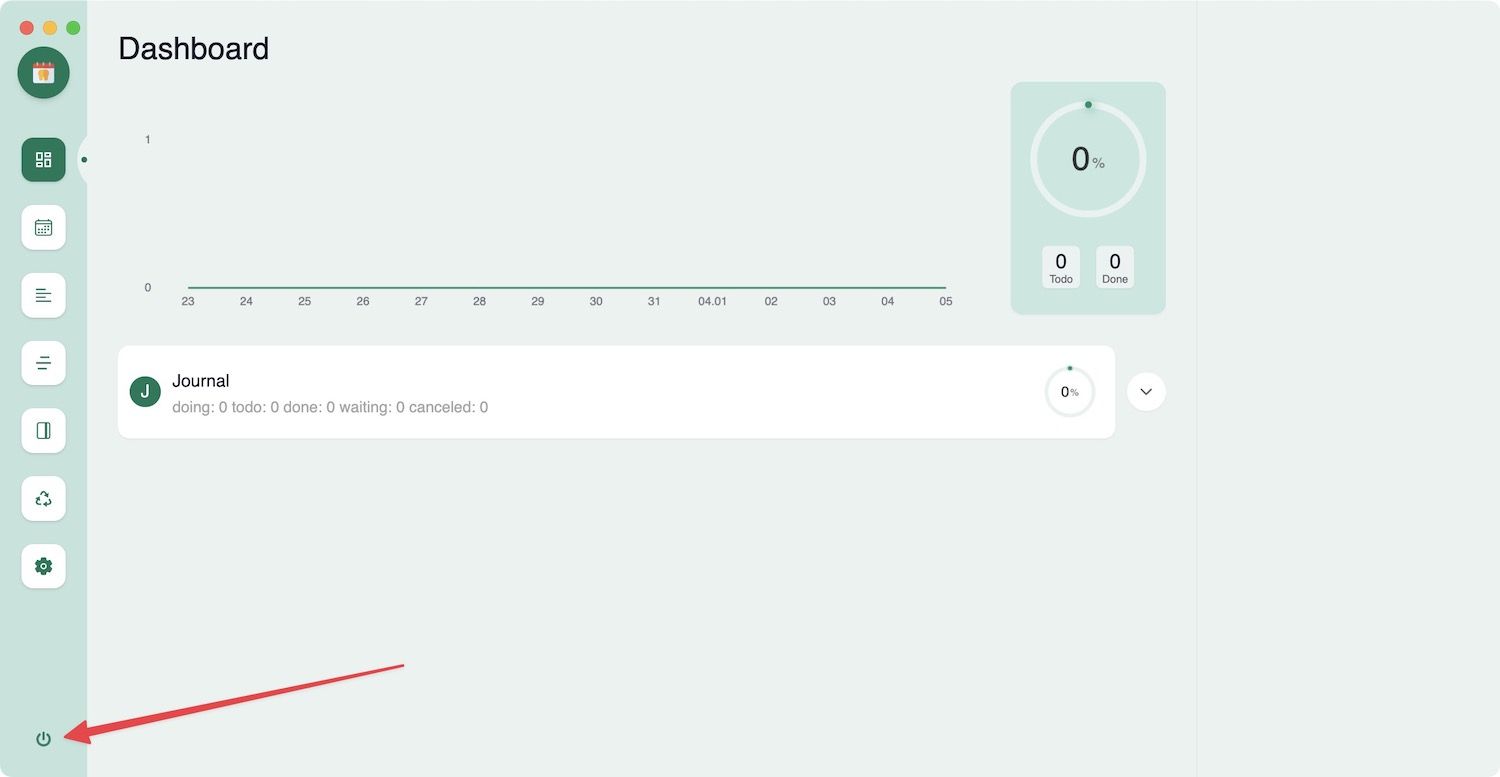
5. To get out of Agenda mode, either hit the Escape key or click the button in the bottom-left corner.
Understanding Agenda plugin user interface
When you open the Agenda plugin, you will be greeted with a beautiful dashboard. Depending on whether there are any tasks in your daily notes or not, the dashboard might already be showing you some data. Since we are using a demo vault for this guide, our dash is empty. On the left side of the interface, you will see a number of icons that you can use to navigate and access its different features. Let us go through them one by one:
Note: Below is only a brief introduction of all the user interface elements of Agenda. You will learn more about these specific features in the coming sections.
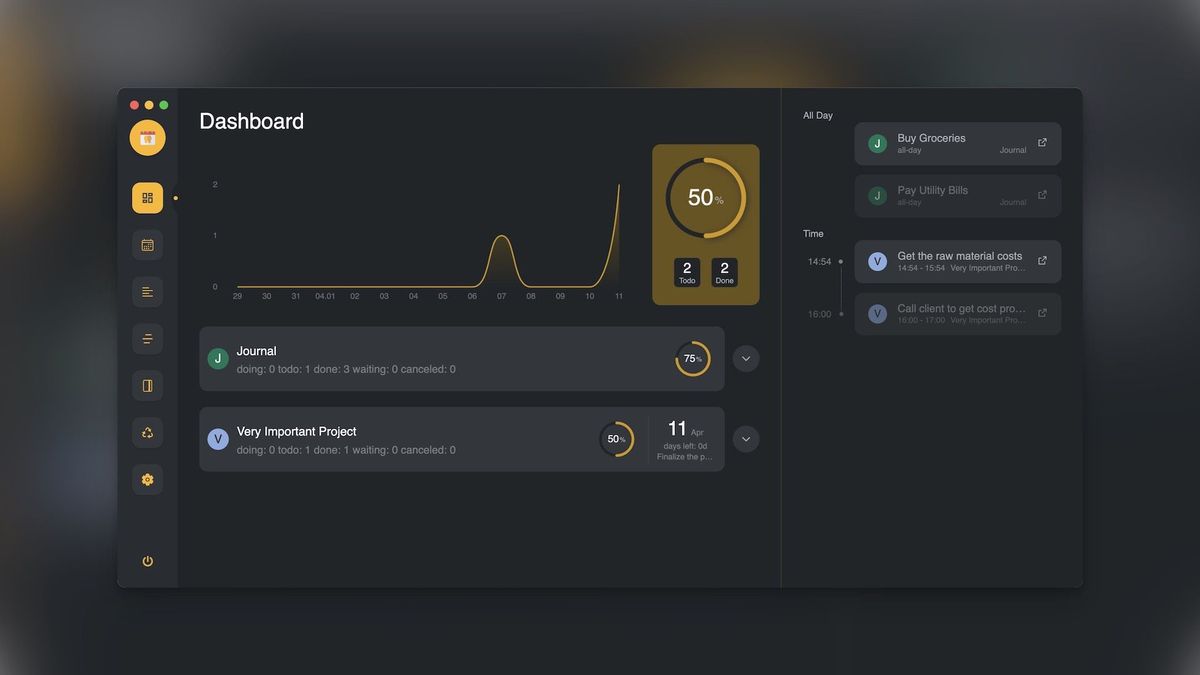
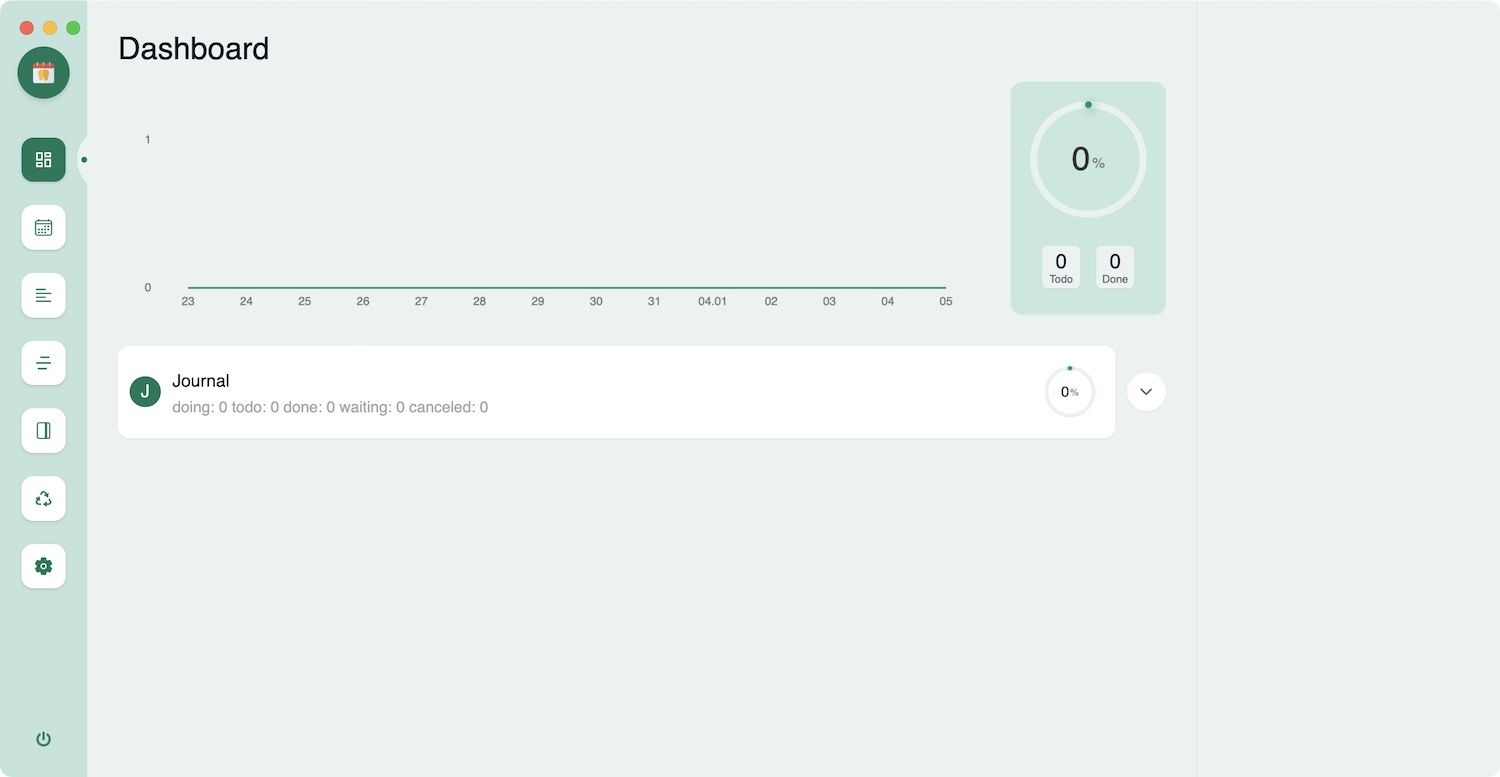
Dashboard
As mentioned above, the dashboard is the homepage of the Agenda plugin. It shows you all the pending tasks in your daily and project notes that are due today. It also has a running counter of all the completed tasks, allowing you to easily keep track of what’s done and what’s pending. It’s a good place to check your pending tasks and track your progress.
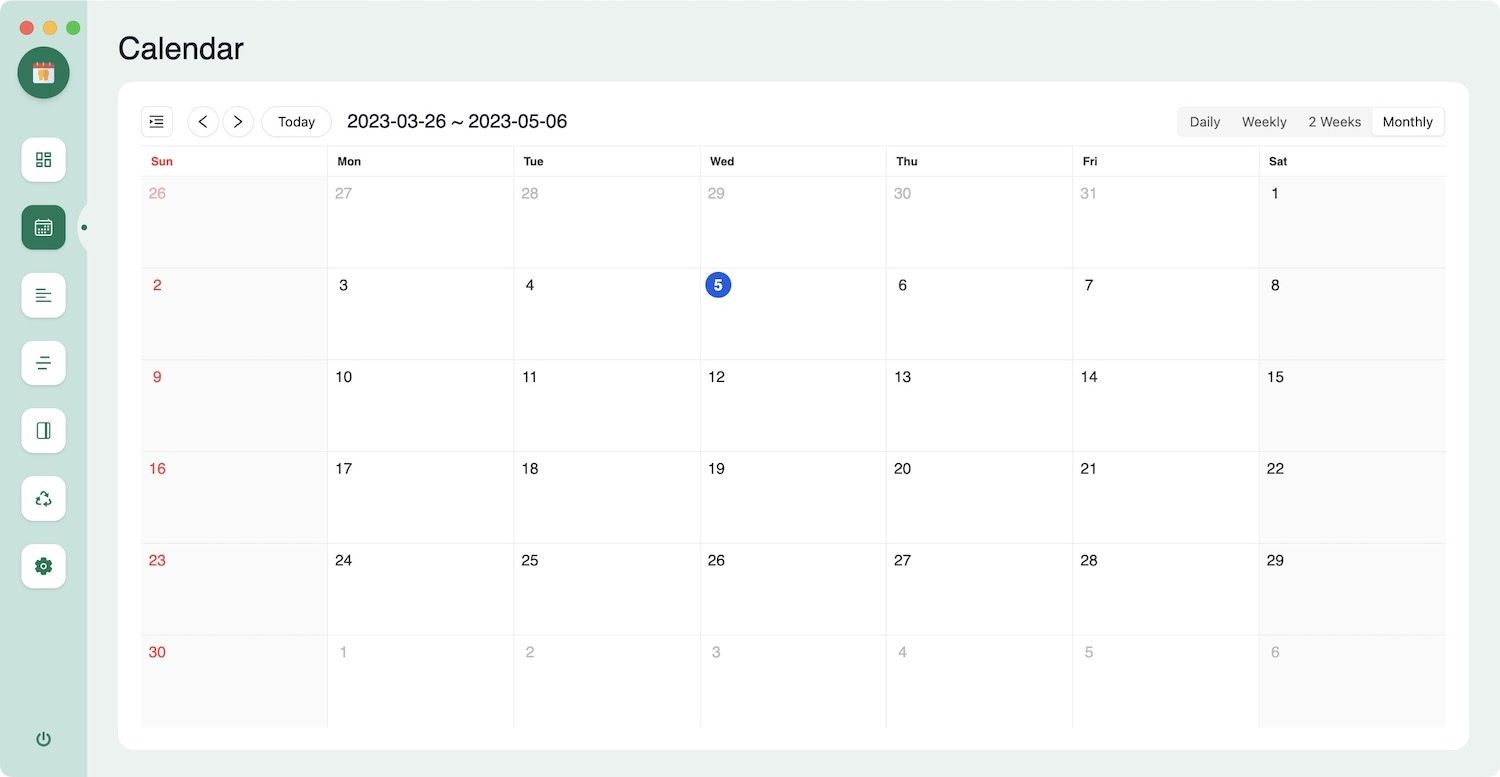
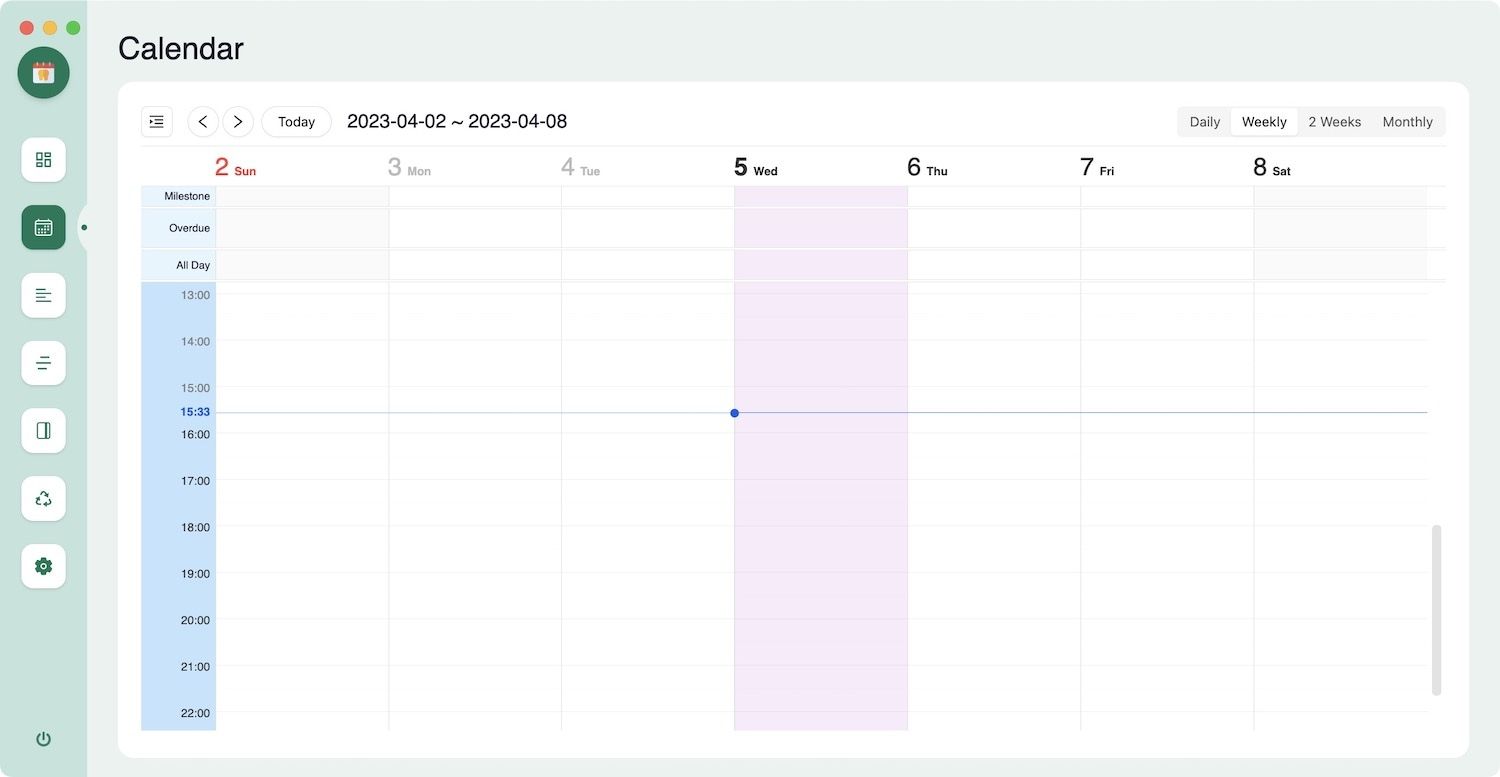
Calendar
The second icon in the sidebar opens the calendar view that shows all your tasks plotted on a calendar. You can change your calendar view between daily, weekly, 2-week, and monthly.
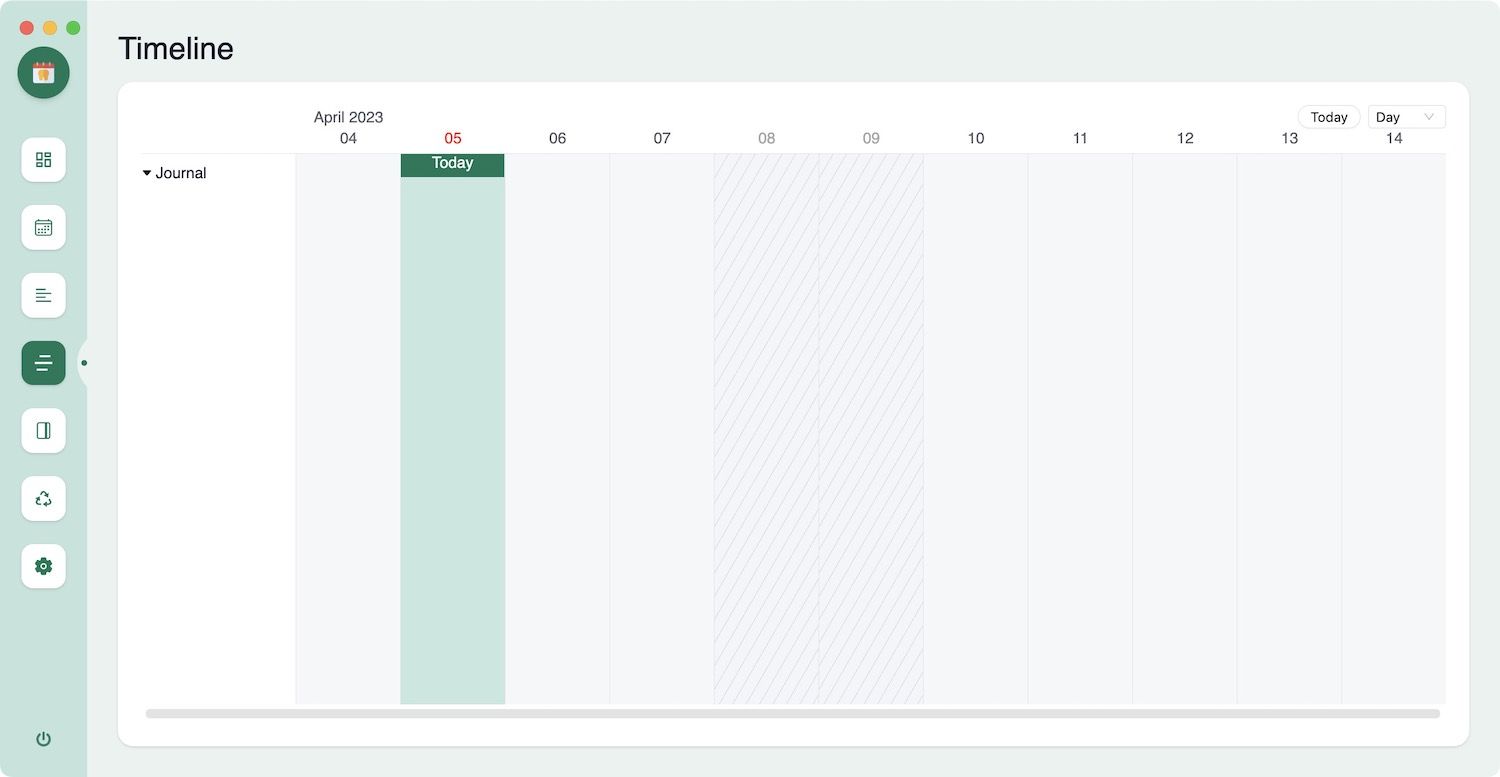
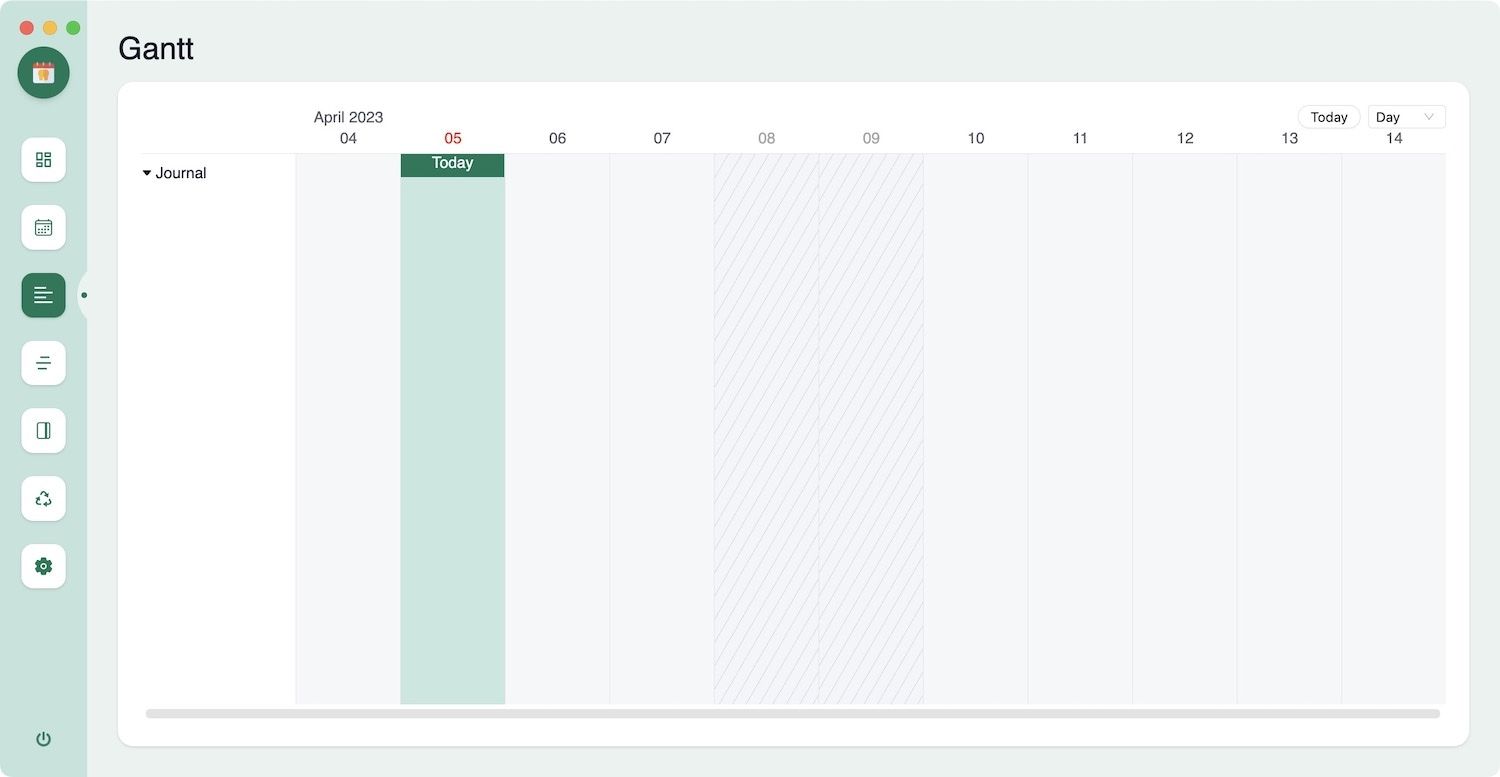
Gantt and Timeline
The Gantt and Timeline views are a good way to see all your tasks in a timeline. You can see your tasks against the time required to complete them. We don’t use this for our work, but if you love the Gantt chart, you have the option to use it here.
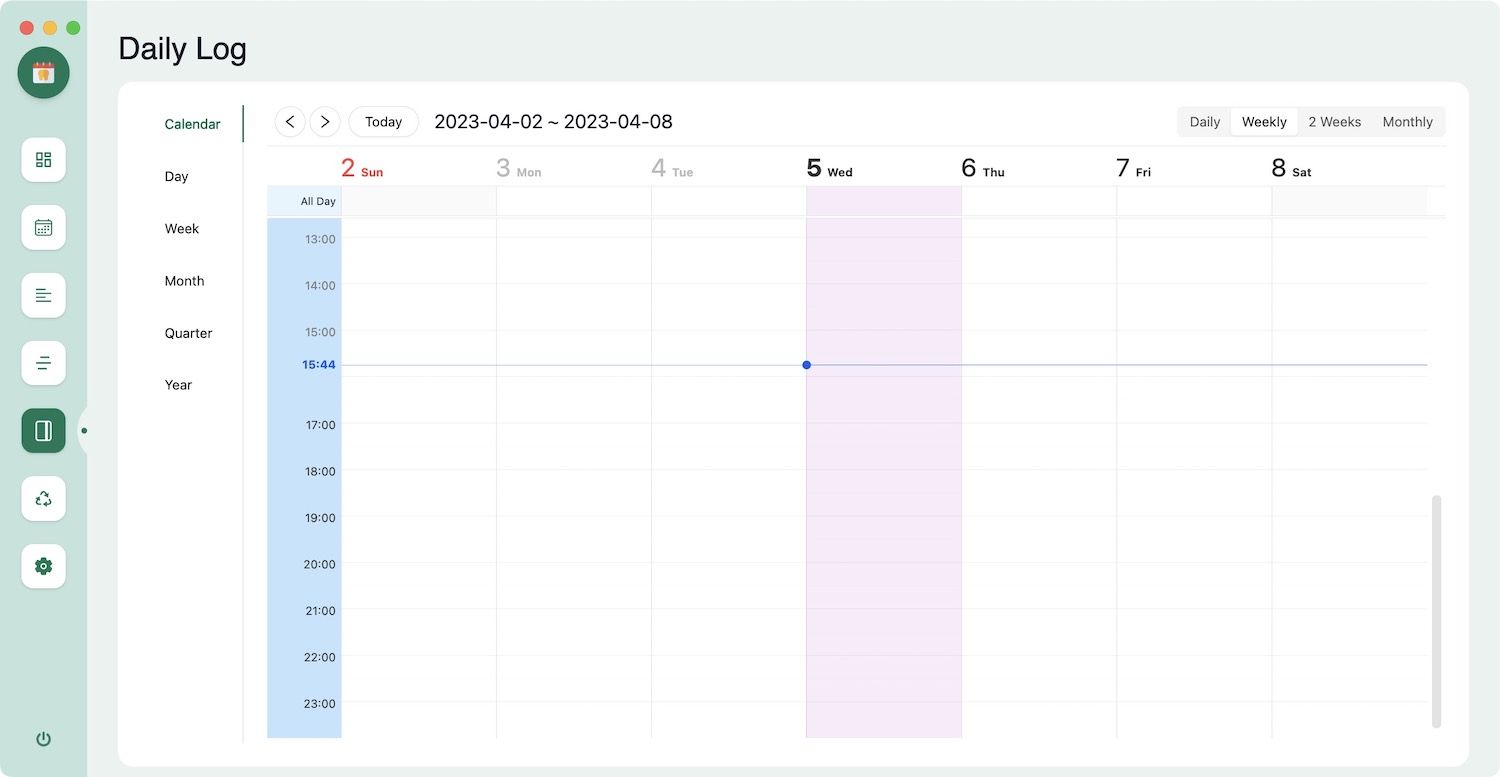
Daily Log
The Daily Log helps you keep track of tasks you have added to your daily log journal. Whenever you create a task or event using Agenda’s calendar view, it adds it under a Daily Log subheading on your journal page. The Daily Log view will help you keep track of these tasks.
Review
The Review tab is one of our favorite features of Agenda. It keeps track of all your completed tasks and is a great way to visualize the time you spend on tasks.
Settings
The Settings tab lets you customize Agenda plugin settings. In the next section, we will use this Settings section to do some basic customization of the plugin.
Customizing the Agenda plugin
The Agenda plugin is highly customizable. You can customize the color of the events, calendar view, theme, and more. In this section, we will customize some basic things to get you started. You can play with more customization settings to customize the plugin.
Customizing the basics of Agenda plugin
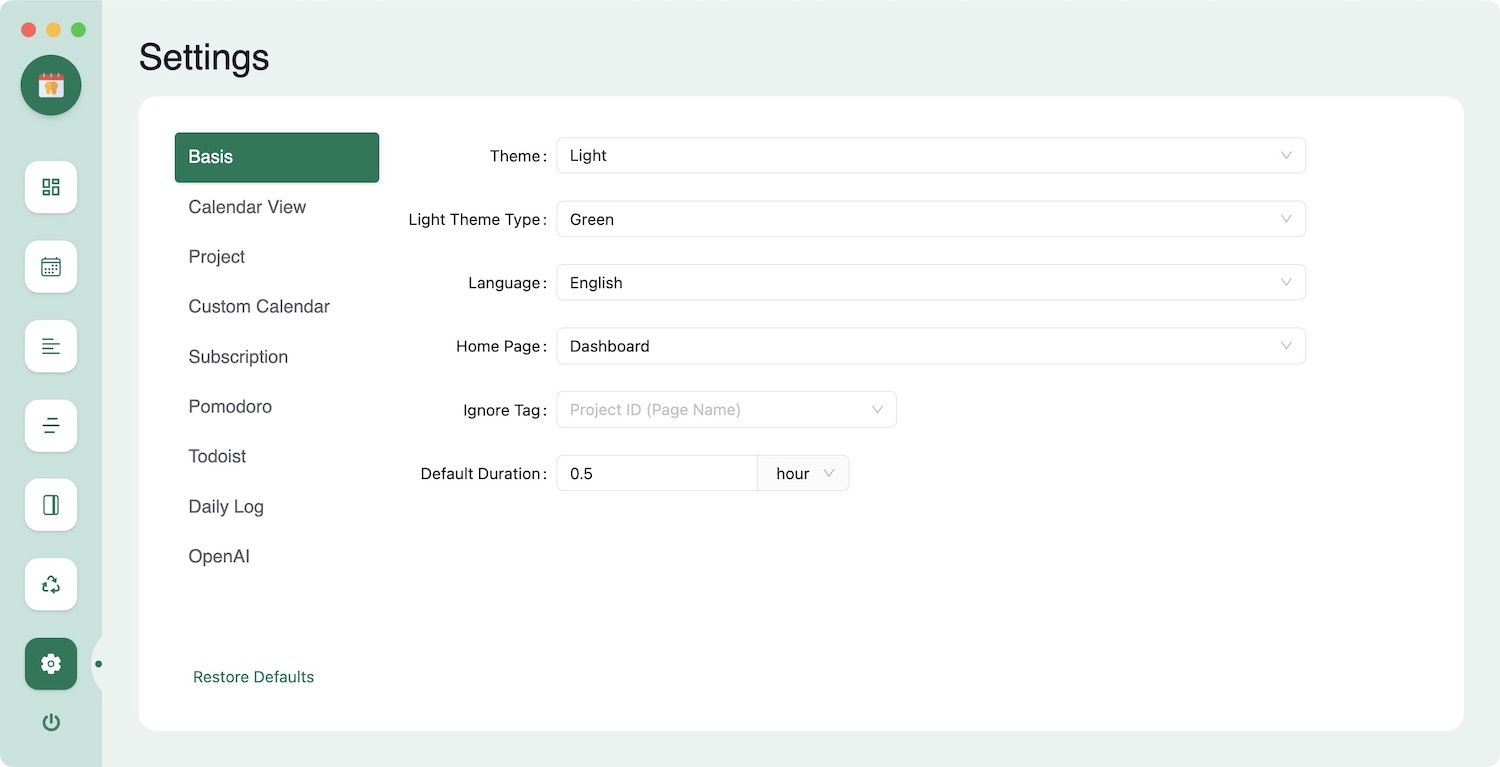
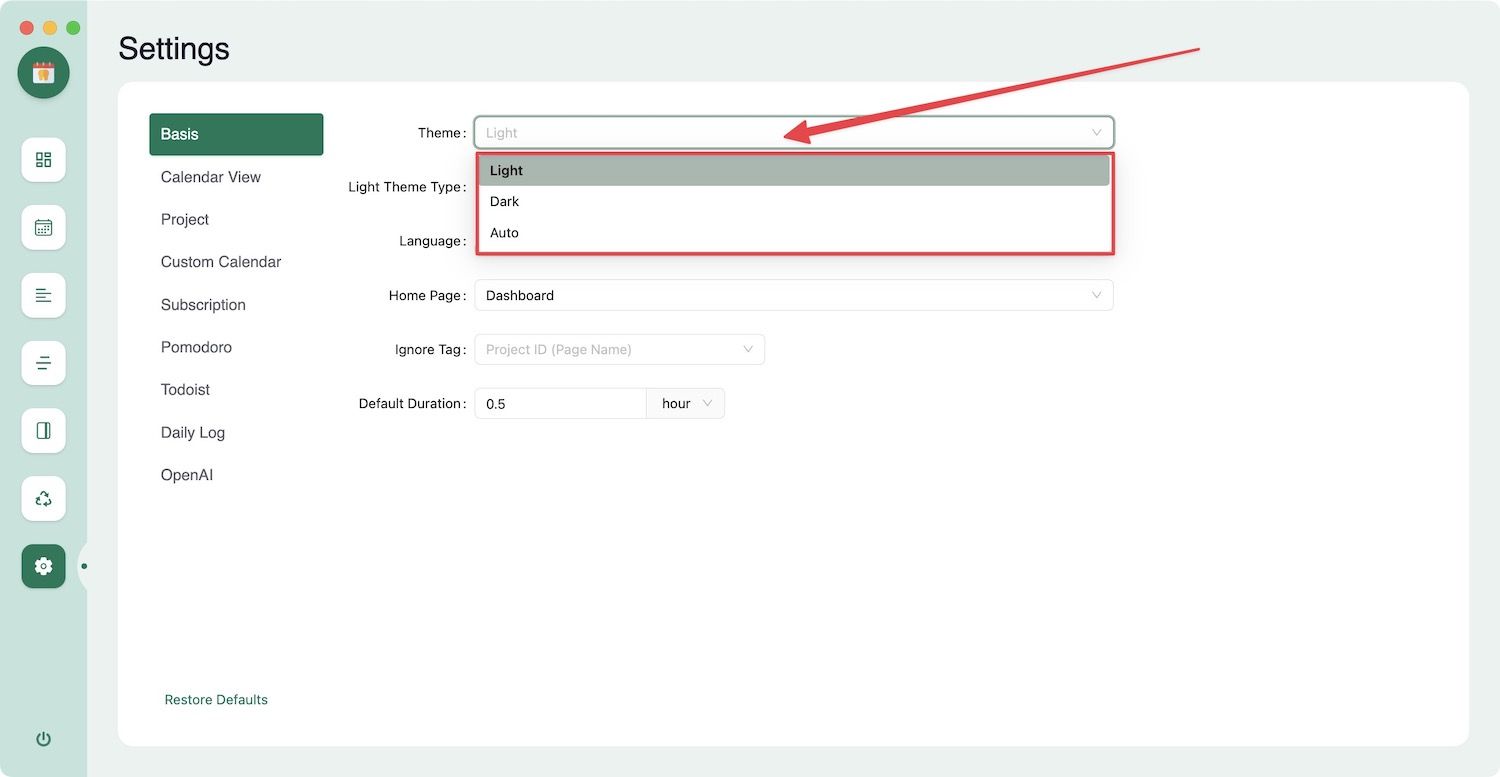
Let us start by customizing the theme. You can choose to use the plugin in auto, light, or dark mode. The auto mode will change the theme from light to dark as per the Logseq theme. You can force it to dark or light mode, using the dropdown menu next to Theme.
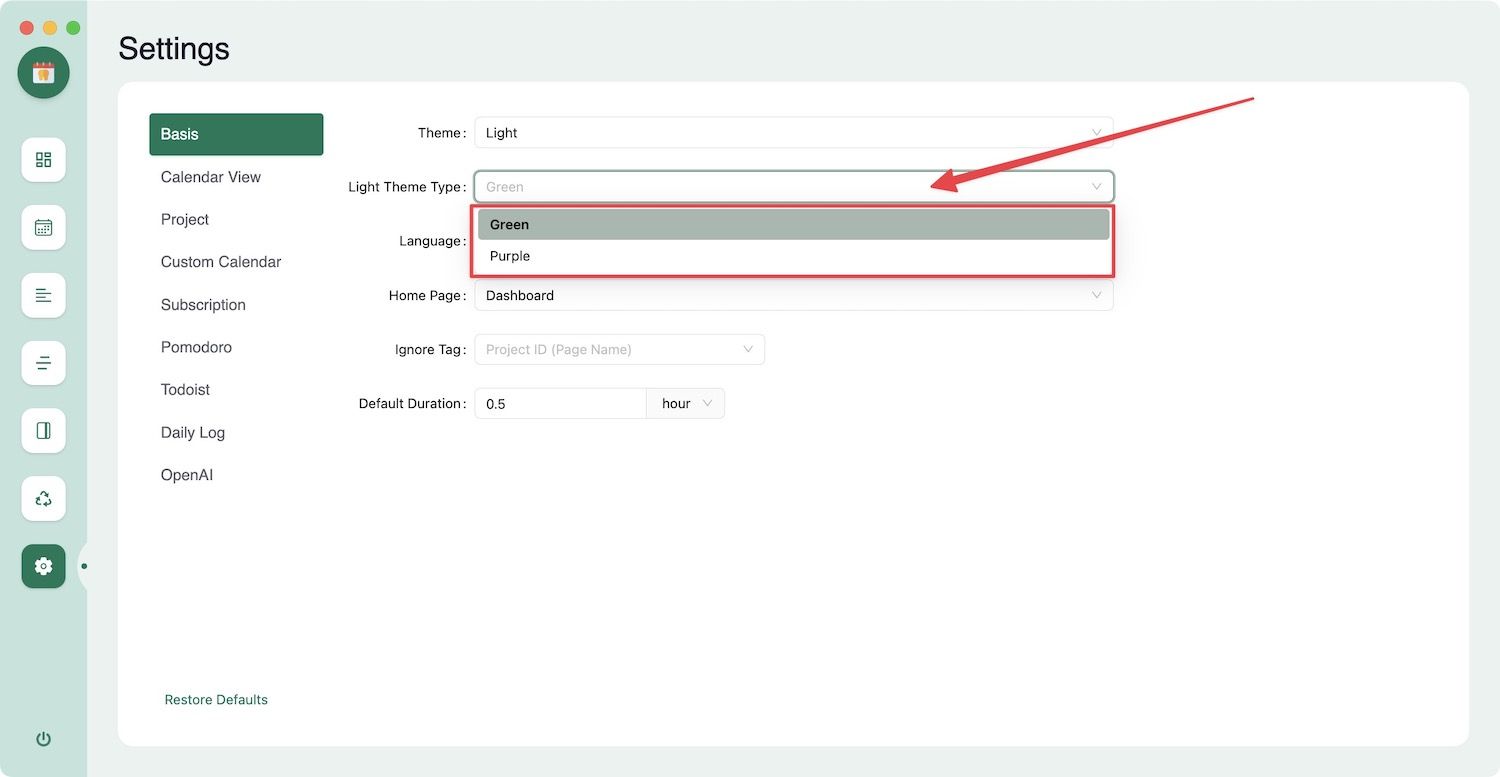
The Light theme has two options; Green and Purple. You can choose the one you like using the dropdown menu next to the Light Theme Type option.
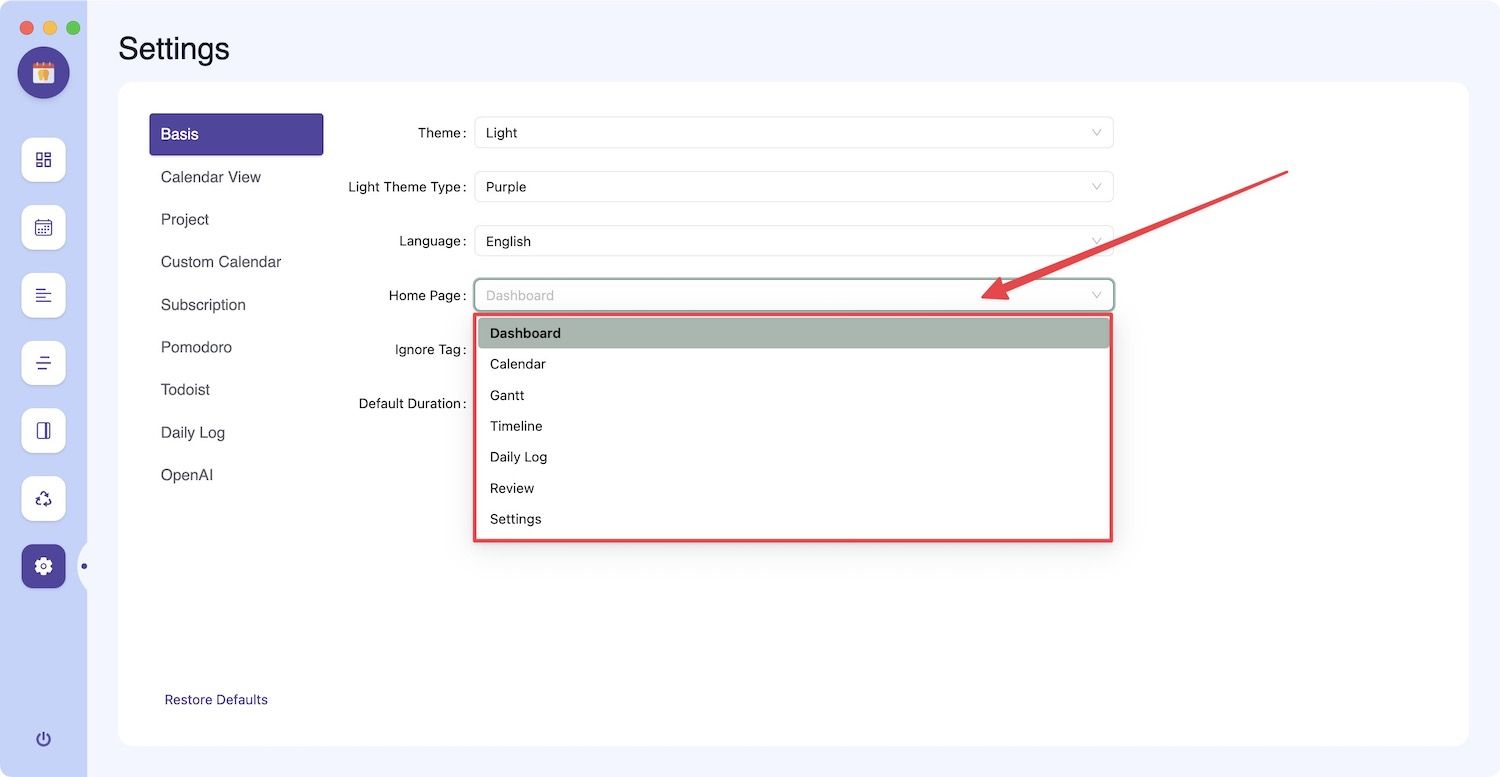
Next, let us set up our preferred homepage. By default, the homepage is set to the dashboard. However, if you prefer to open calendar or Gantt view when you launch the Agenda plugin, you can do so using the dropdown next to the Home Page option.
Finally, change the Default Duration to change the default calendar event duration. It is set to 30 minutes by default, but you can change it to whatever you want.
Customize the default calendar view
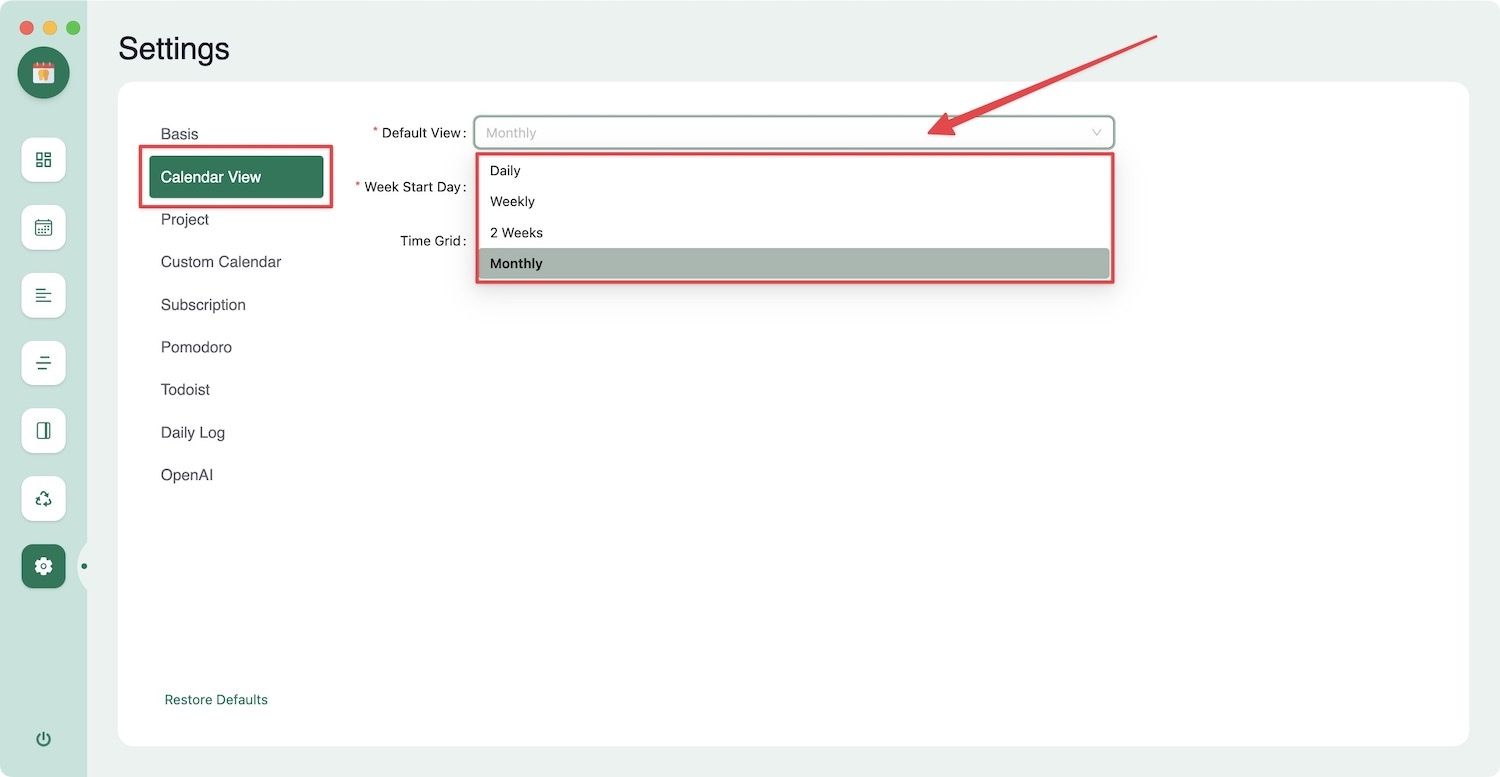
The Month view is the default calendar view in Agenda. We prefer the week view as it lets you view your upcoming tasks without bombarding you with a ton of information. To change the default calendar view, choose the Calendar View option and click the dropdown menu next to Default View. While you are here, you can also choose to start your week on Sunday or Monday.

Change pomodoro time
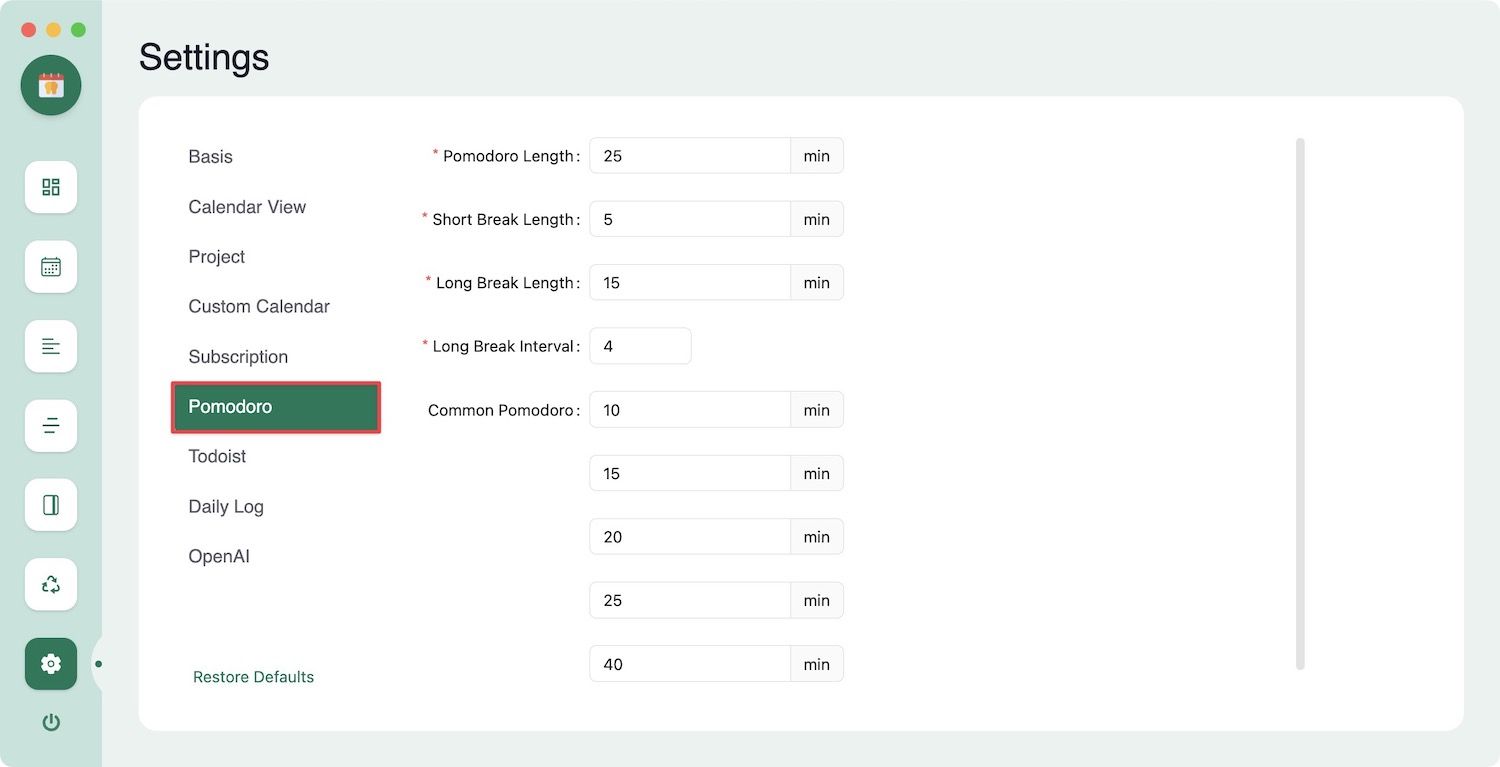
The final customization you need to do is to adjust the Pomodoro time. If you are happy with the 25 minutes of work and 5-minute break concept, leave it as it is. However, if you want to change it, select the Pomodoro option and set the time as you want.
Use Agenda to create and manage tasks in Logseq
Agenda lets you create and manage tasks, projects, and calendar events. In this section, we will cover how you can create and manage tasks in Logseq using the Agenda plugin. But before we begin, let us first understand the nature of tasks in Agenda.
- Agenda records all the tasks you create on your daily notes page and add them to its calendar view.
- If you don’t assign a start and end time to a task, it will appear as a full-day event.
- You can schedule tasks in Agenda using the Logseq scheduled task feature.
- You can create tasks from the calendar view in Agenda.
- By default, the tasks you add on pages other than daily note is not recorded unless you tell Agenda to log these tasks. We will learn more about this in the projects section of this guide.
Let us tackle all of these points one by one.
Note: If you are on a Windows machine, replace Command with the Control key.
Create a task in your daily note to capture it in Agenda
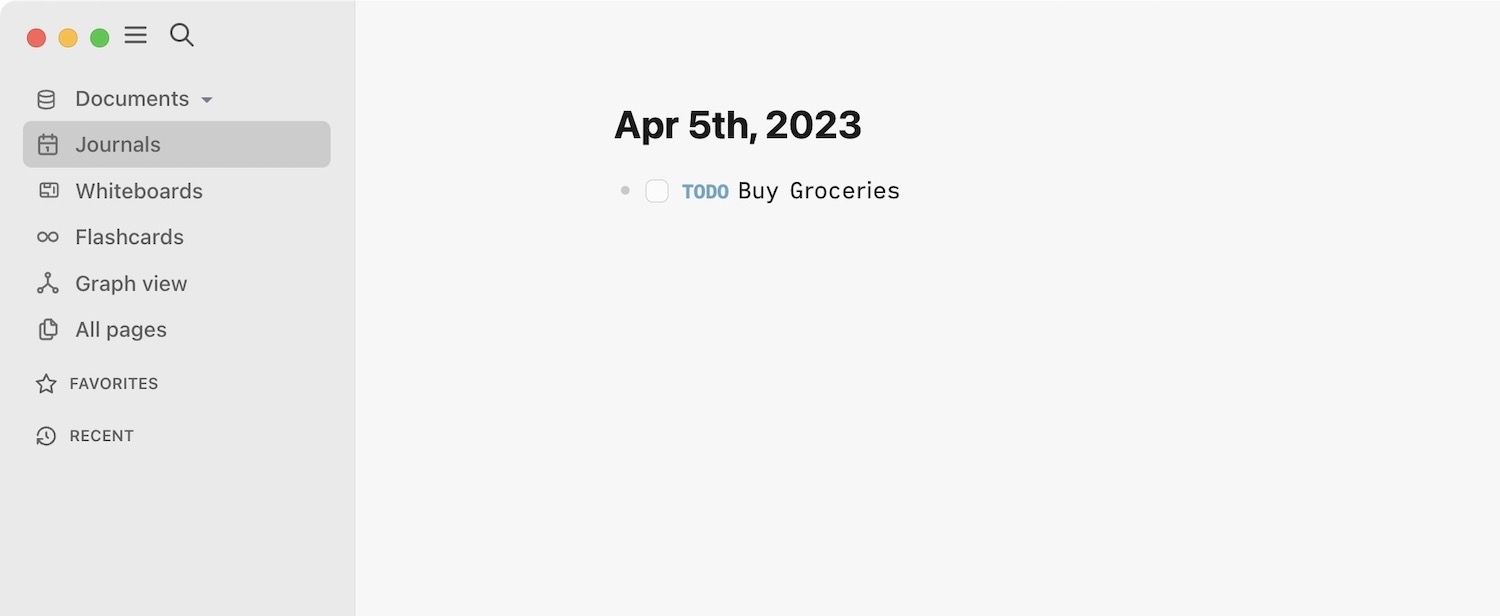
The easiest way to capture tasks in Agenda is by adding them to your daily notes or Journal page. To add a task to your Journal, either use the ‘/‘ command or hit Command+Enter (⌘+Enter). In the screenshot, you can see we have added a simple task to our daily notes page.
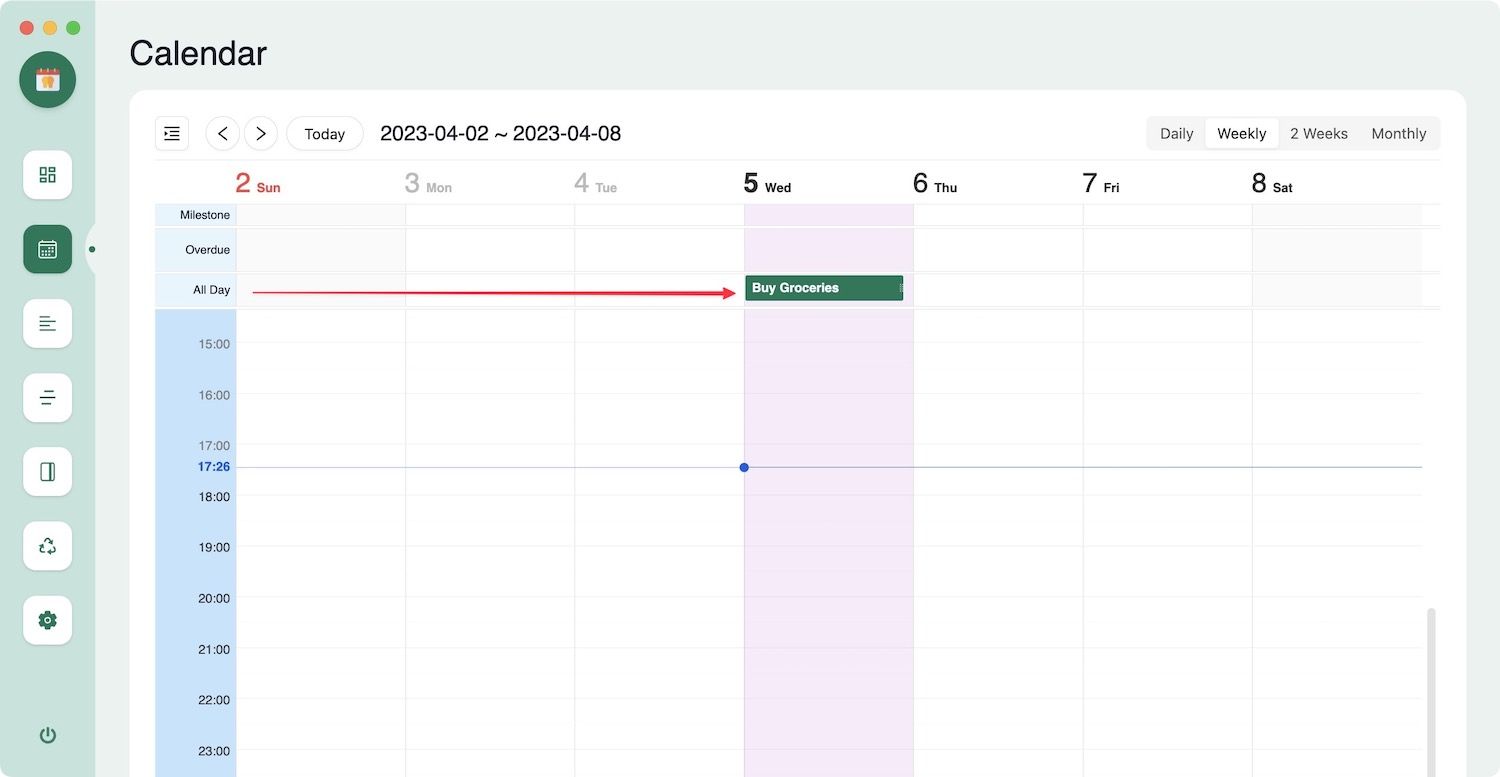
When you open the Agenda plugin you will see the task appear in the Dashboard and the calendar view. Notice that Agenda has added a Journal category or project. It’s the default project where all your daily tasks live.
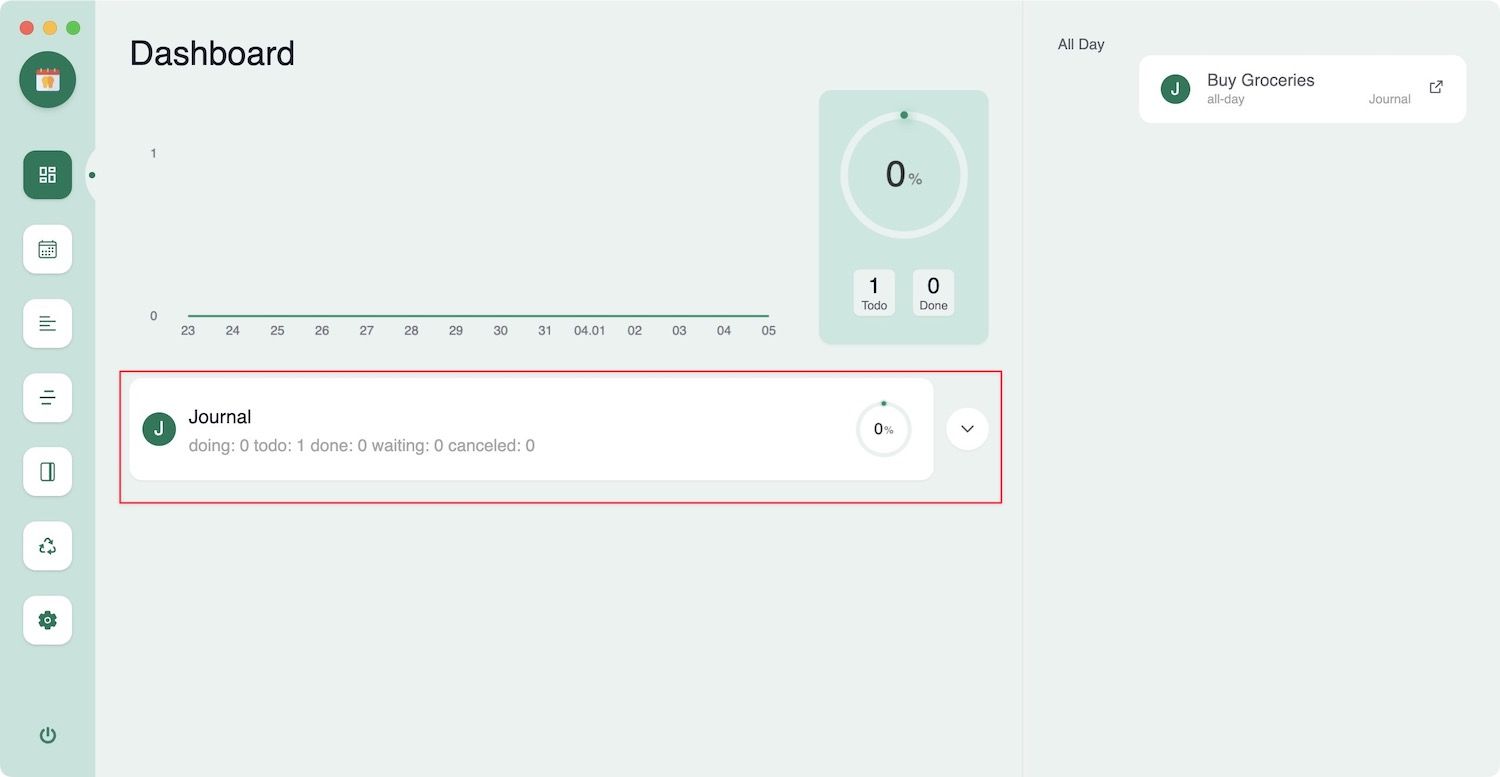
Since we have not assigned it a specific time, you will notice that Agenda has added it as an all-day event.
Add time to tasks in Agenda
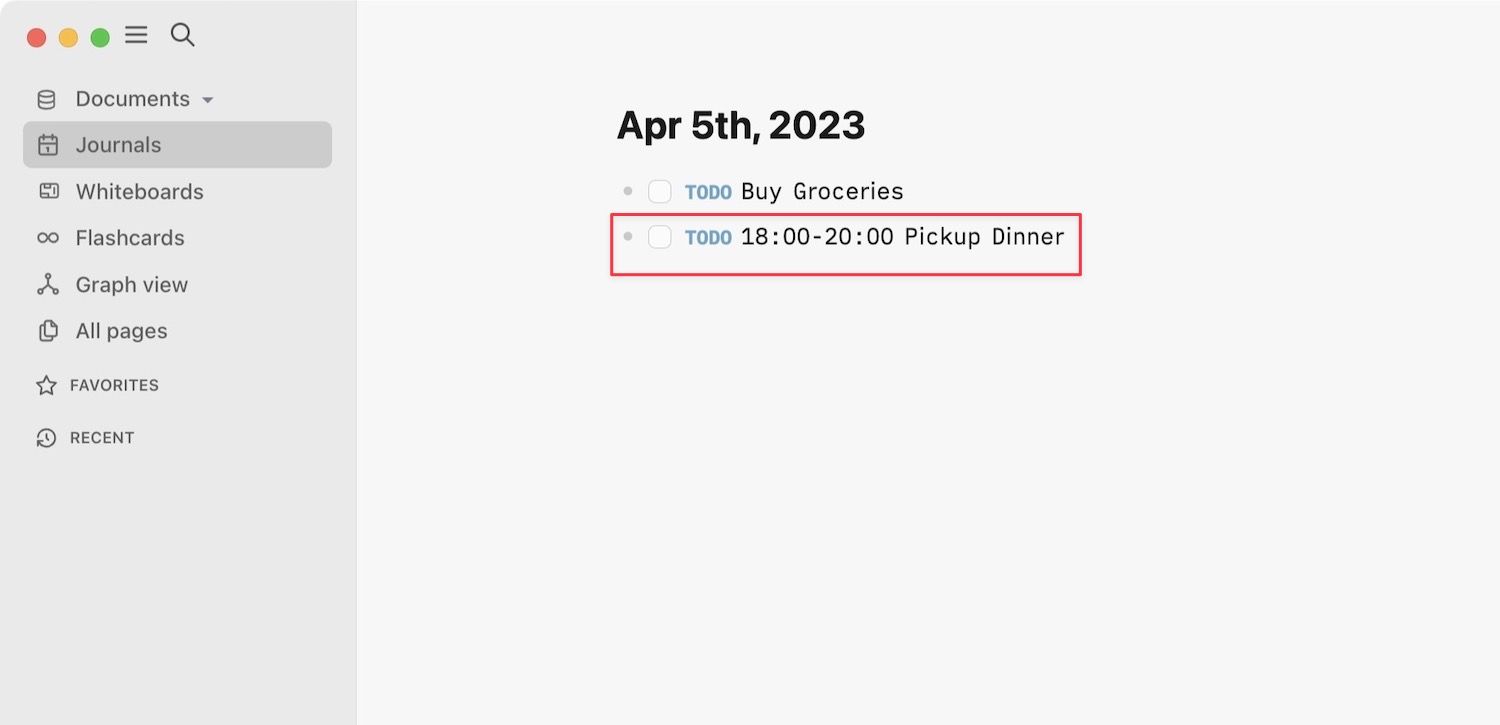
If you prefer to time block your tasks, you can do so in Agenda. To time block, add the time in front of a task in the “HH:MM-HH:MM” format. Agenda uses a 24-hour clock, so you don’t need to assign AM and PM. Let us create a task that we need to complete this evening.
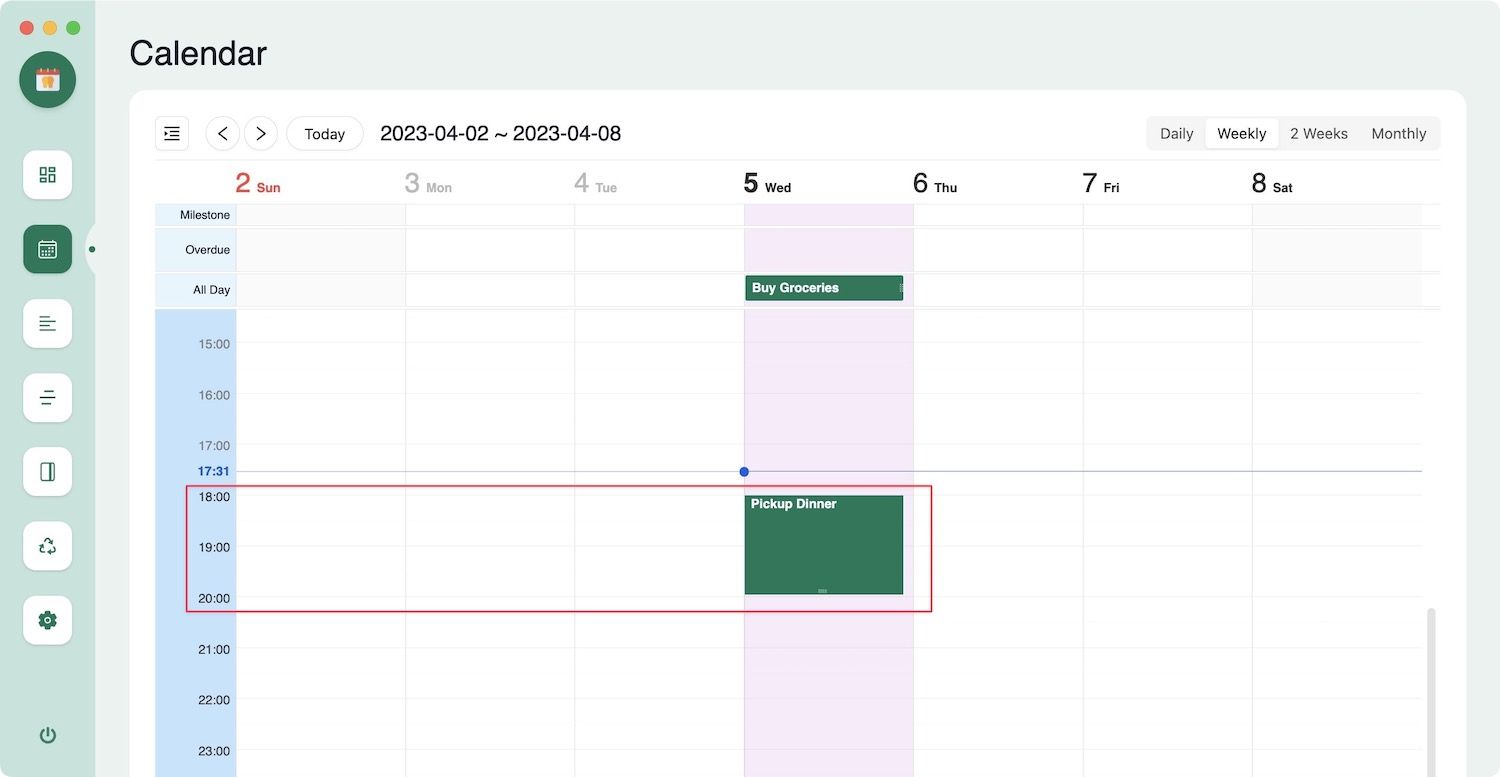
You will notice that the task appears in the correct time slot we assigned.
Schedule a Task in Agenda
If you want to add tasks for future dates, you can schedule them using either the Logseq scheduling or the Agenda schedule features.
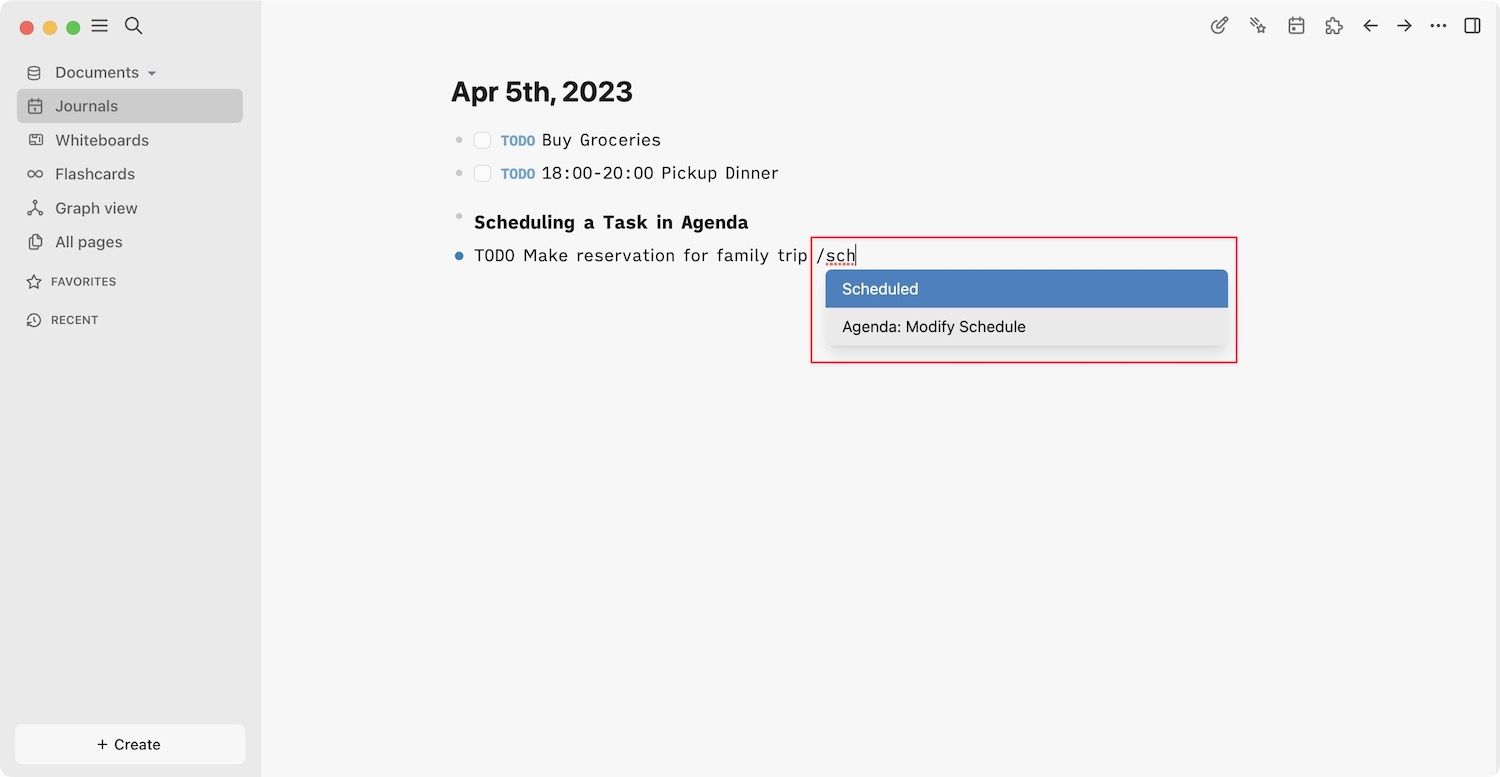
1. create the task and use the slash ‘/‘ command to access the native scheduling feature.
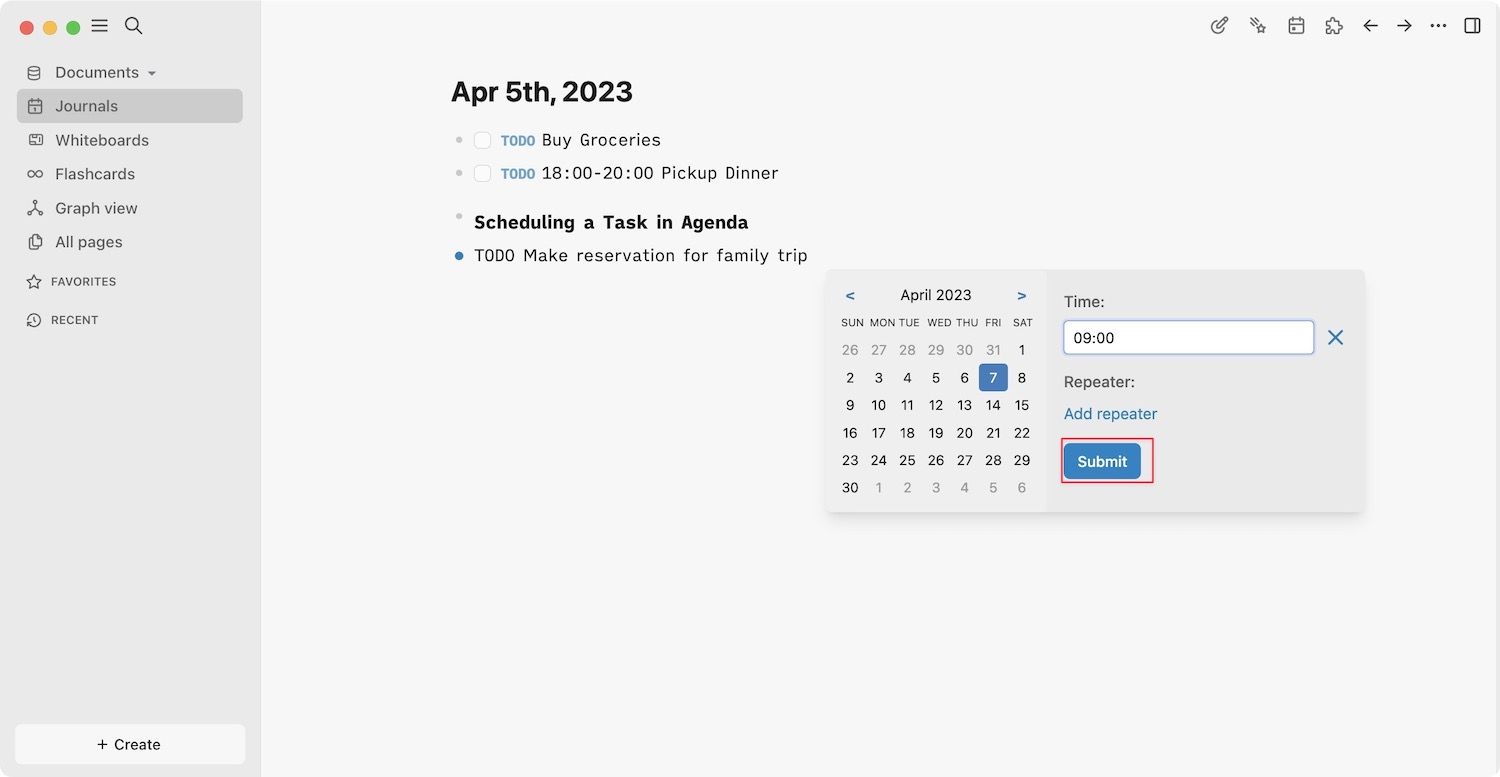
2. Assign the date and time and click the Submit button to schedule this task. Notice that Logseq’s native scheduling feature doesn’t have an end time. It means the task will get the default task duration.
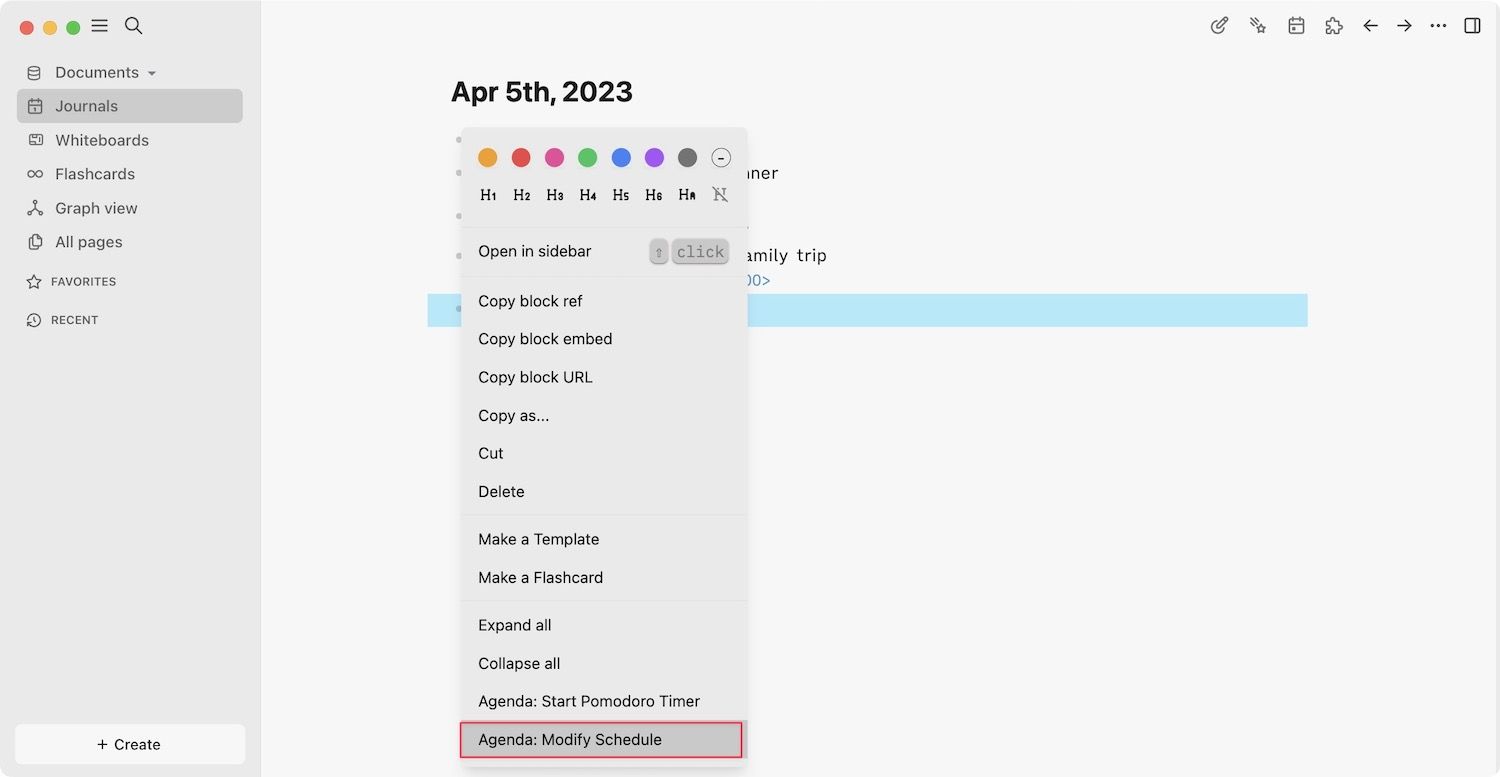
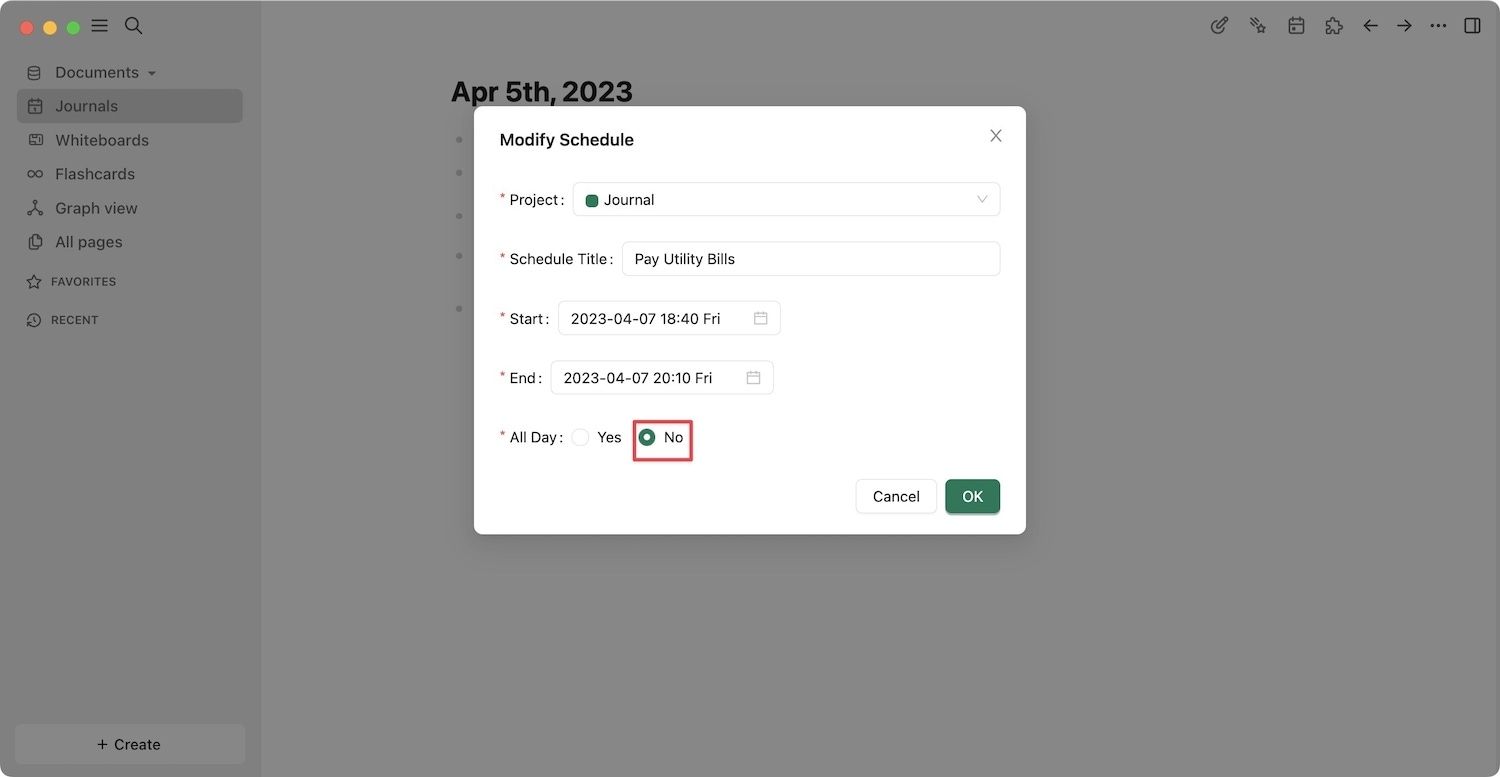
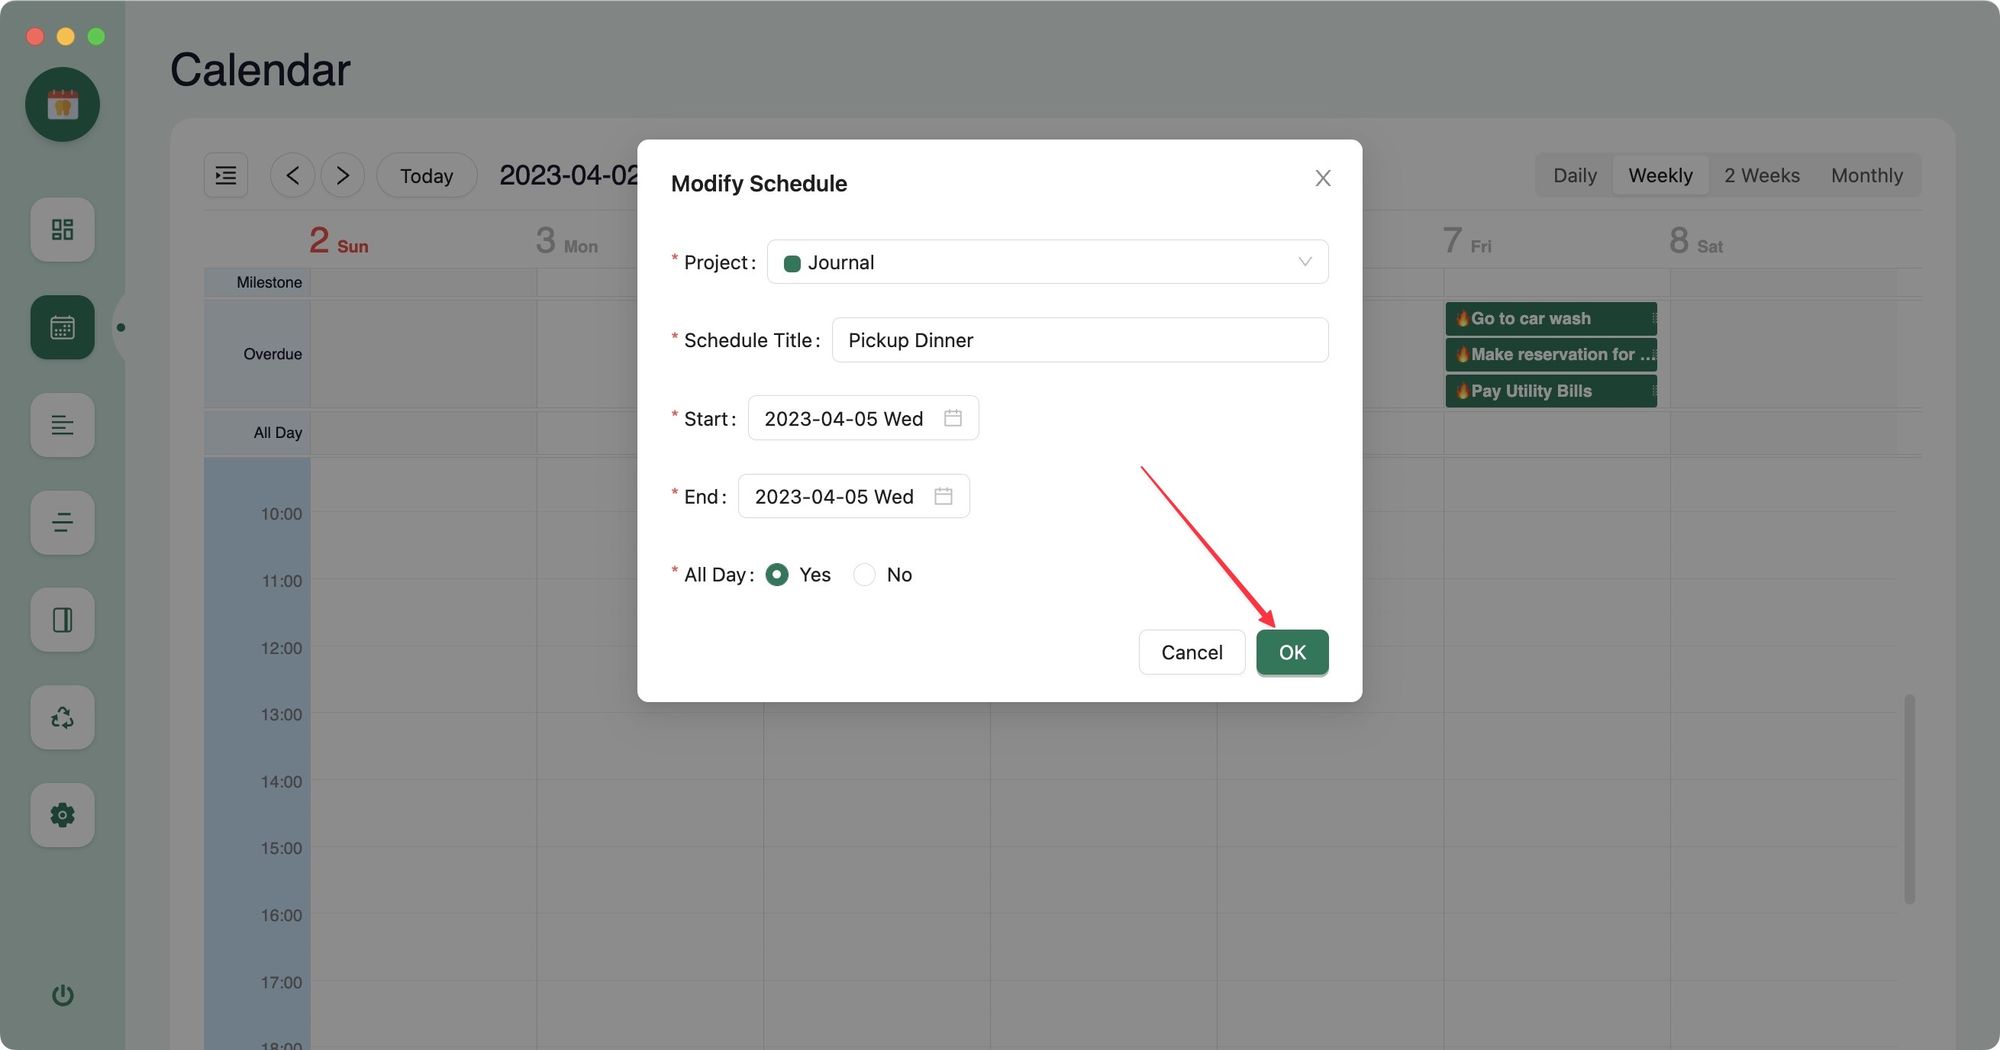
3. You can also use Agenda’s task scheduler to schedule a task. You can access it using the / command or right-clicking on the task bullet.
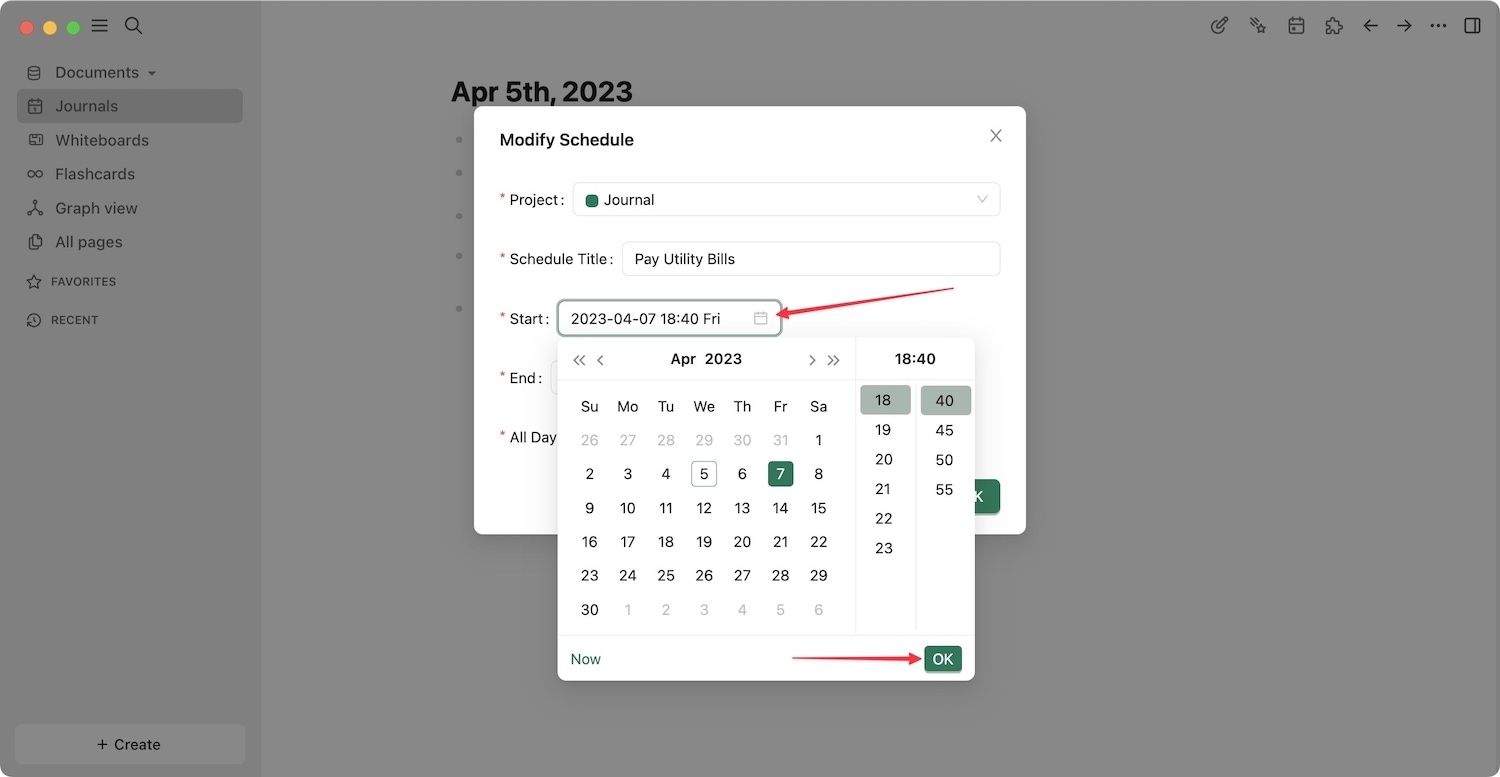
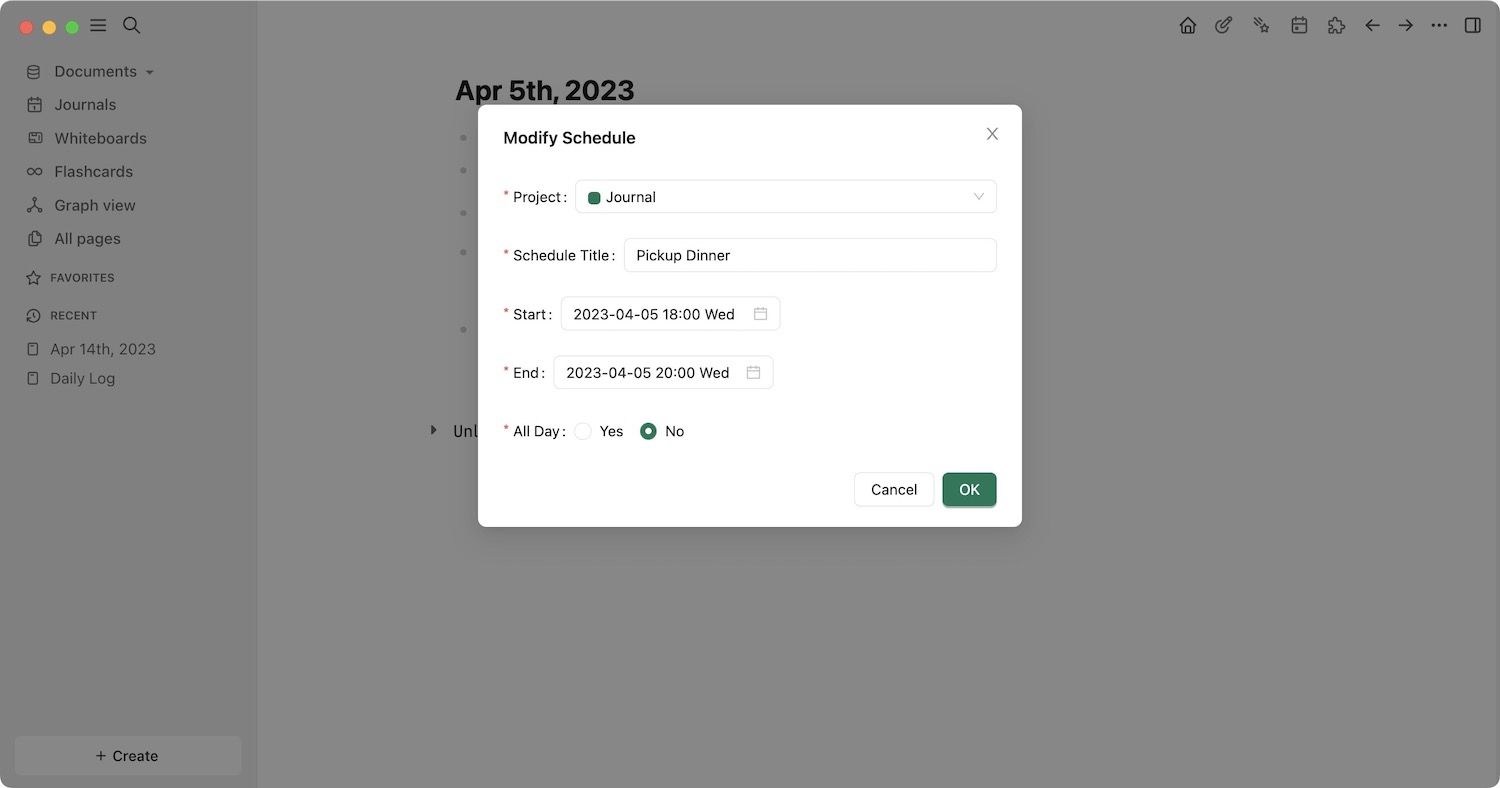
4. To add start and end times for the task, select No against the All Day option. Now click and fill in the time sections. Click on Ok to schedule the task.
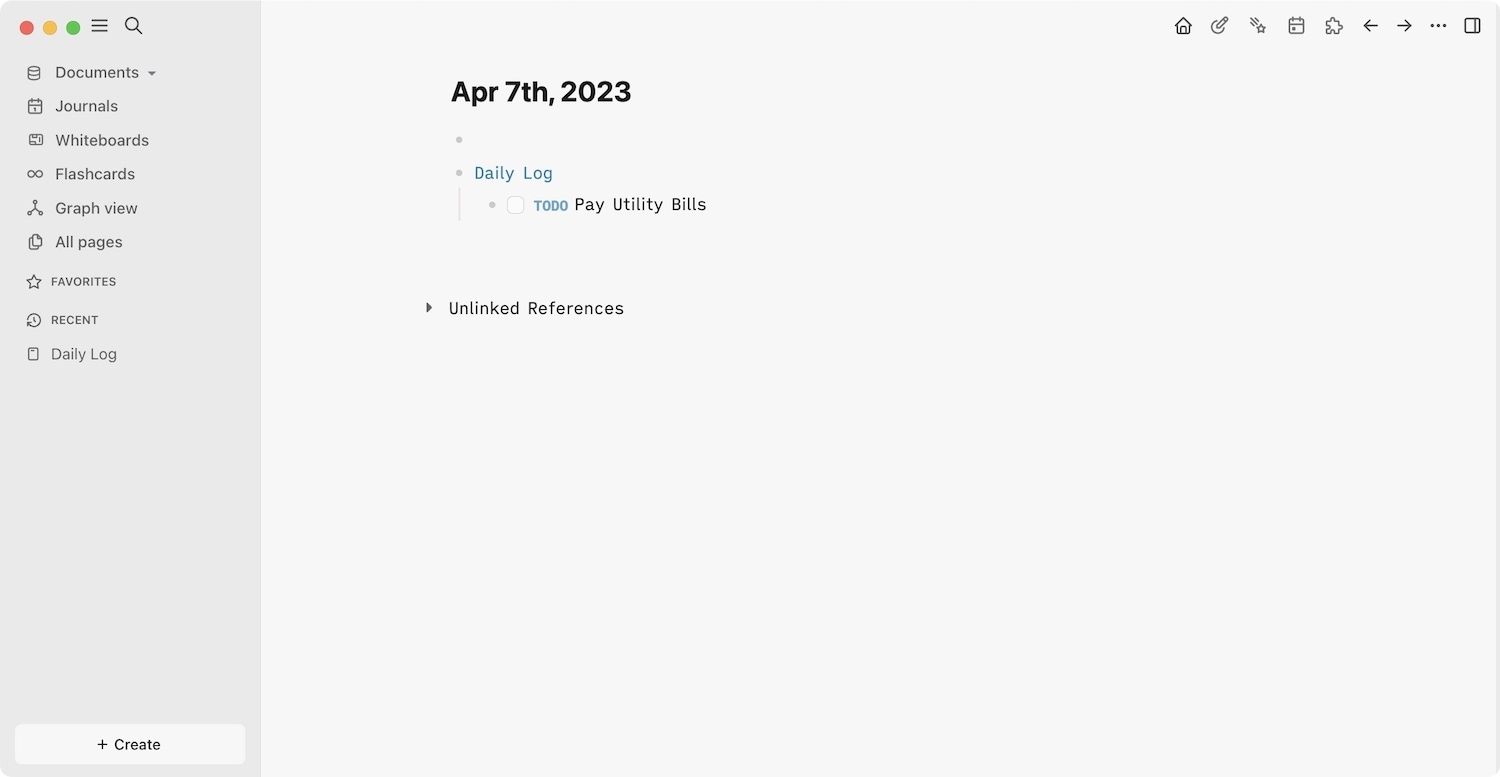
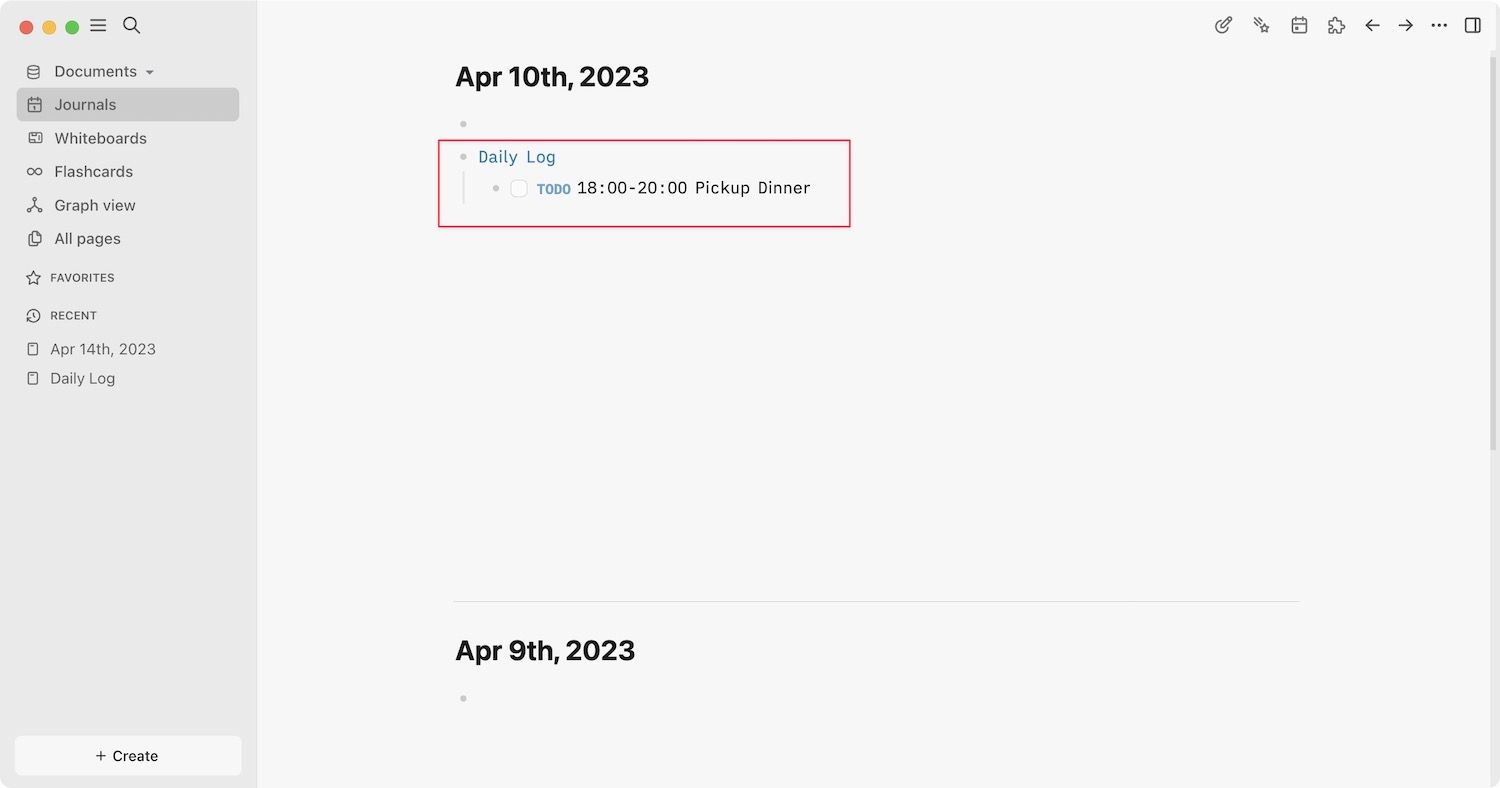
5. Notice that Agenda has created a new Daily Log section and added the task below it. It’s because all the tasks you add using Agenda live under the Daily Log section.
Create a task or event using the Agenda Calendar View
One of our favorite methods to create tasks in Agenda is via its calendar view. As you create a meeting or task in Google Calendar by clicking and dragging with your mouse, you can do the same in Agenda.
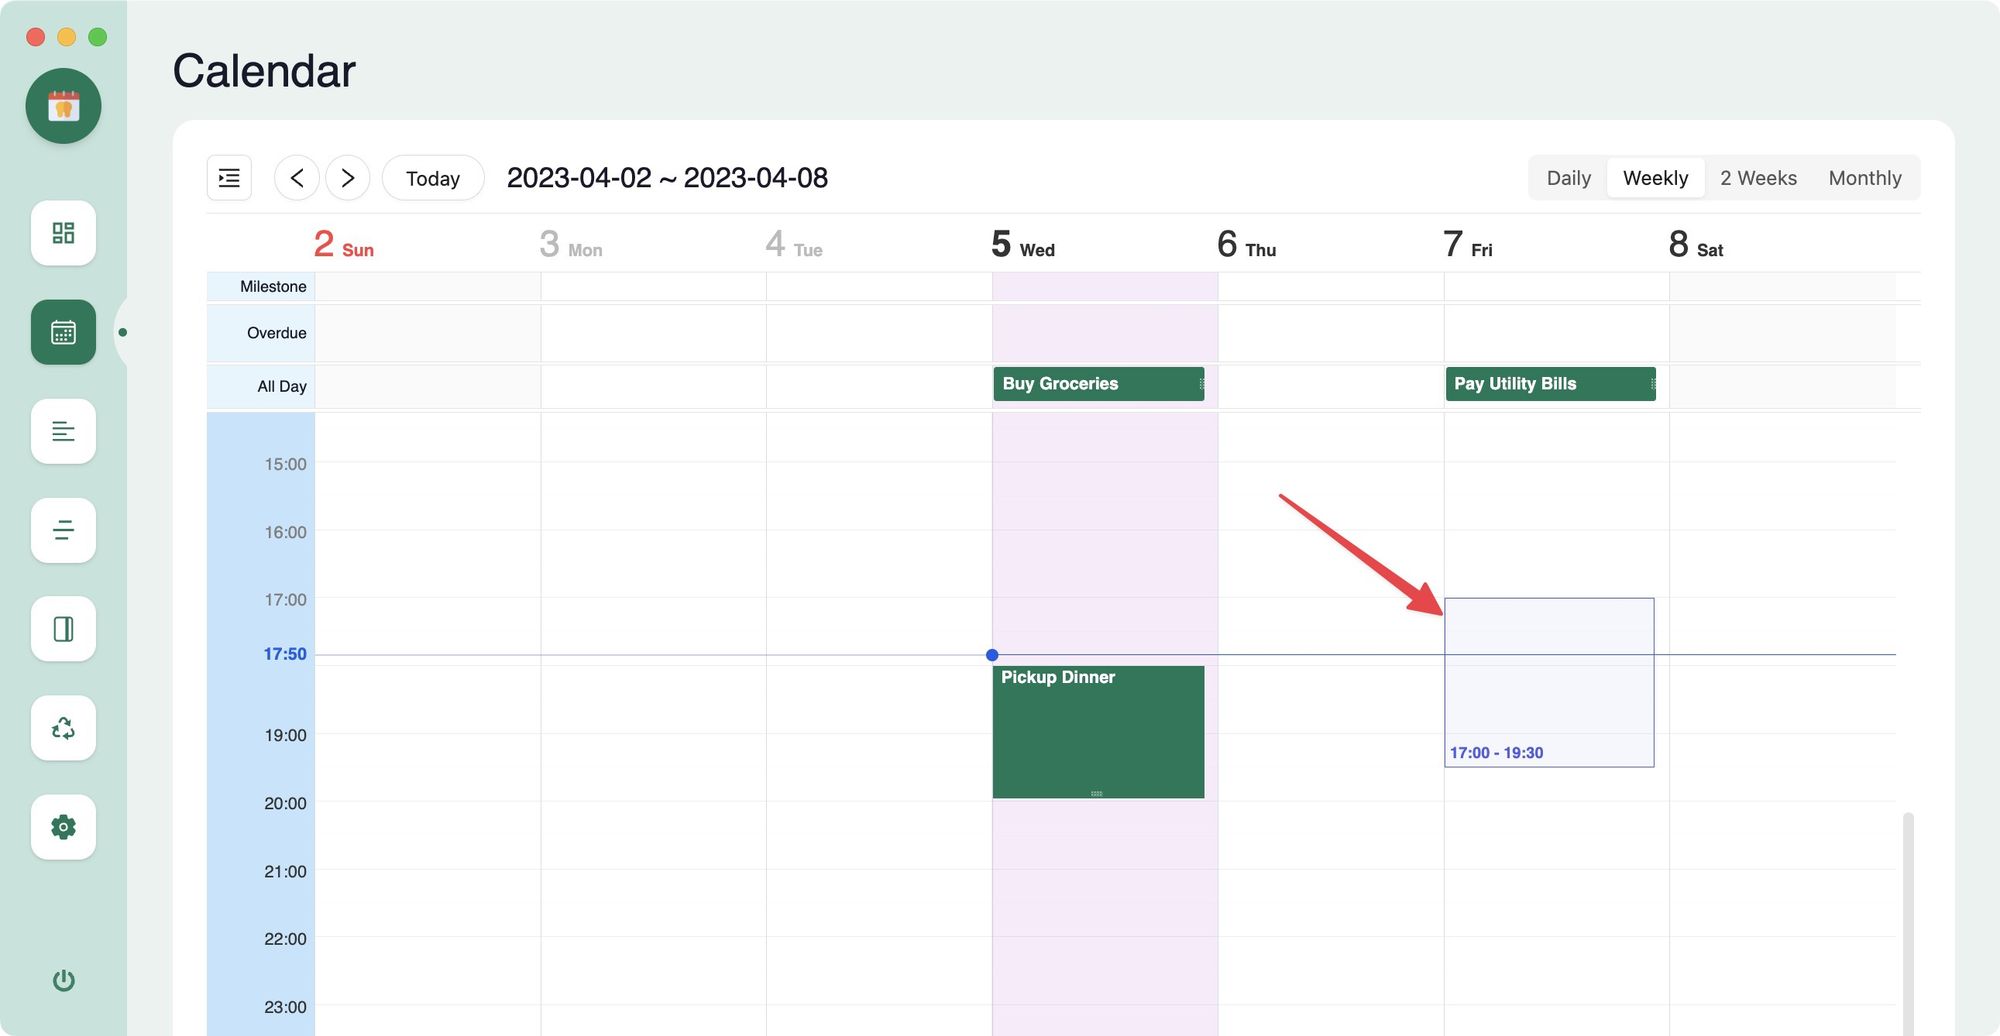
To create a task, open the calendar view in Agenda. Now click and drag to select the time slot for the task. Let go, and it will open an event creator window.
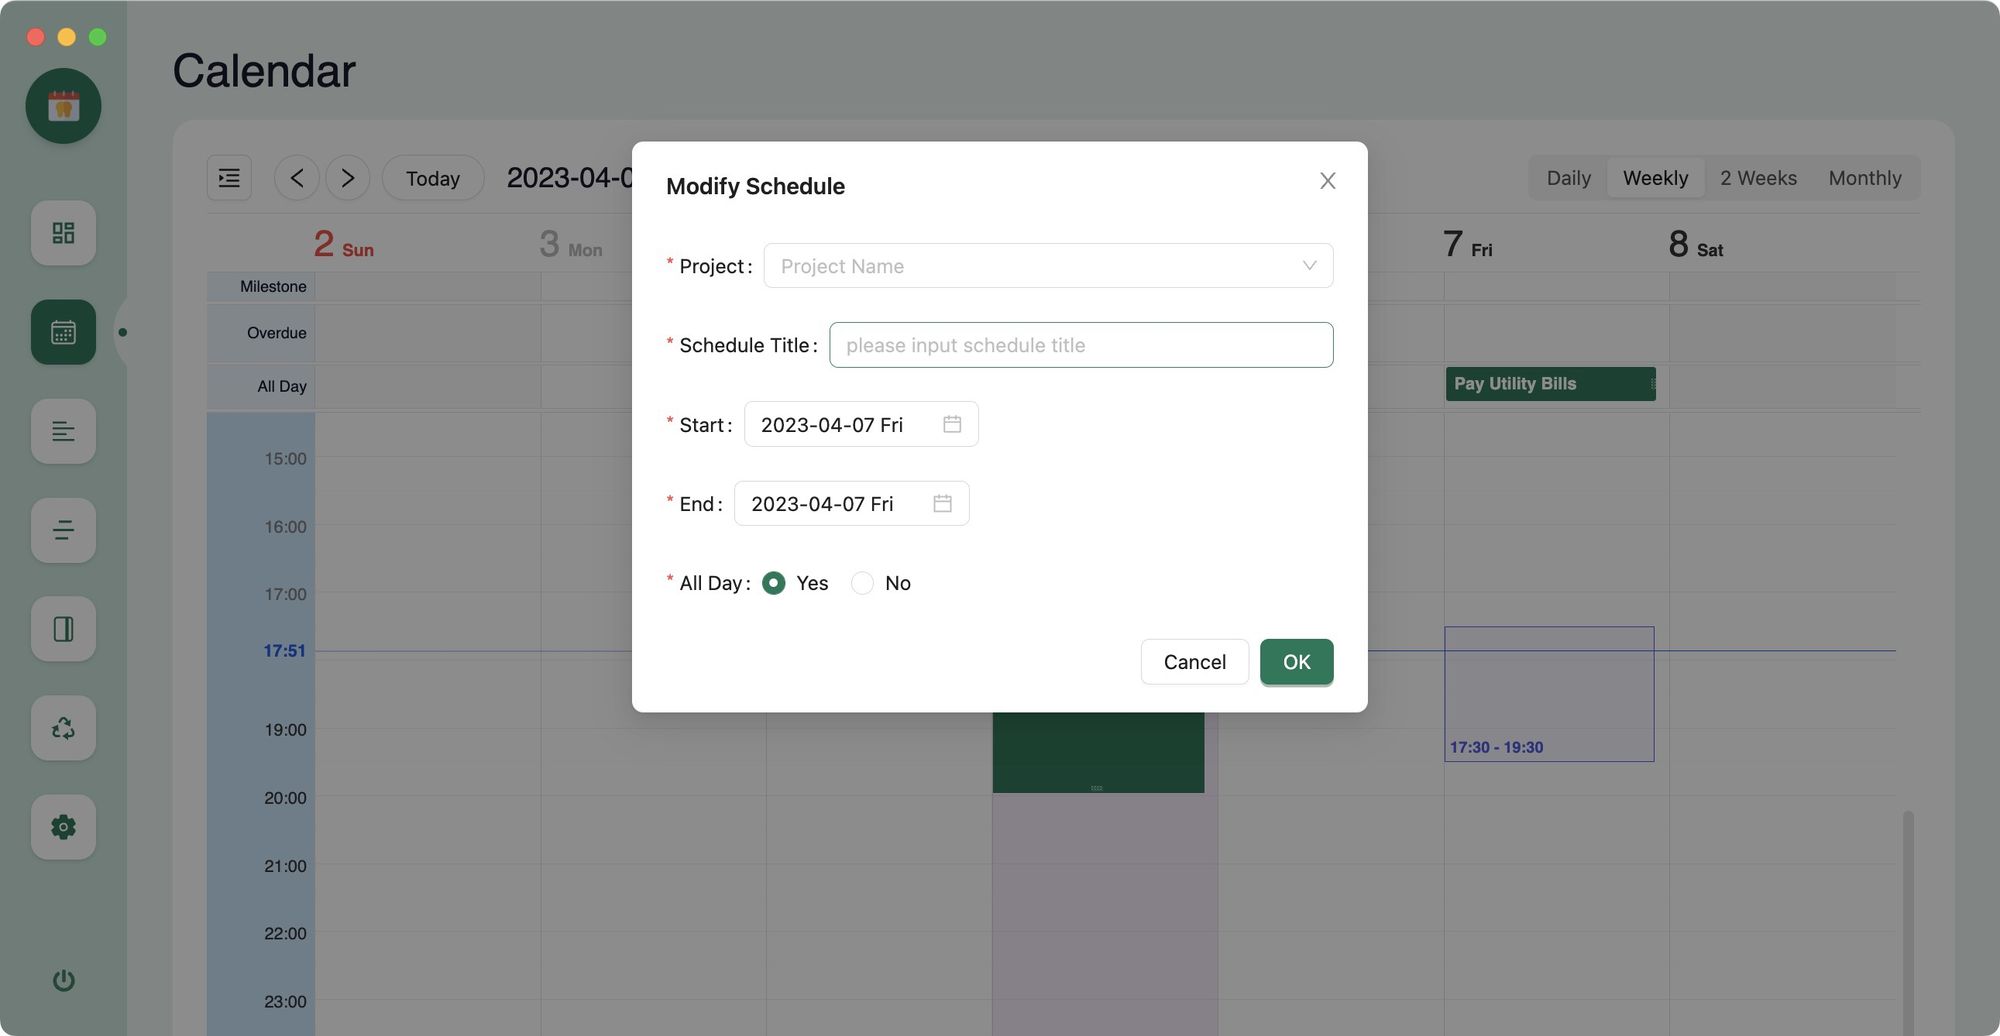
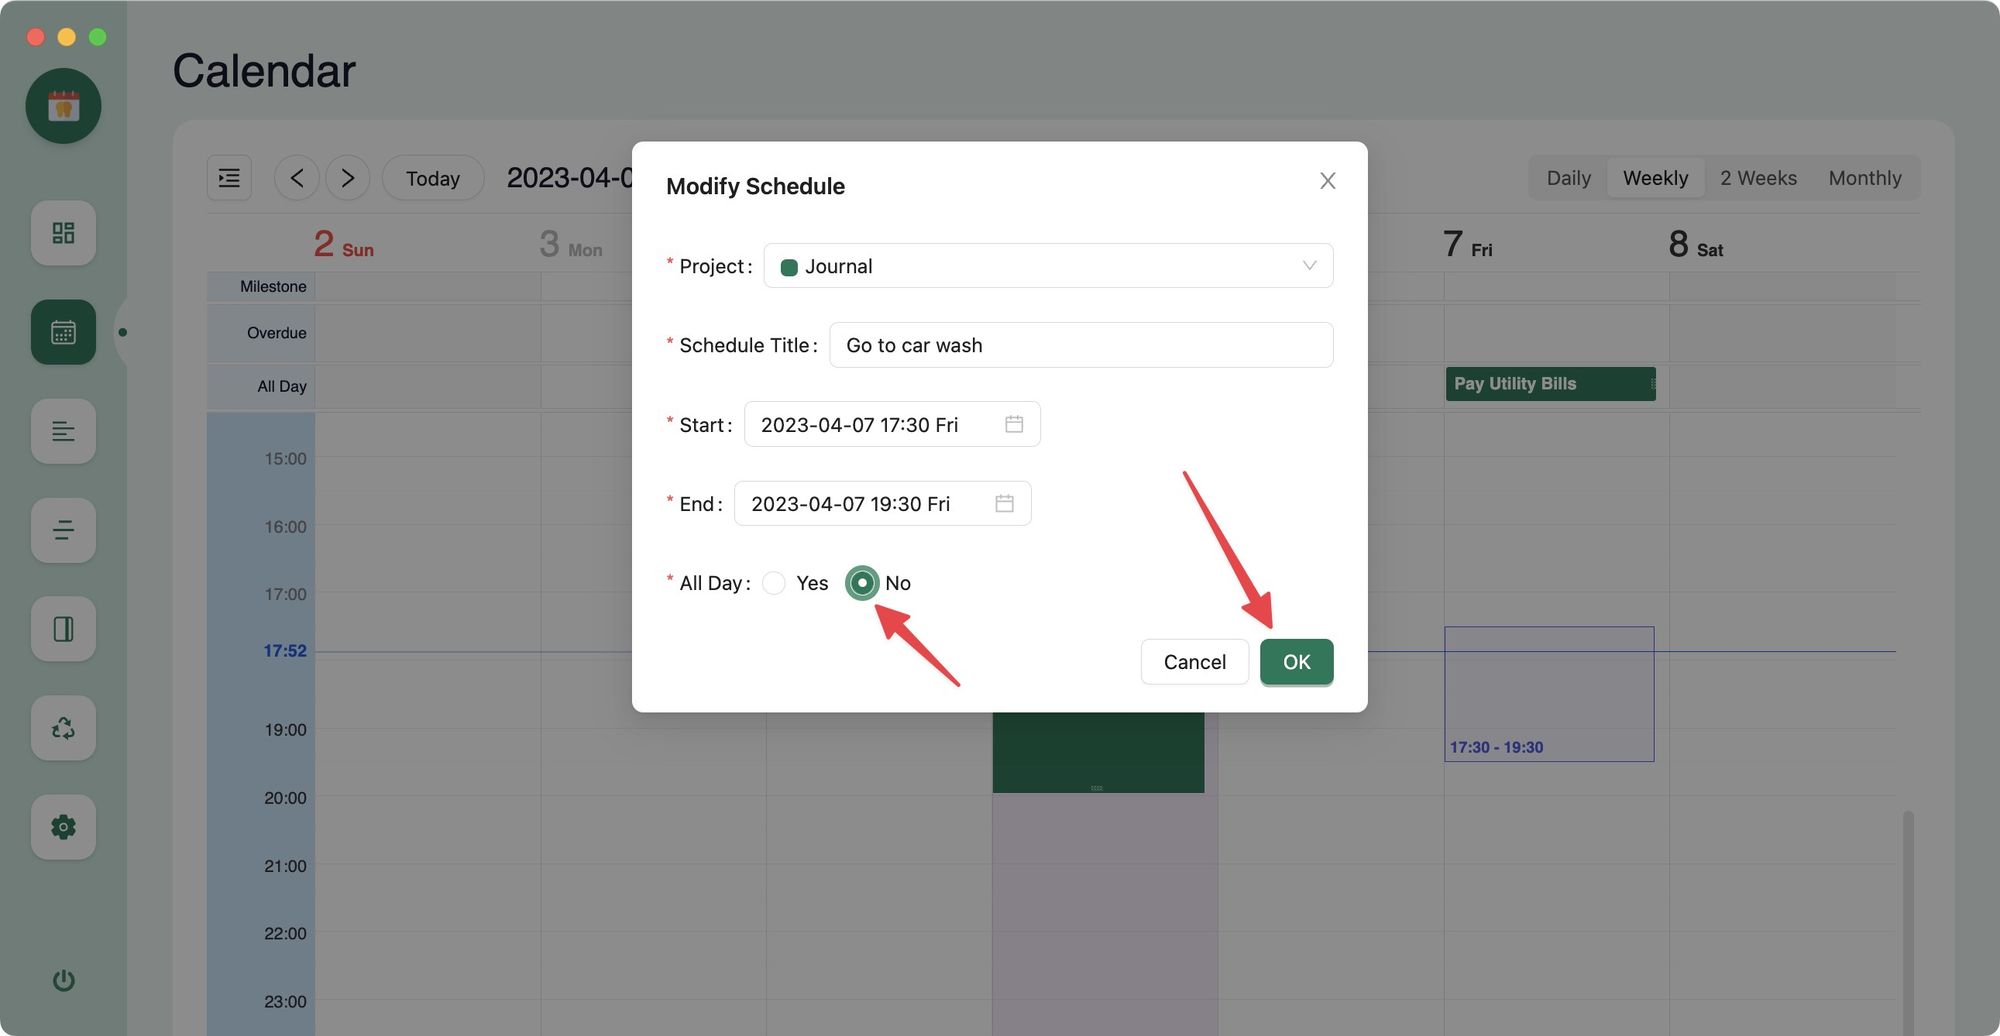
Choose Journal in the project field (as we have not created any project), and enter the task name. Now, select No against the All Day option and click the Ok button to add the task.
Manage and reschedule tasks and events using Agenda Calendar View
The Agenda plugin also makes it easy to manage and reschedule tasks in Logseq. The best way to reschedule tasks in Agenda is by using its calendar view. But you can also reschedule them directly from your daily notes page.
Reschedule tasks in Logseq using the Agenda calendar view
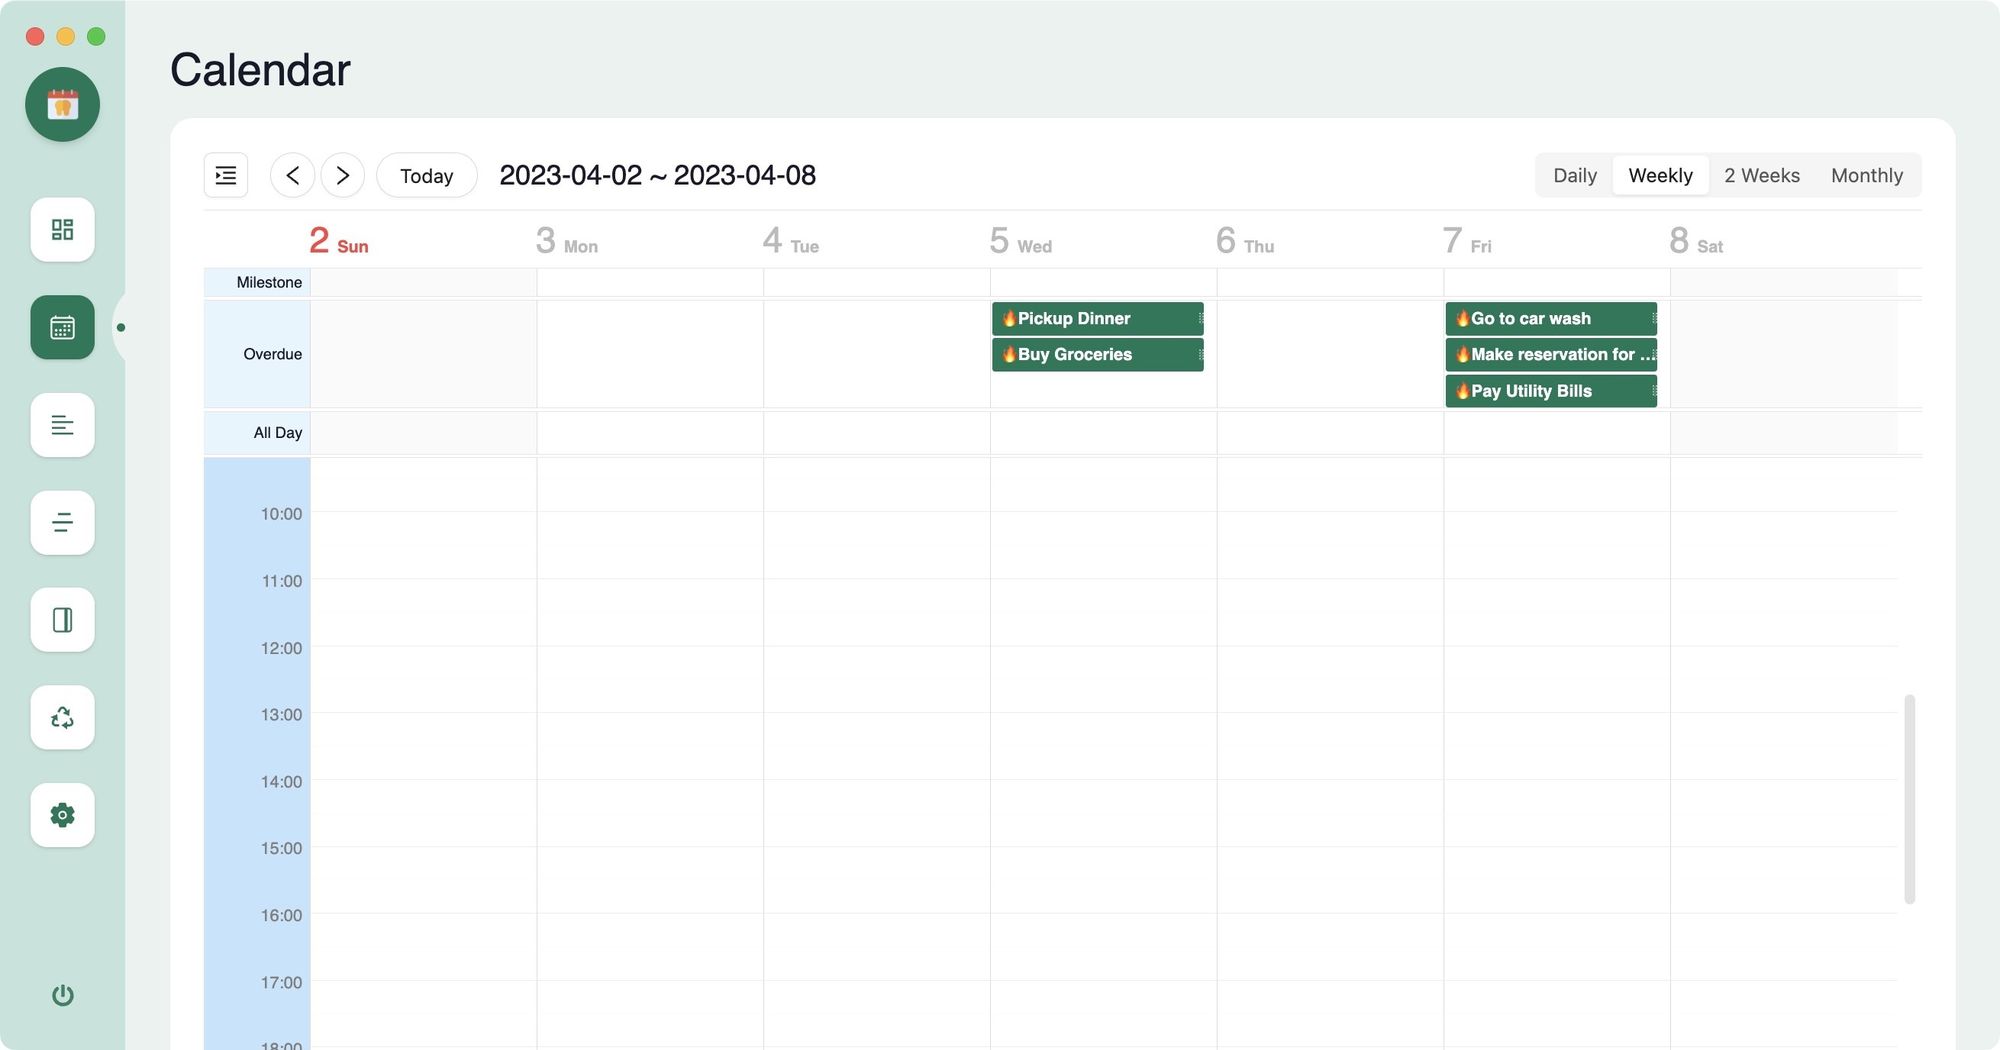
If you see the screenshot below, all the tasks we have added have a fire icon next to them, marking them overdue tasks.
To reschedule a task, click on it to reveal the task details and click the Edit button.
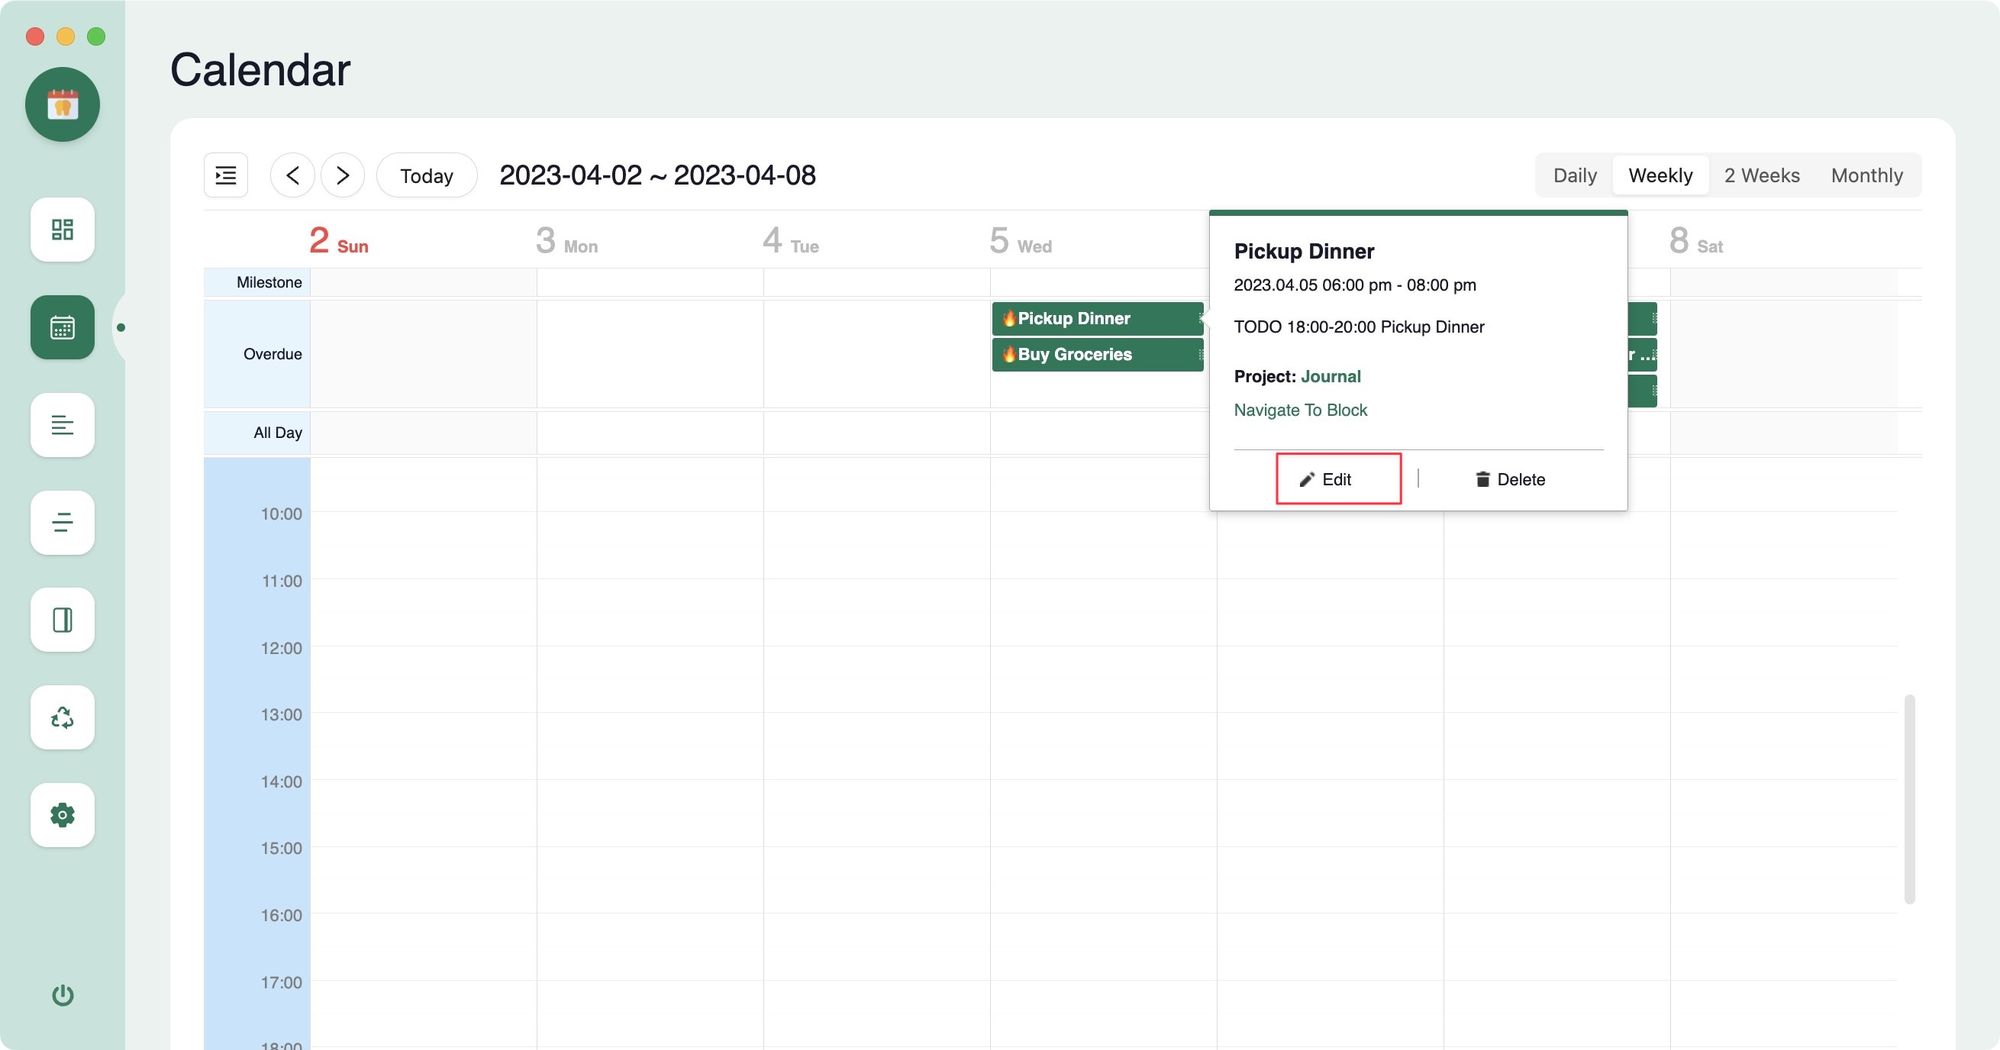
Now you can use the Start and End date fields to reschedule the task.
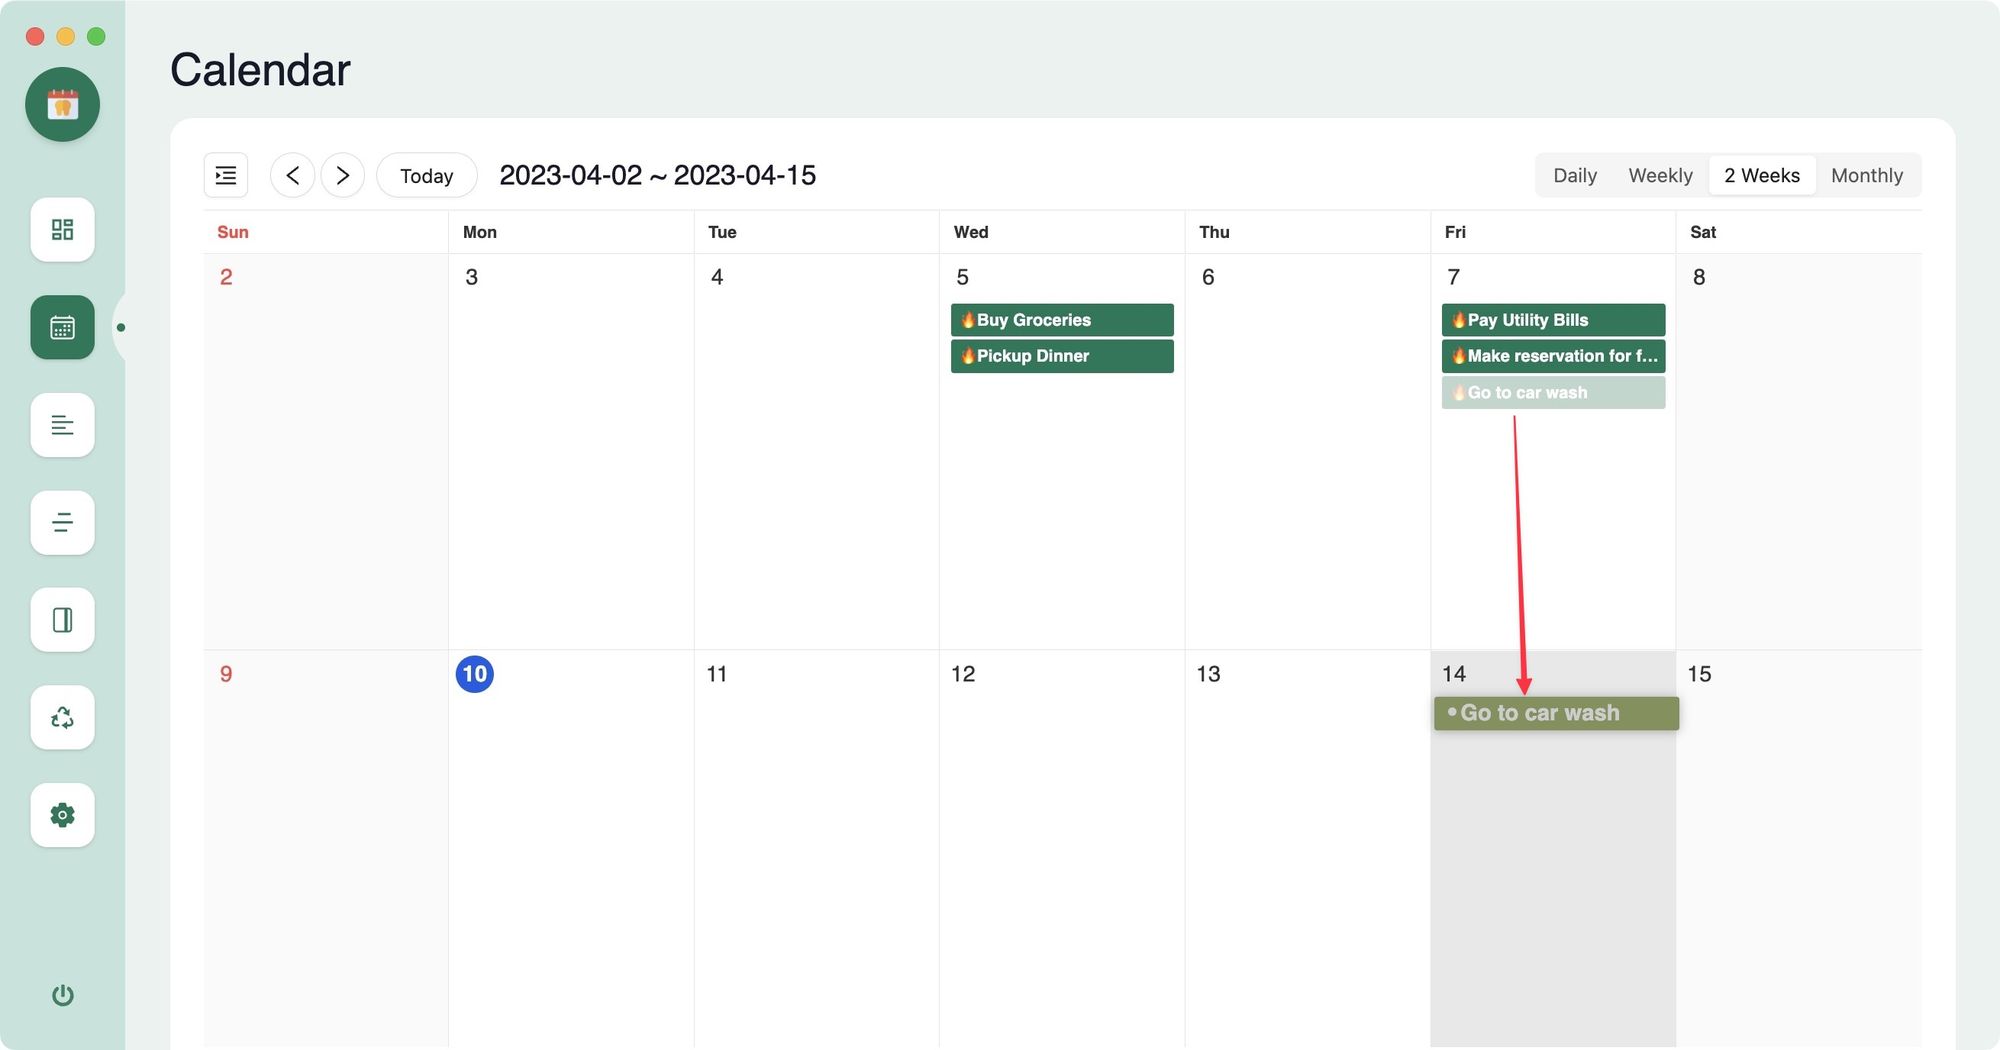
Another way to reschedule tasks using Agenda is by dragging and dropping them to the date you want. It works best for all-day tasks, as you don’t have to be precise with the task placement.
Reschedule tasks in Logseq using slash command
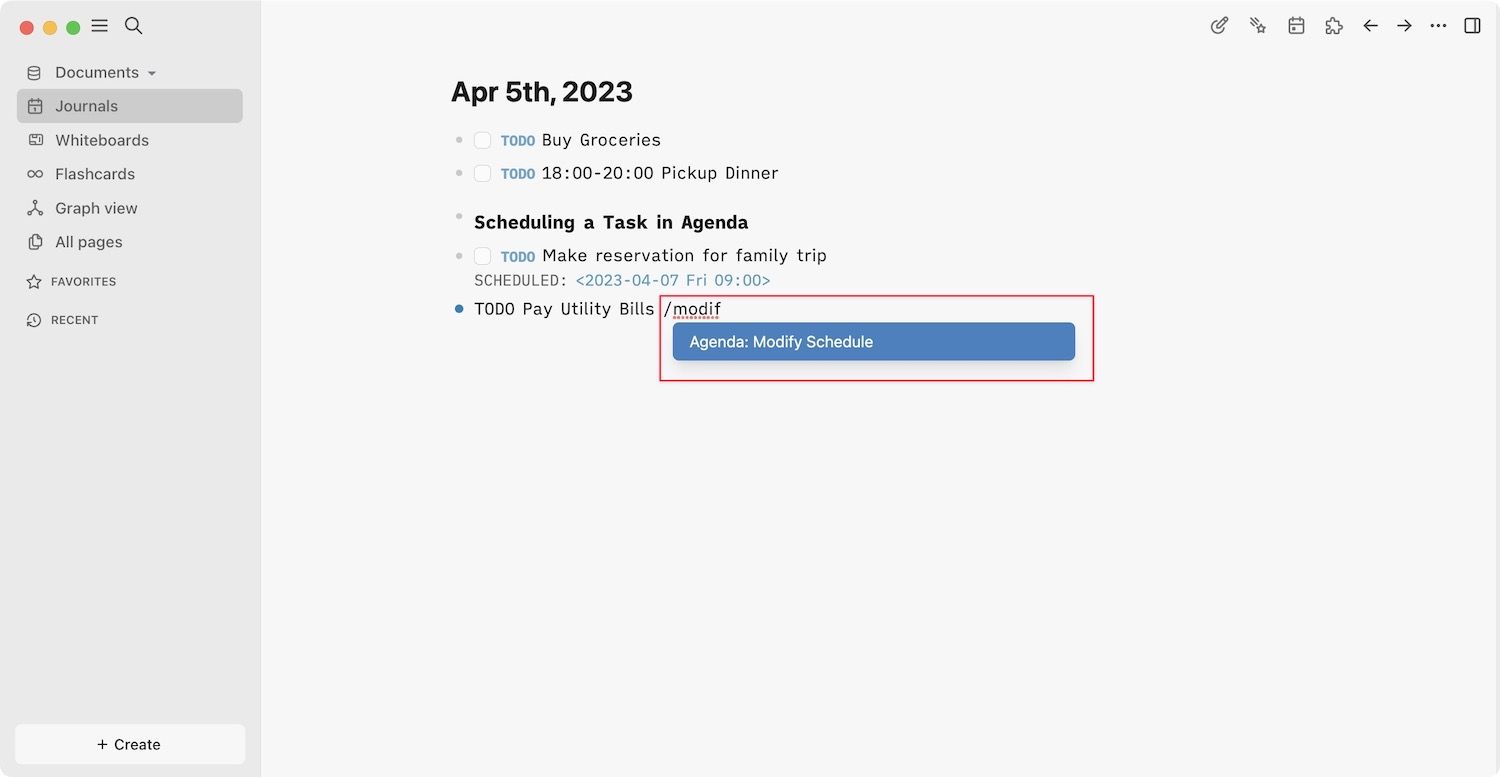
While the calendar view is awesome for quick rescheduling, if you want to reschedule only one or two tasks, you don’t have to break the flow by opening the Agenda plugin. You can reschedule tasks directly from your notes page. Use the slash command to execute the Agenda:Modify Schedule action and follow the steps to reschedule the task.

Use Agenda to Manage Projects in Logseq
One of the best features of the Agenda plugin is that it lets you create separate calendars for different projects. It allows you to get a focused view of any individual project. When you want to see everything on your plate, you can view the tasks across all projects and daily notes in a single view. In this section of the guide, we will show you how you can manage a project in Agenda.
Create a project in Agenda
To create a project in Agenda, we will first add it as a page in your Logseq database. Agenda treats each page in Logseq as its own project. Agenda will consider any task you add to this page as a task for that project. Let us understand this better with an example:
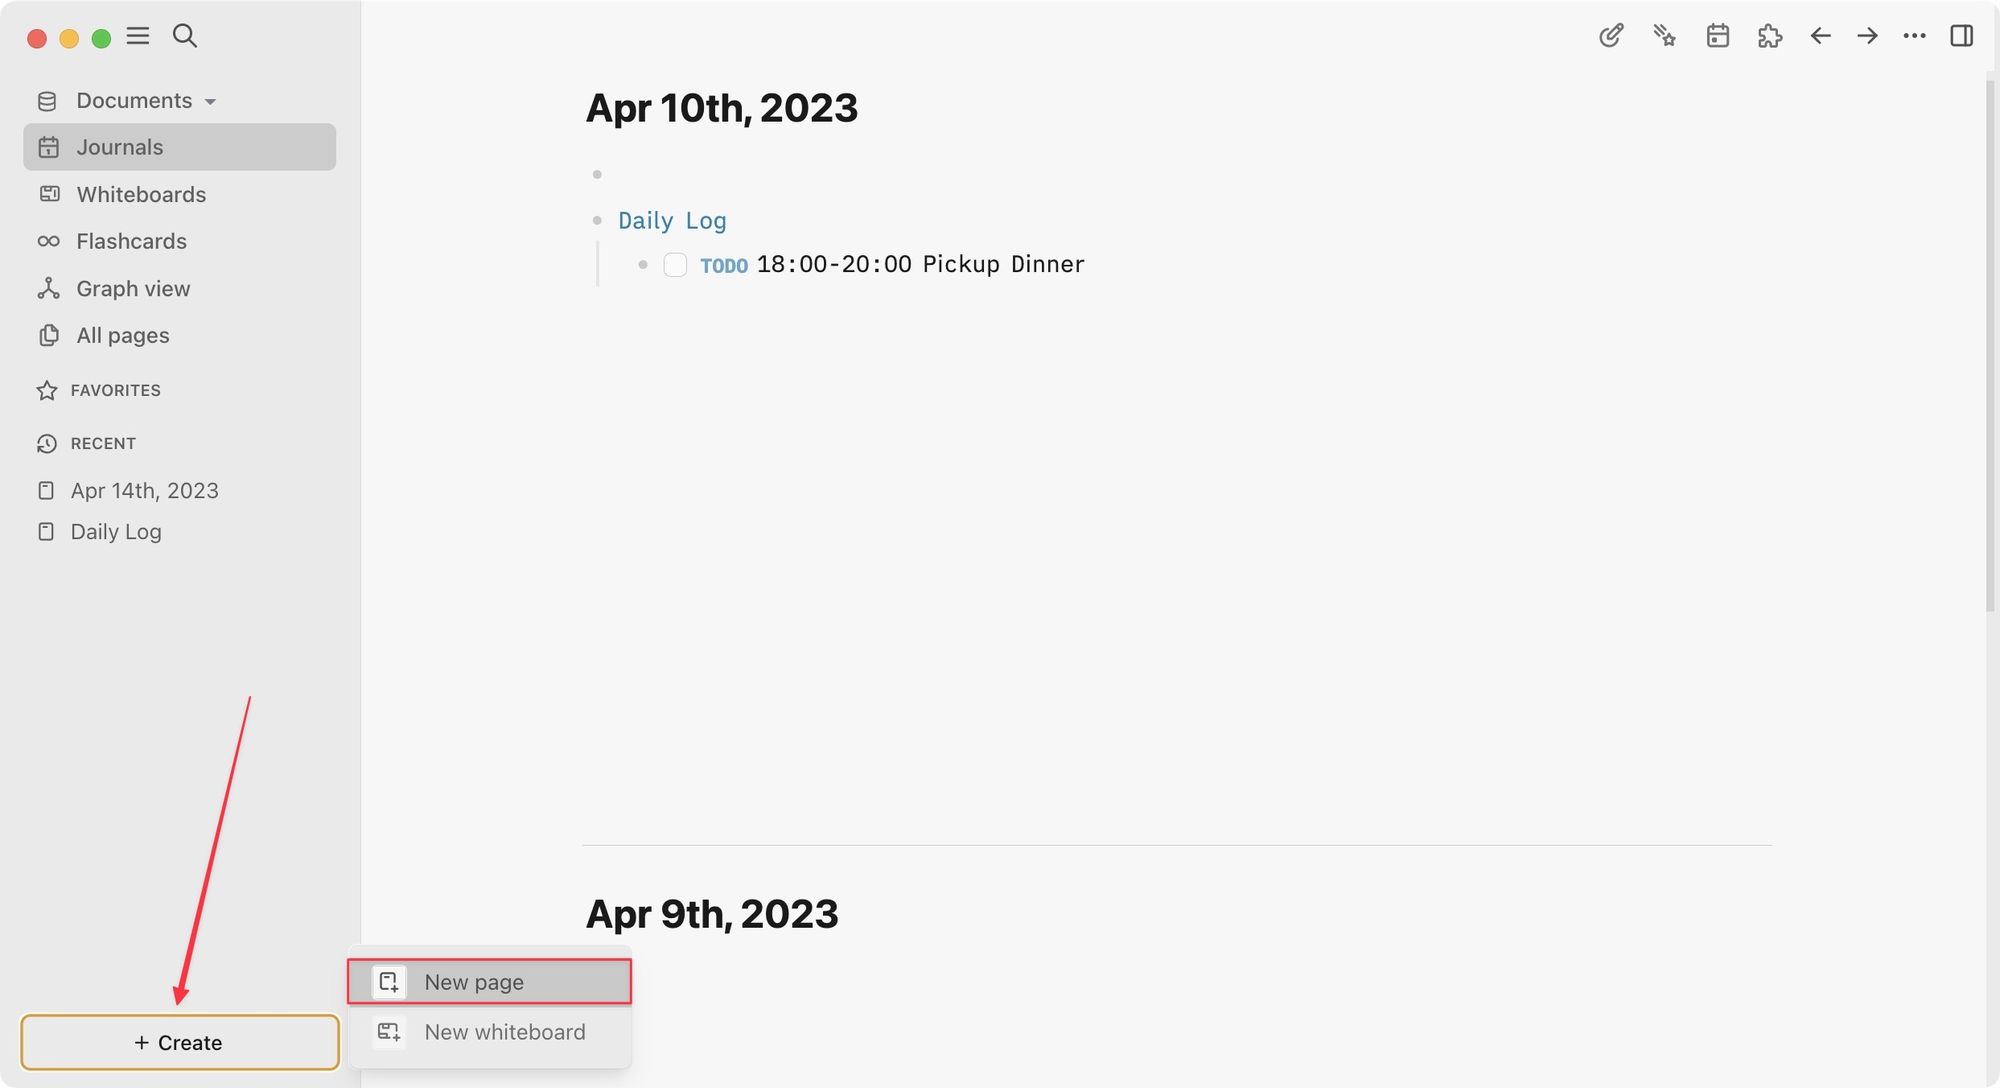
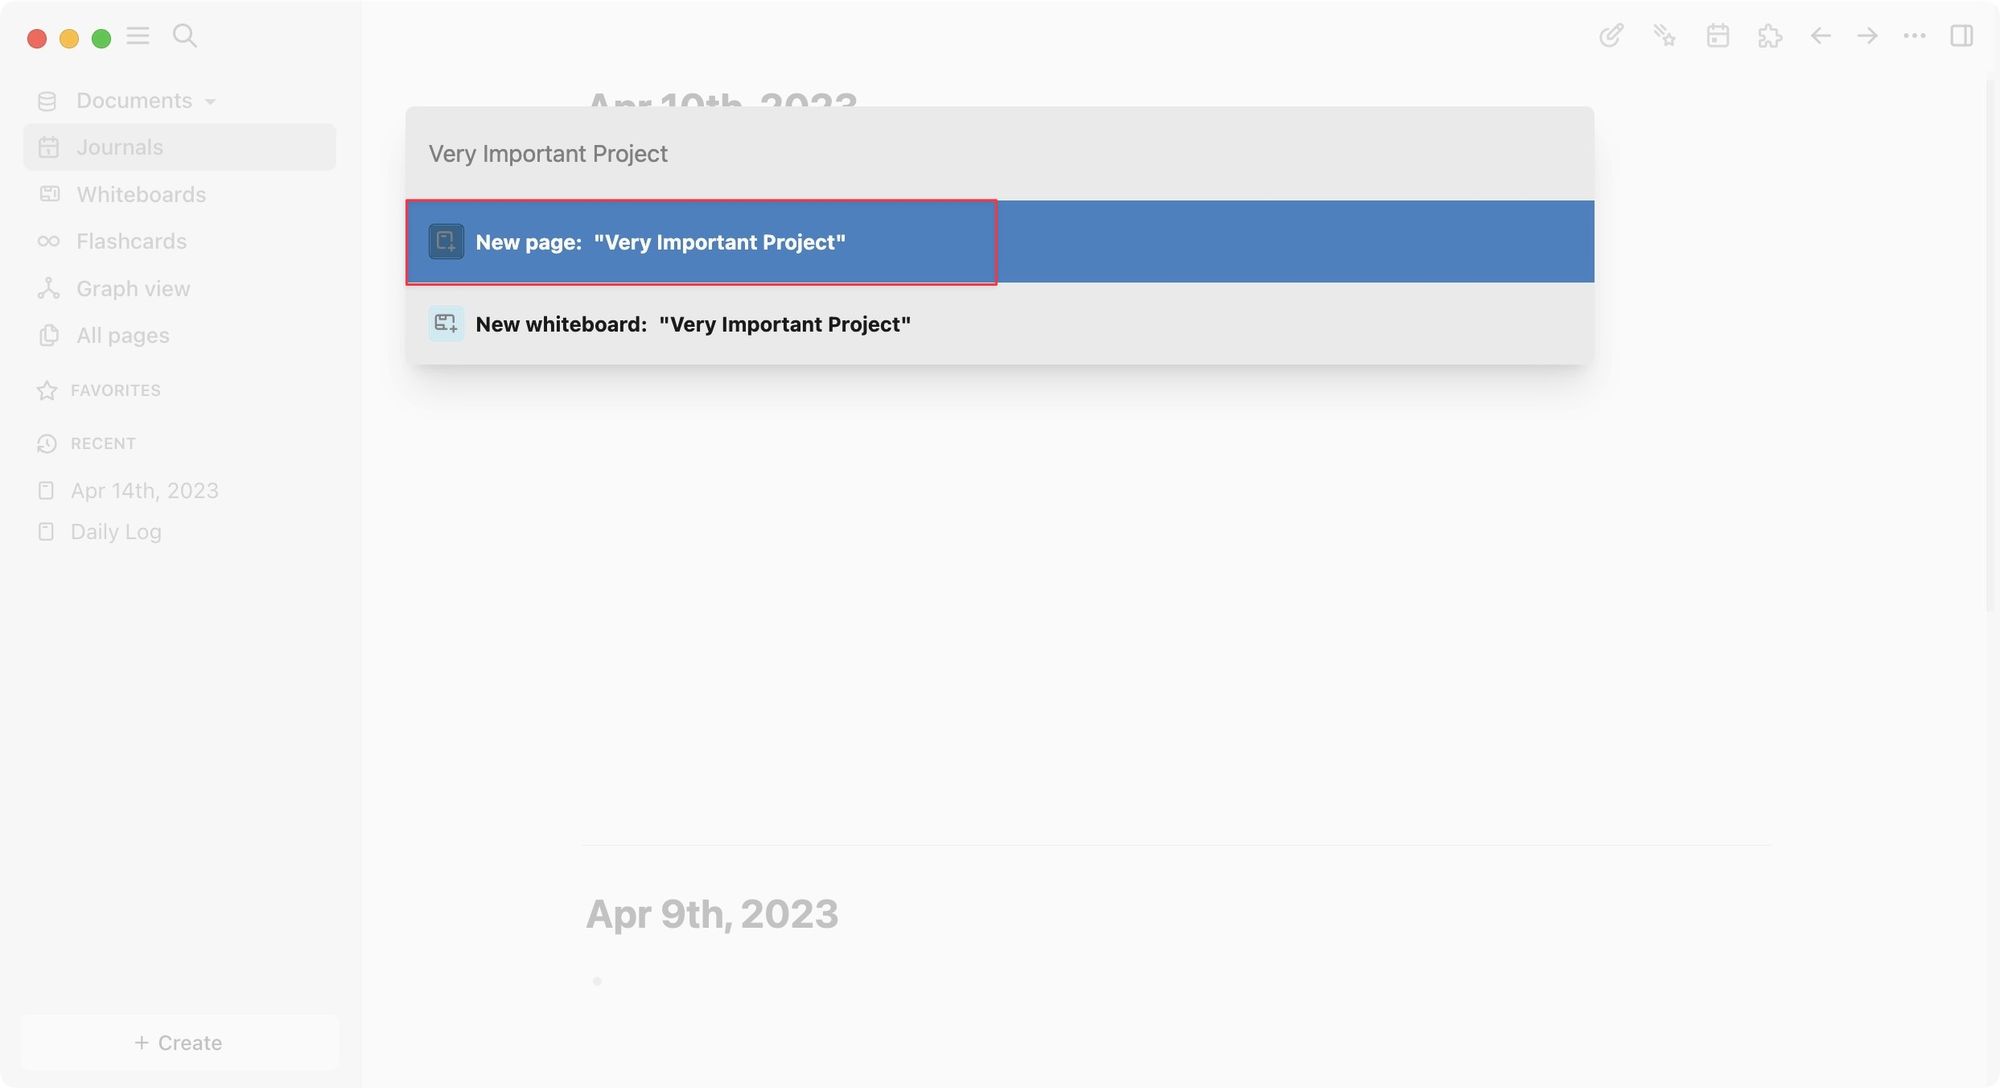
1. Launch Logseq and click the Create button to create a new page. Let’s give it a name and add it to our Logseq directory.
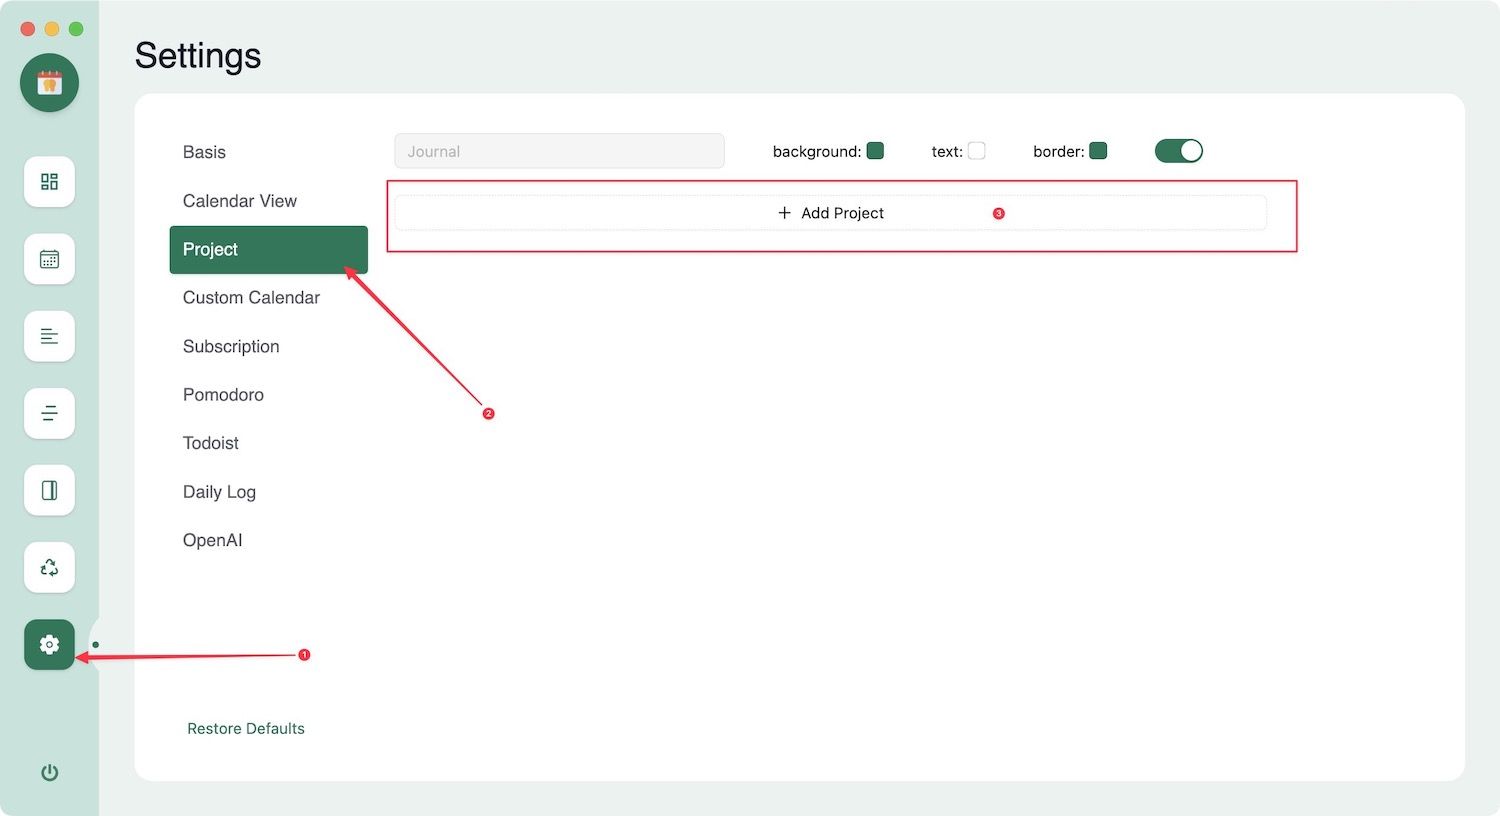
2. Now, we will ask Agenda to log this page as a project. Open Agenda (ctrl+shift+s) and click on Settings. Choose the Project option and click on Add Project.
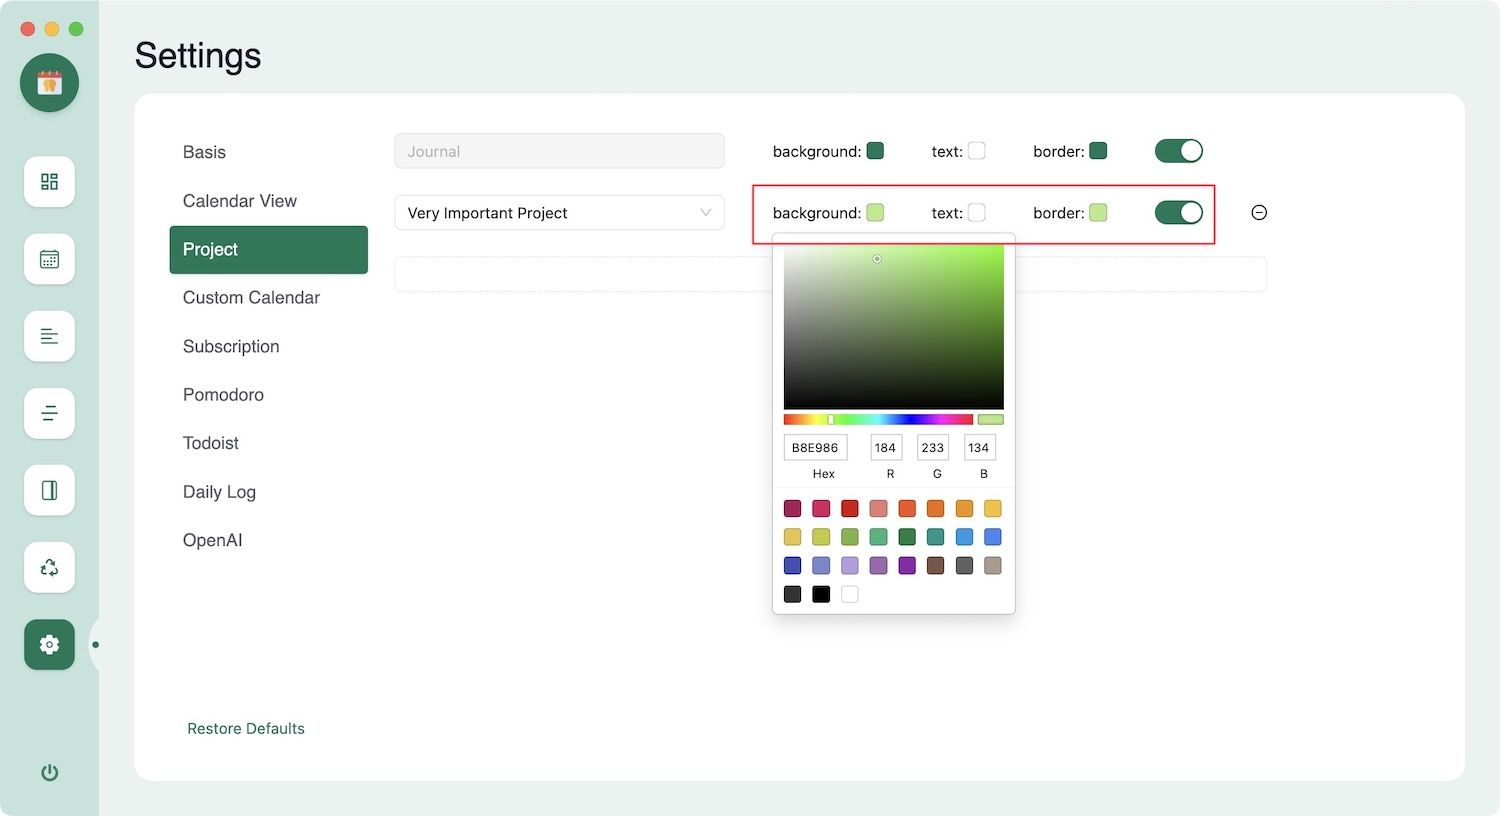
4. Click the Project Name area and choose the page you created.

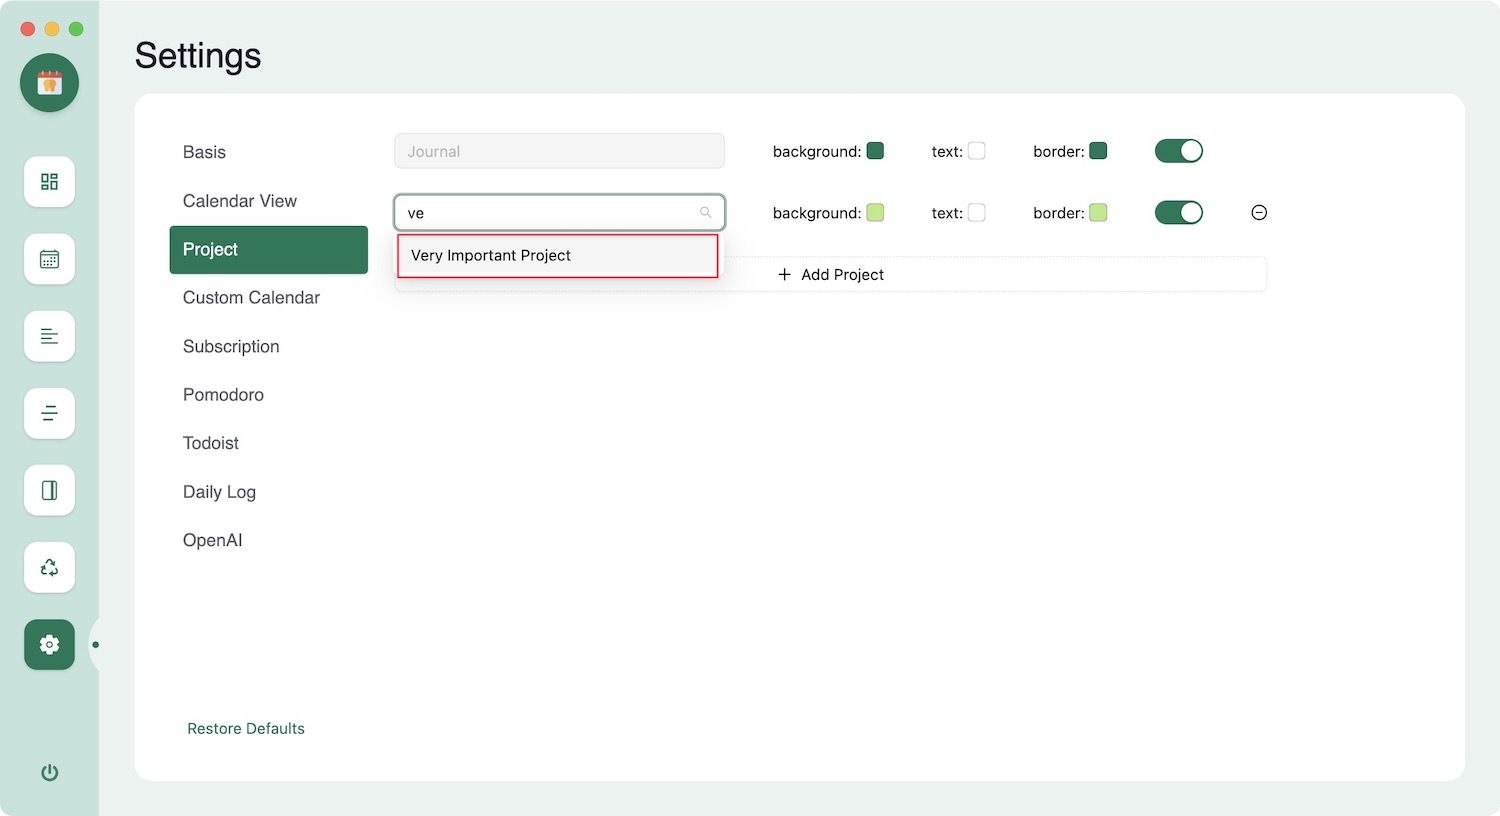
5. You can also customize the background, text, and border colors to customize the look of the tasks.
Use Project Calendar view to see your tasks
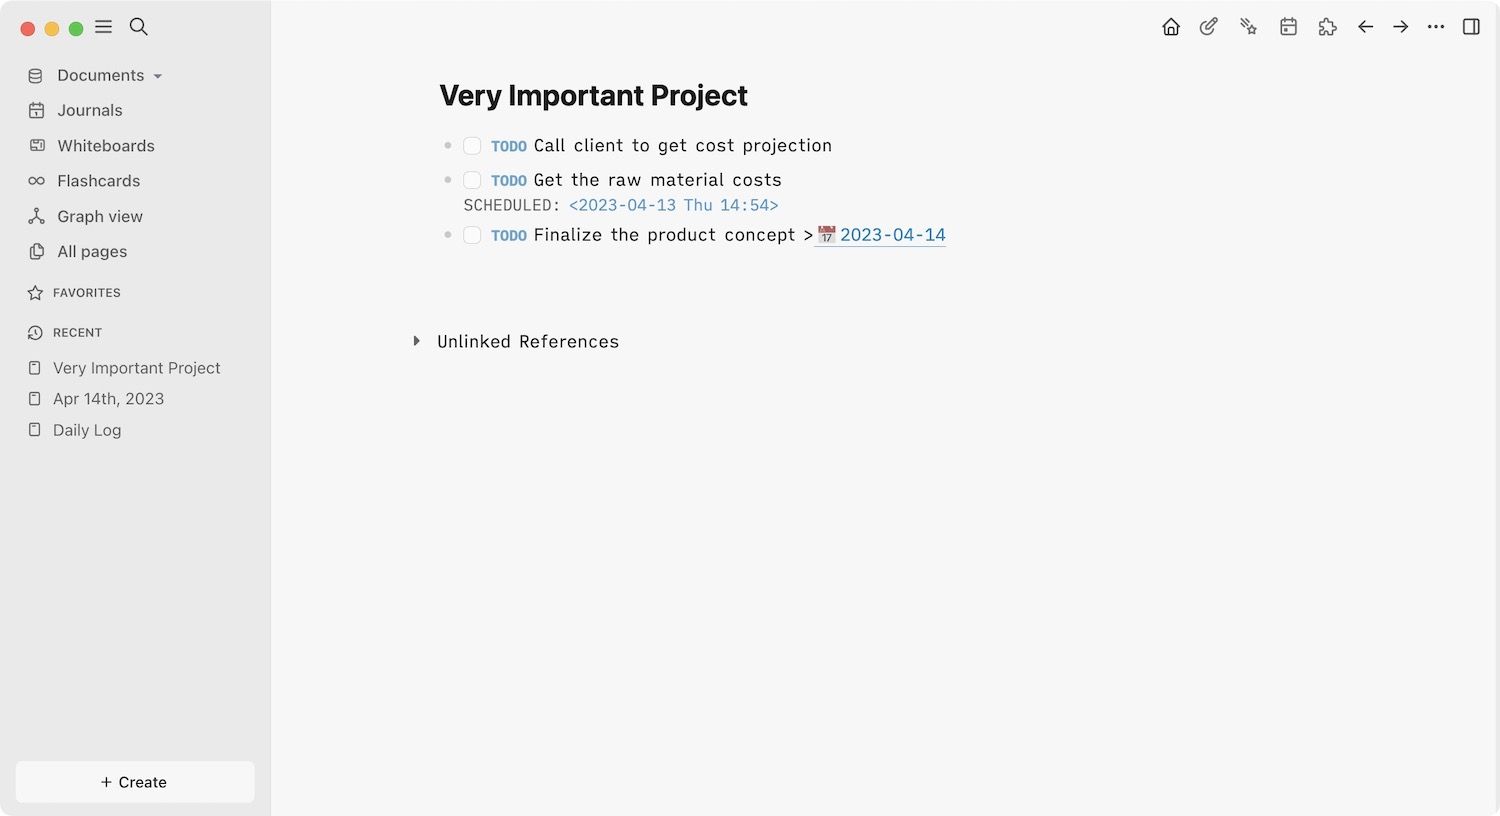
Now let us create some tasks in the project and see how you can view them in Agenda. We have already covered how to create, schedule, and manage tasks in Logseq. Use the same methods to add tasks to your project. Here’s how our project page looks after adding some tasks.
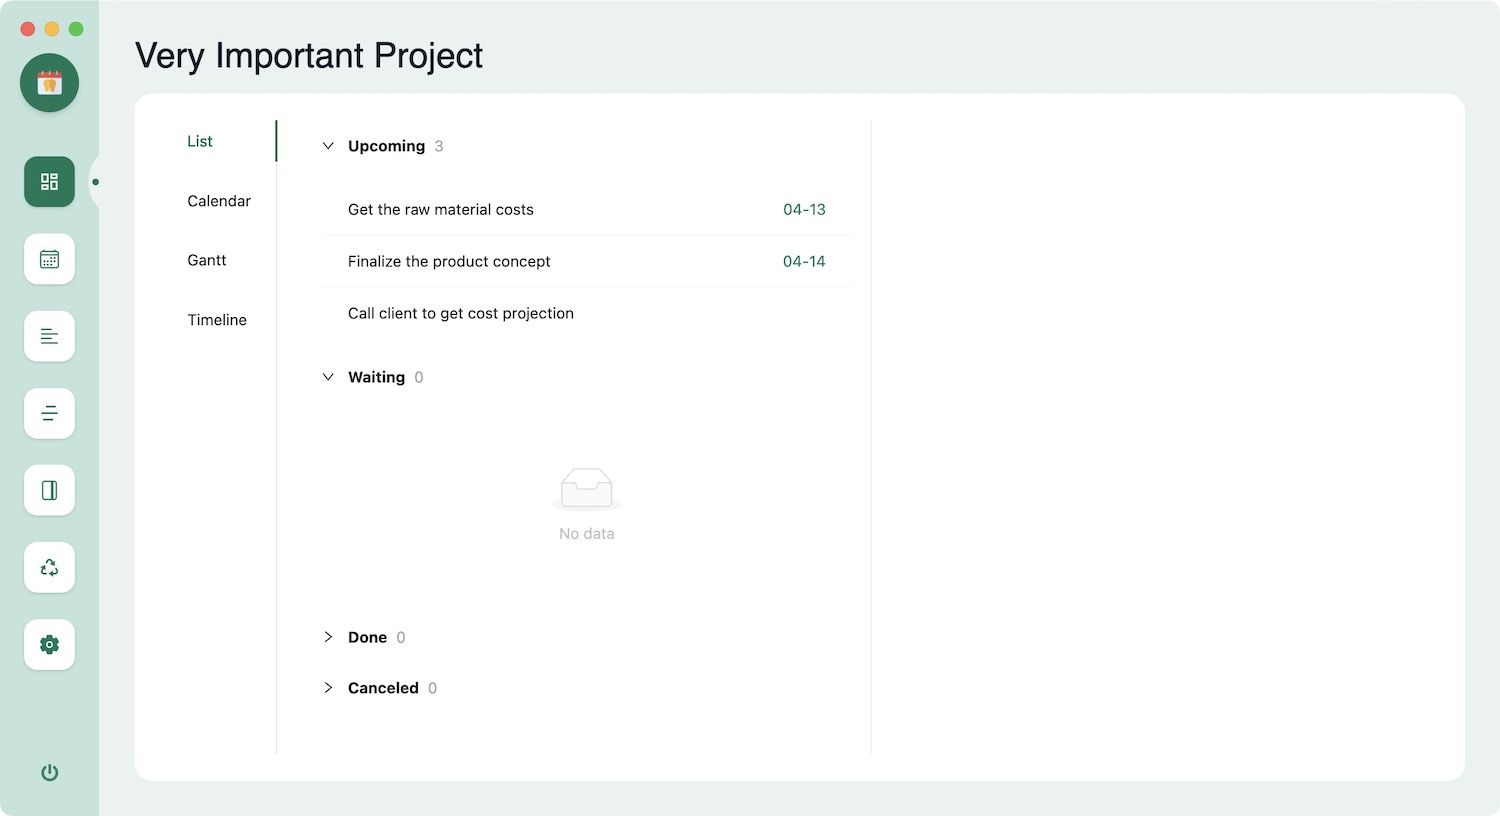
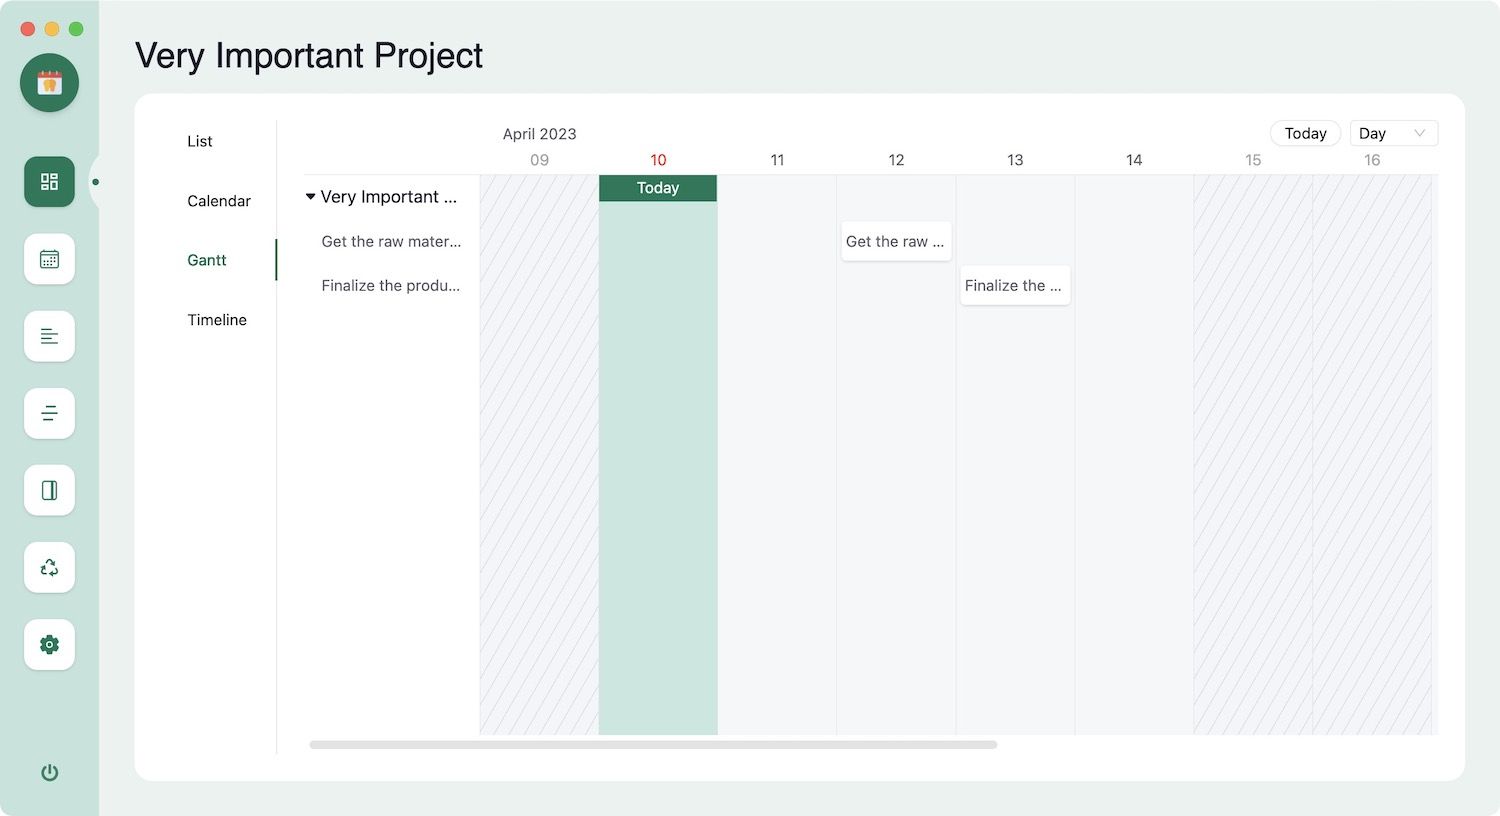
Now hit the keyboard shortcut to invoke Agenda. You will see that when you open Agenda from a project page, it will open a project dashboard, showing all the tasks of that project. You get all four views, including a list, calendar, Gantt, and Timeline.
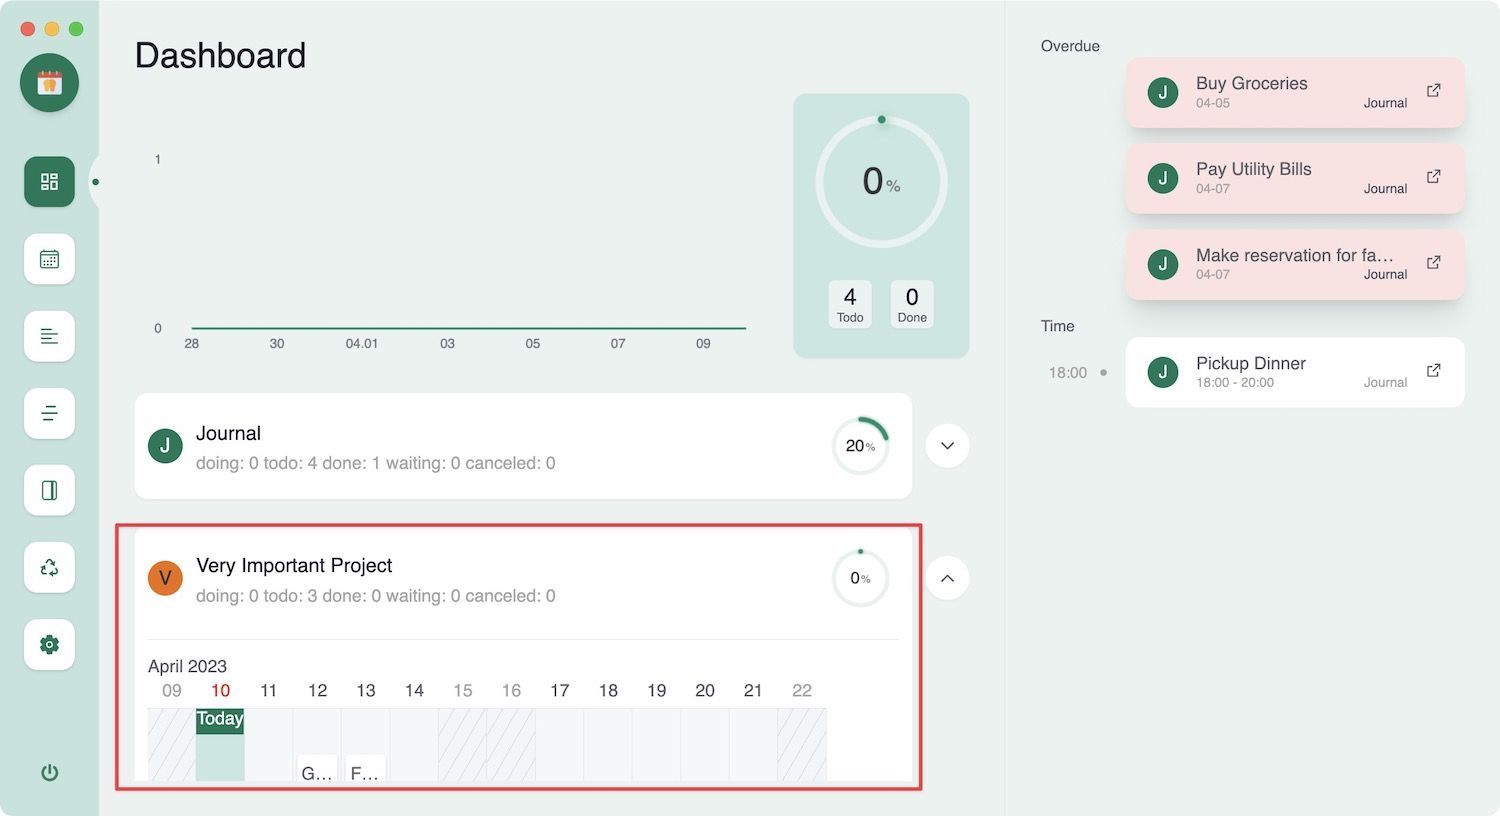
If you open Agenda from any page other than the project page, you will see the regular dashboard view. Notice that Agenda has added our new project alongside the journal project (which houses tasks on your daily notes).
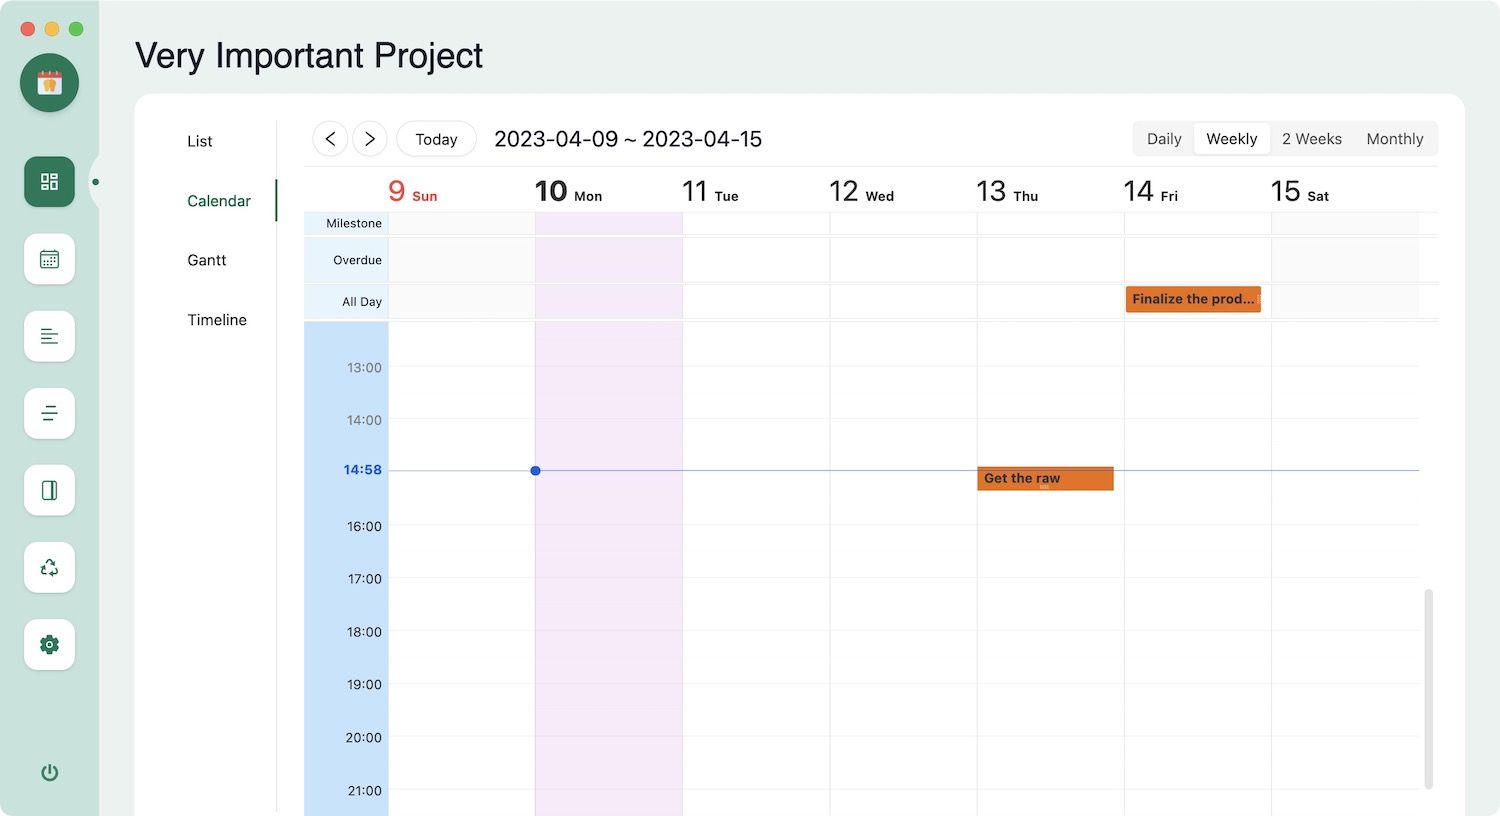
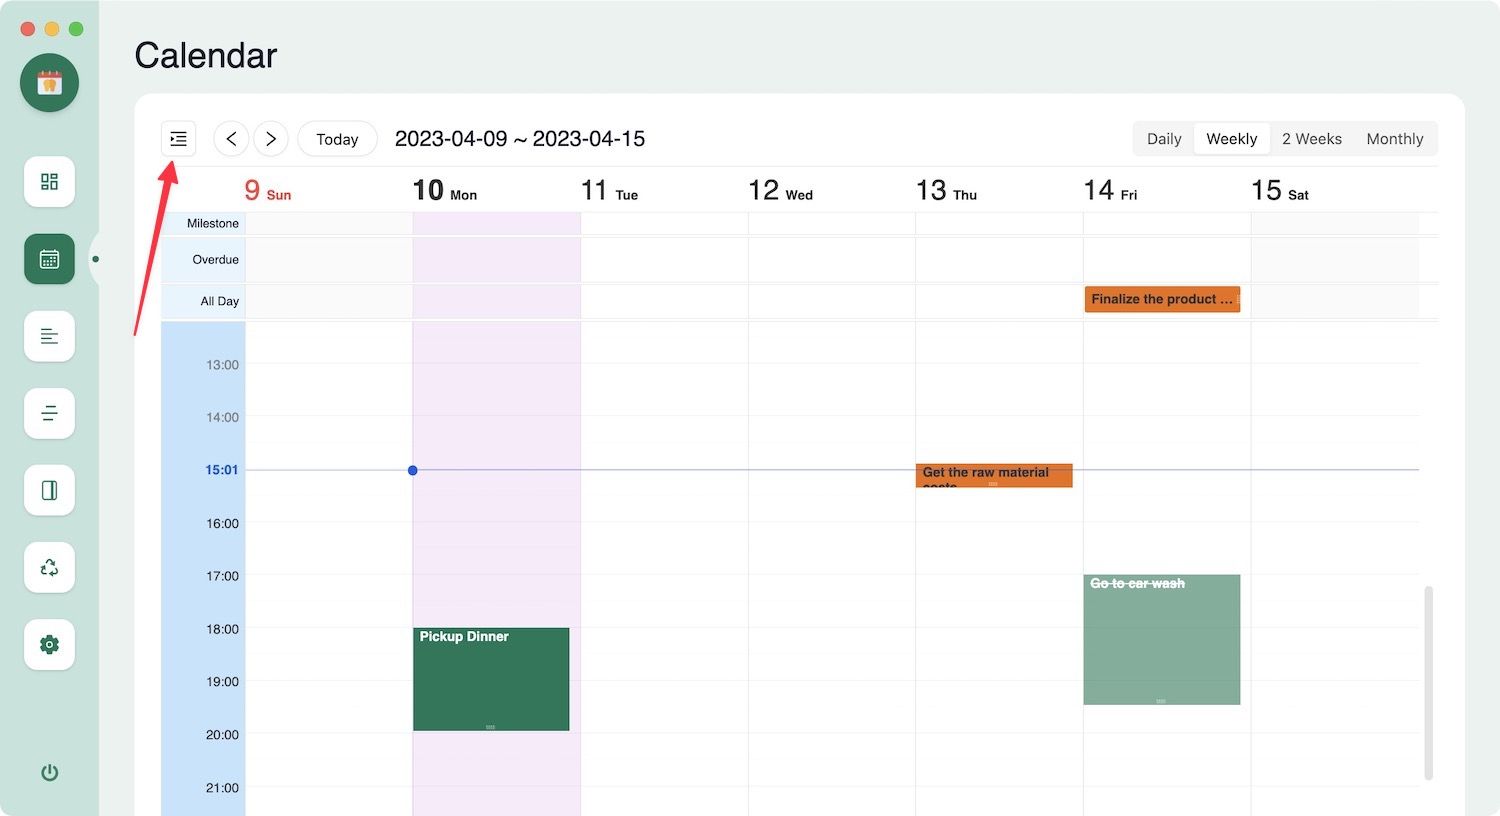
If you go to the calendar view, you will see your project tasks along with journal tasks. Notice our project tasks are using a different color scheme that we set during our project creation phase. To only see tasks from a project, click the button marked in the screenshots.
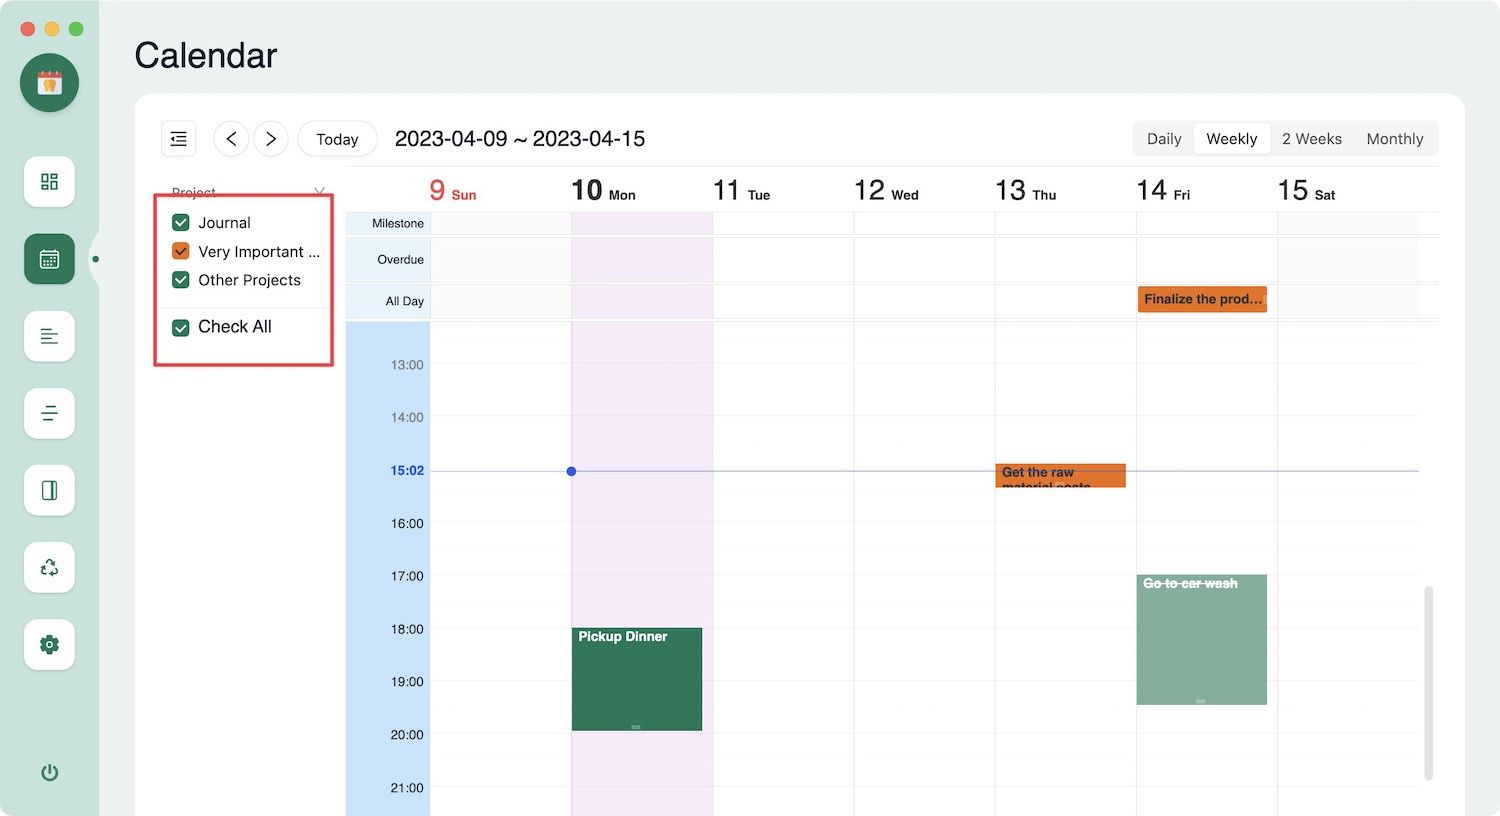
Deselect all the projects other than the project you want to view. Now you will only see the tasks related to the current project.

Creating project milestones
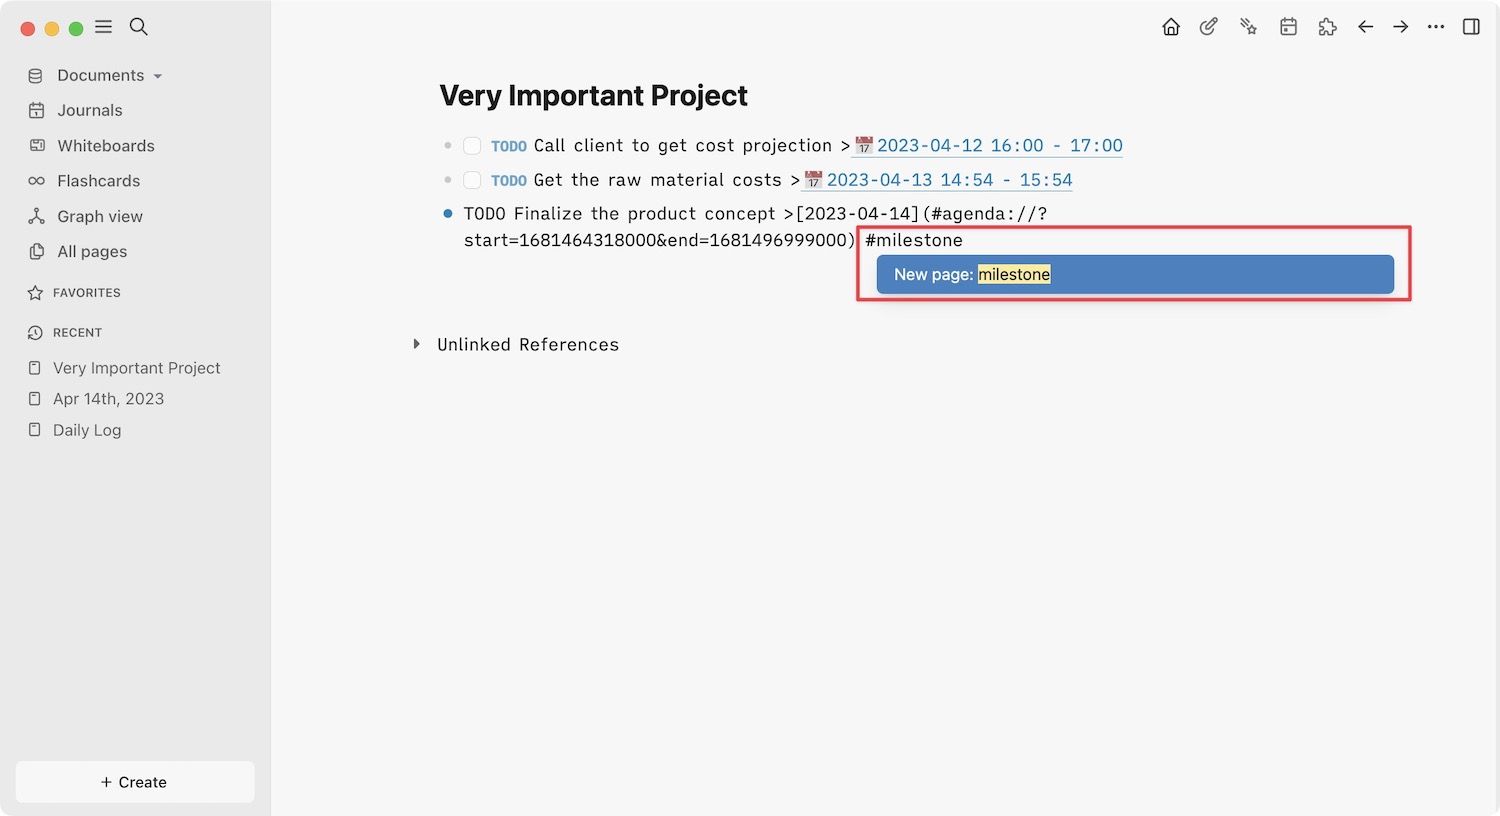
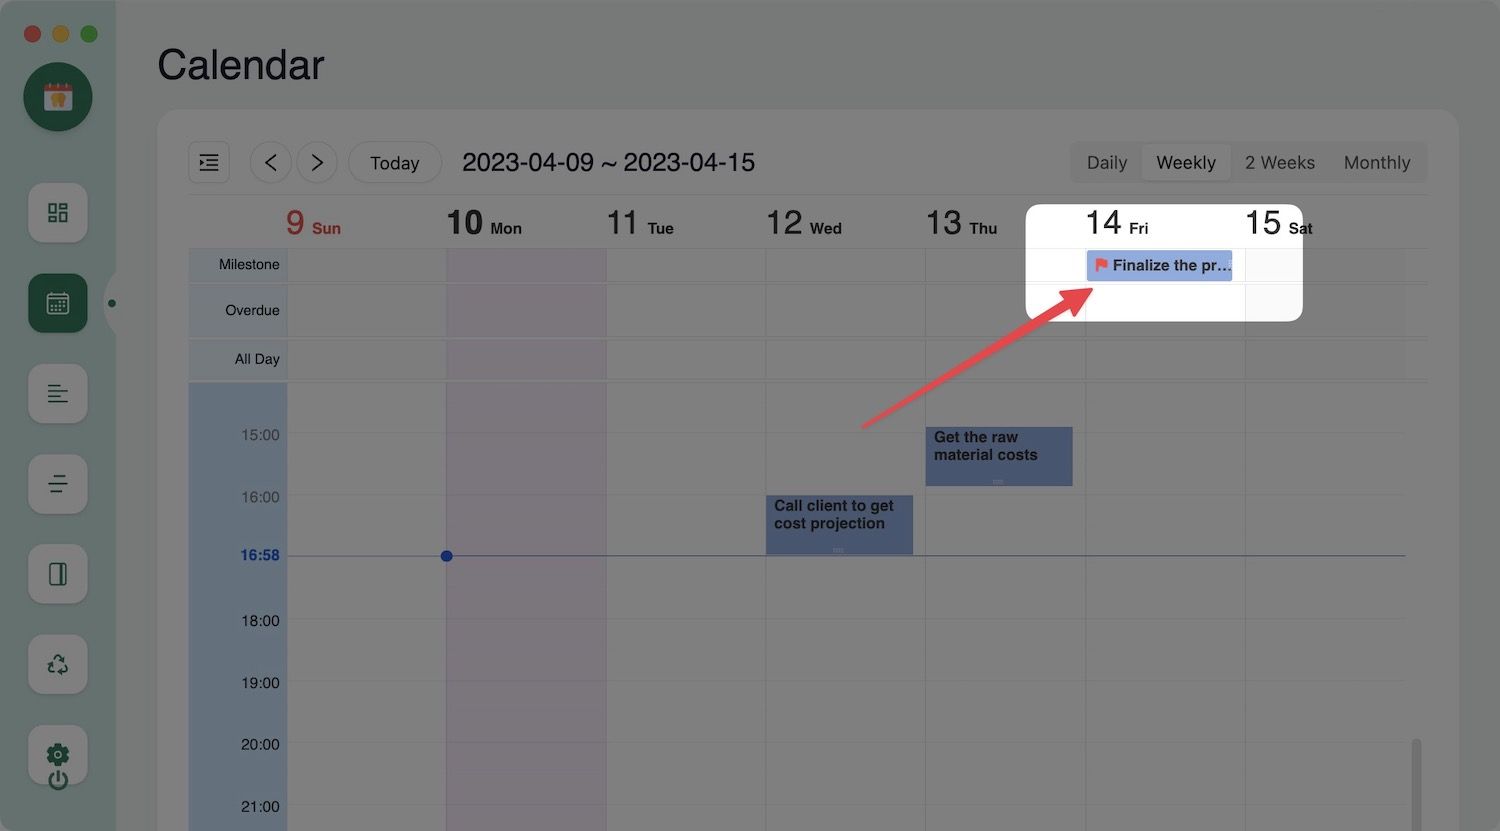
If you manage projects, you must be familiar with project milestones. A project milestone marks significant points in its timeline. For example, finalizing a proposal for a project can be a project milestone. Agenda lets you create project milestones to keep track of these points. To convert a task into a milestone, you only need to add a #milestone tag. The task will appear with a flag next to it in the calendar view.
Track time spent on tasks in Logseq
Agenda has a built-in Pomodoro timer that lets you focus on work. The plugin also logs the time you spend on each task using its timer to create a chart. Let us open our project and start working on a task.
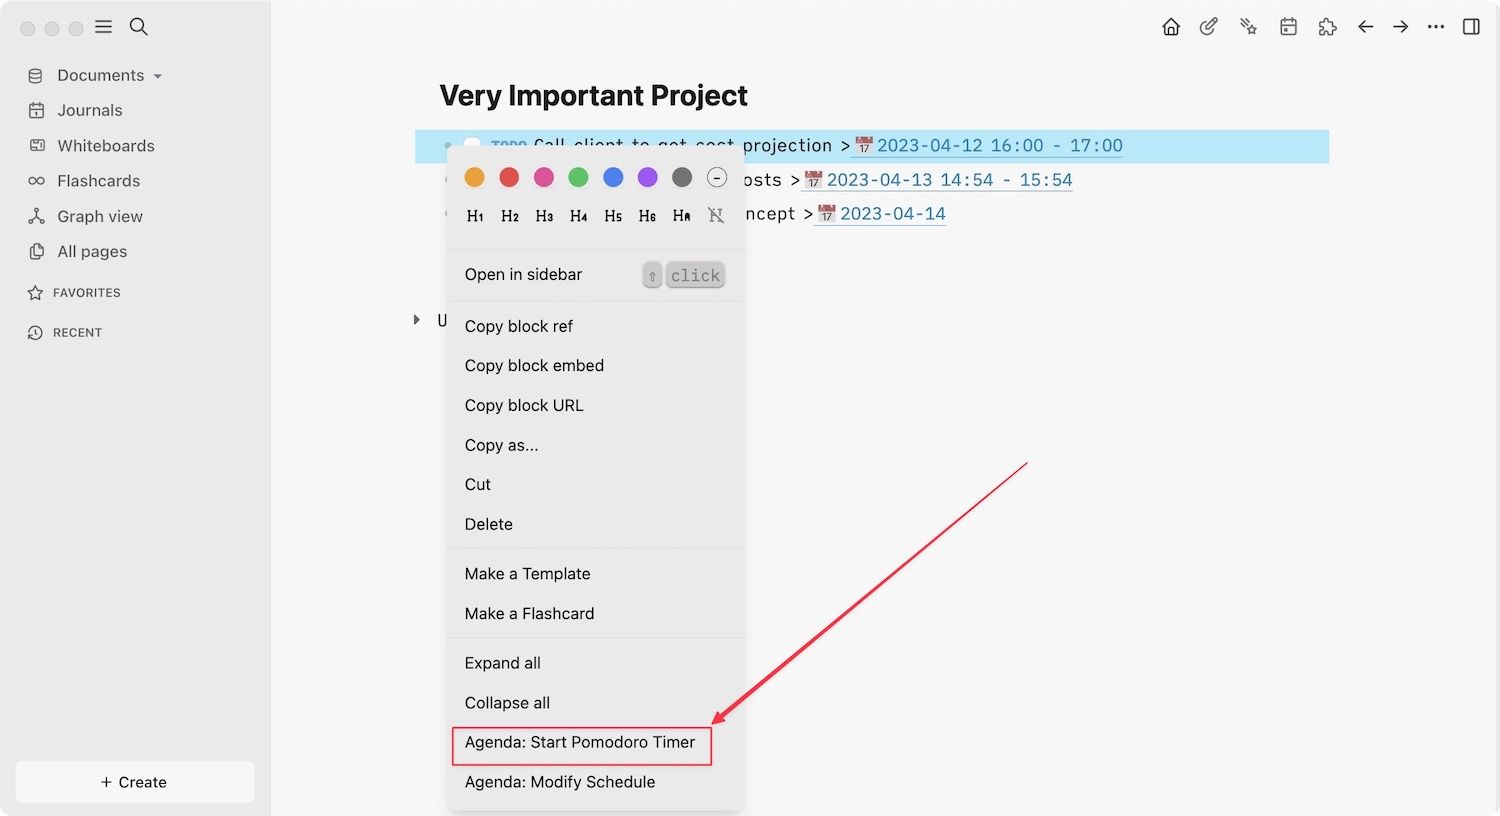
1. To start the Pomodoro timer, right-click on the task you want to start and choose the Agenda: Start Pomodoro Timer option.
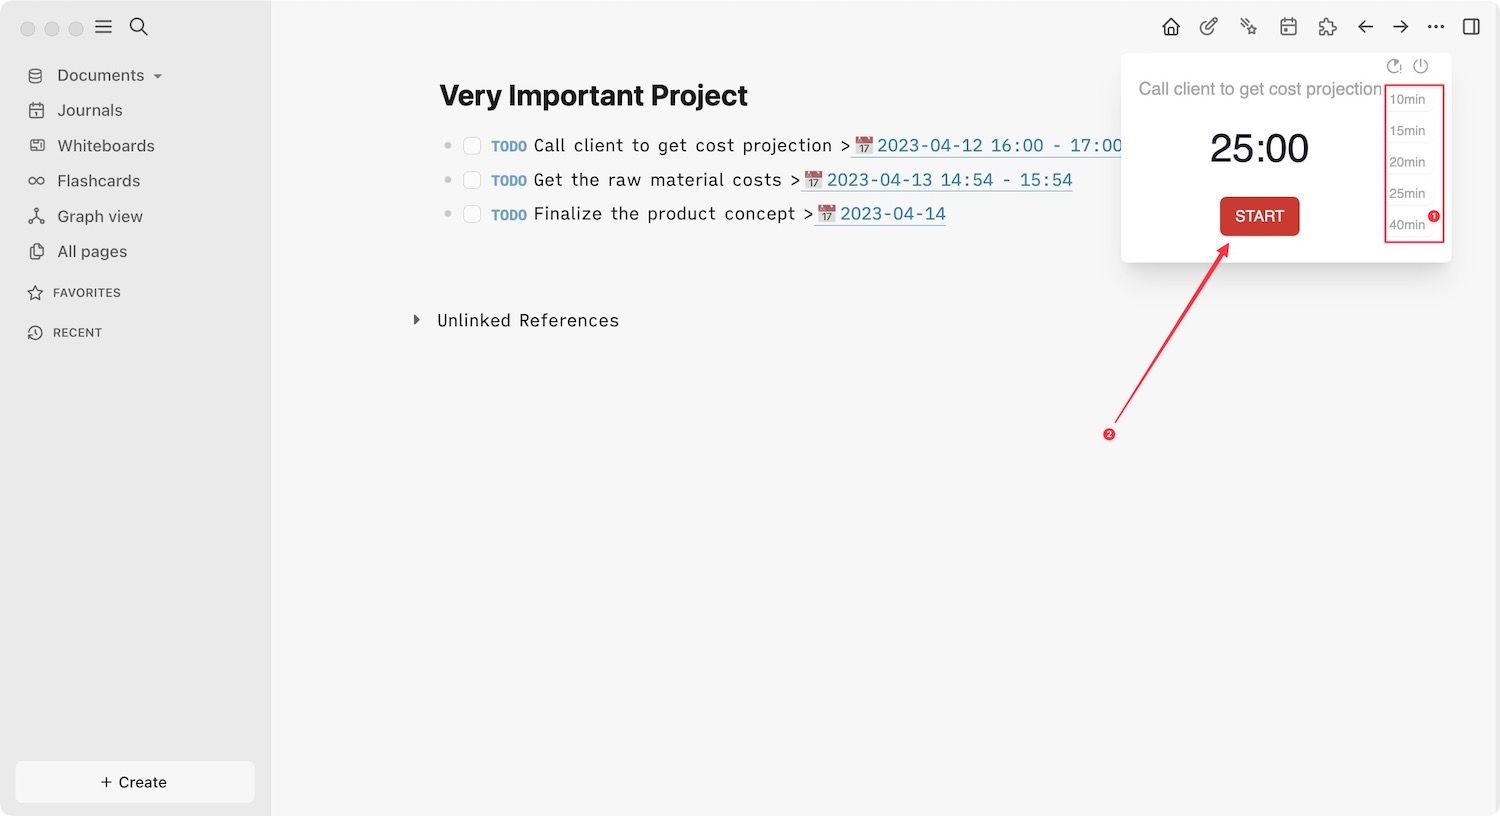
2. You will see a popup Pomodoro timer with the task as its name. Choose the estimated time and click the Start button to start the task.
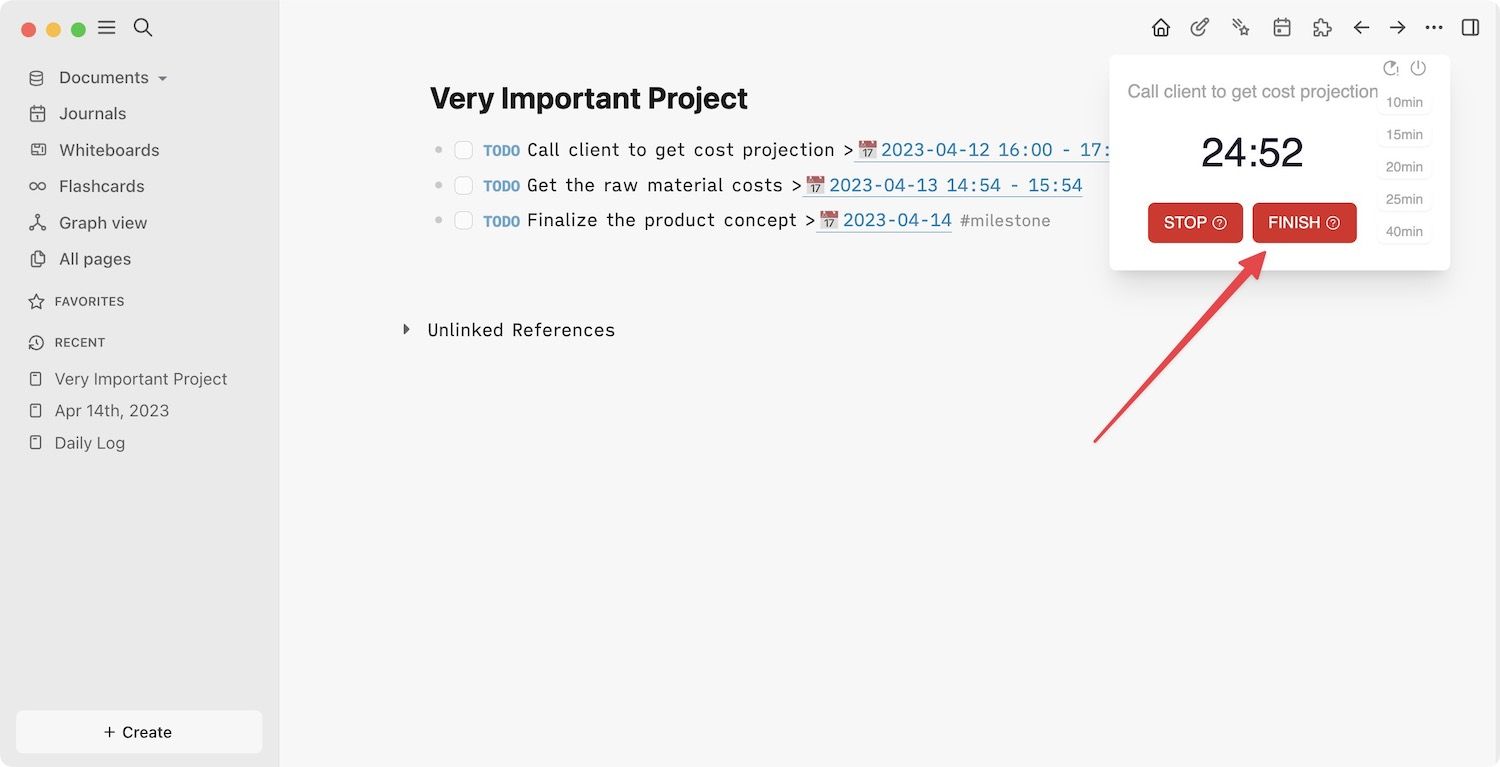
3. The timer will start counting down. Click the Finish button when you complete the task to log it. Use the Stop button to stop without logging the time. If you log the time, it will appear next to the task.
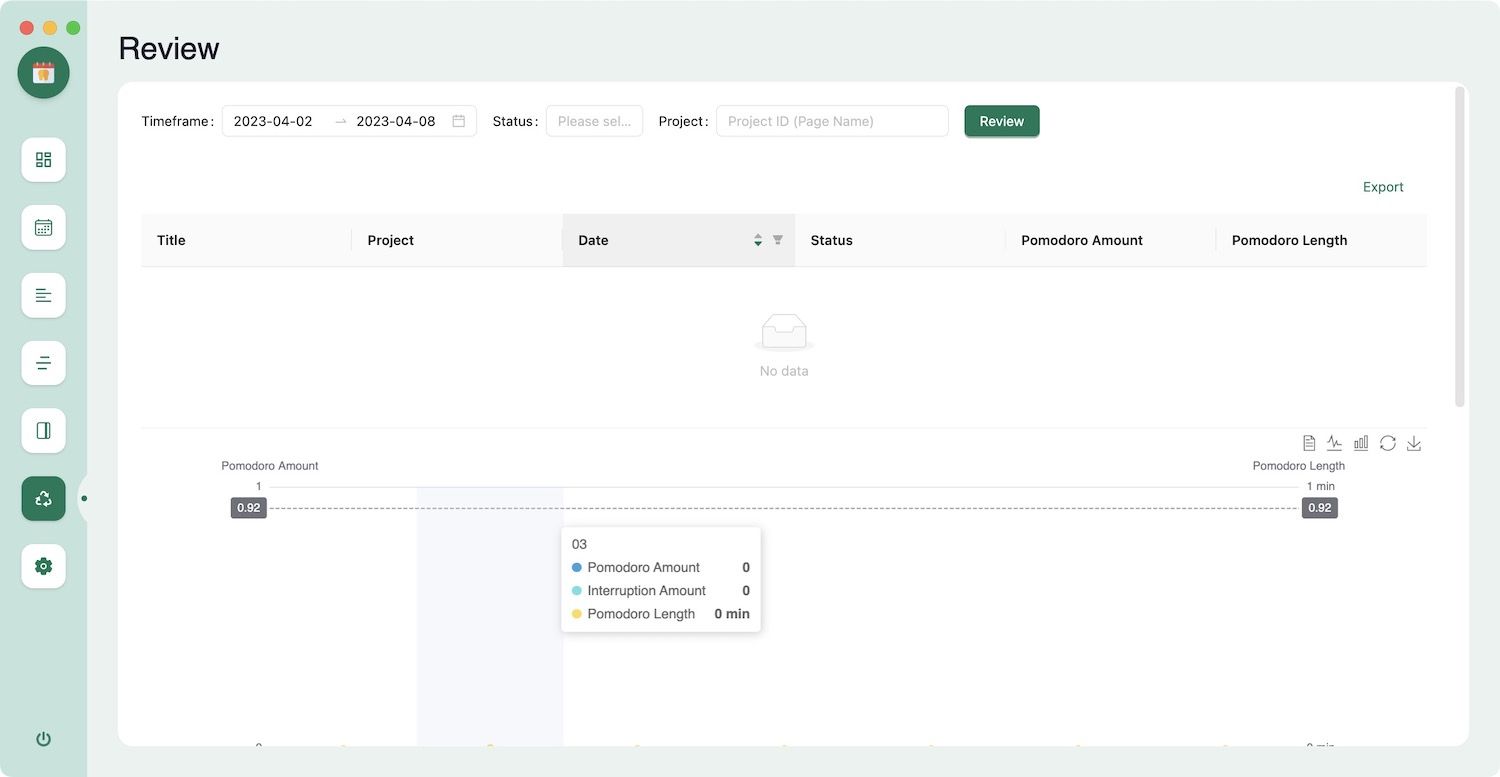
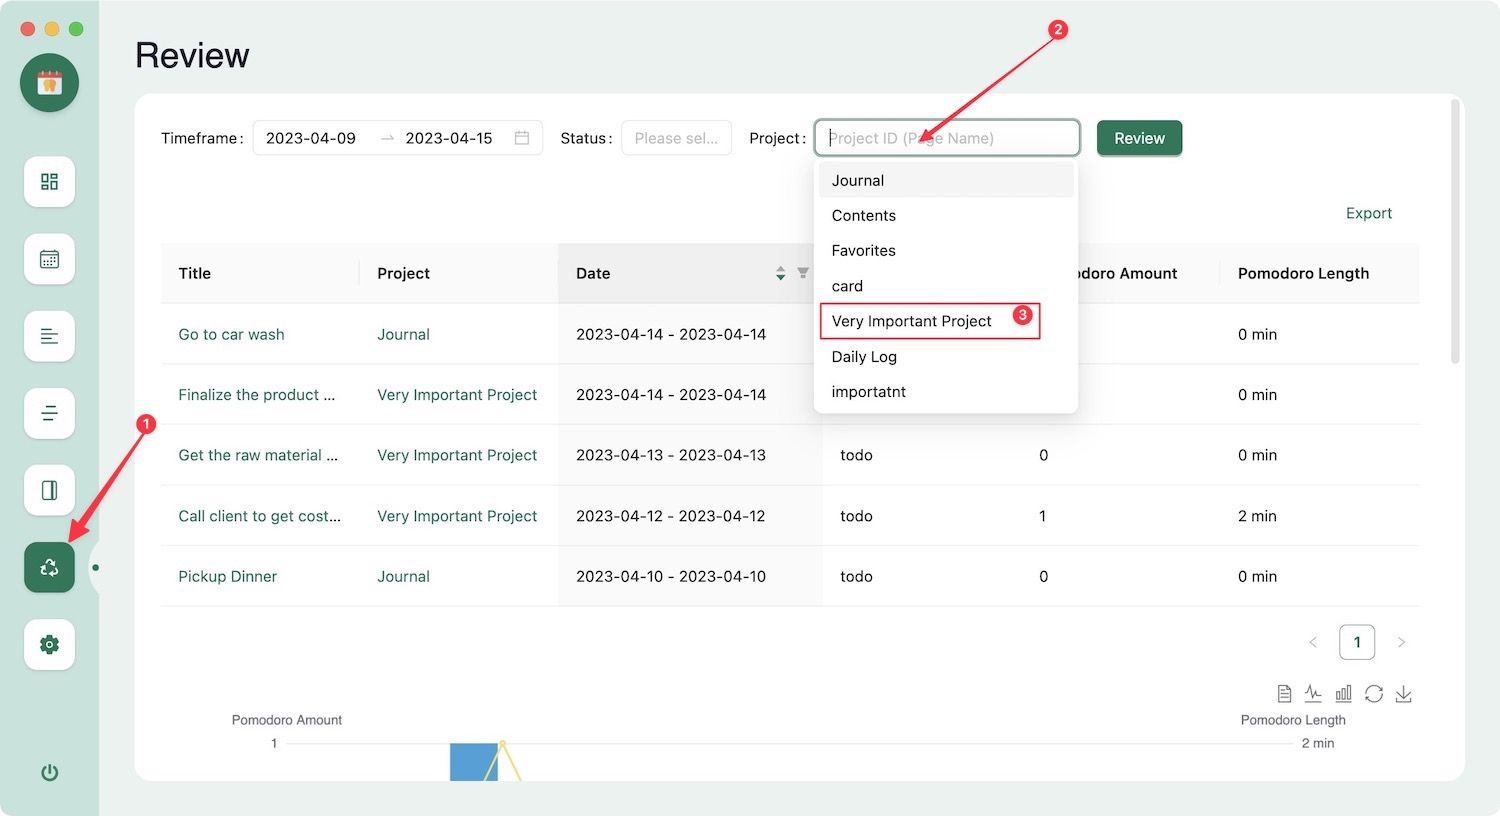
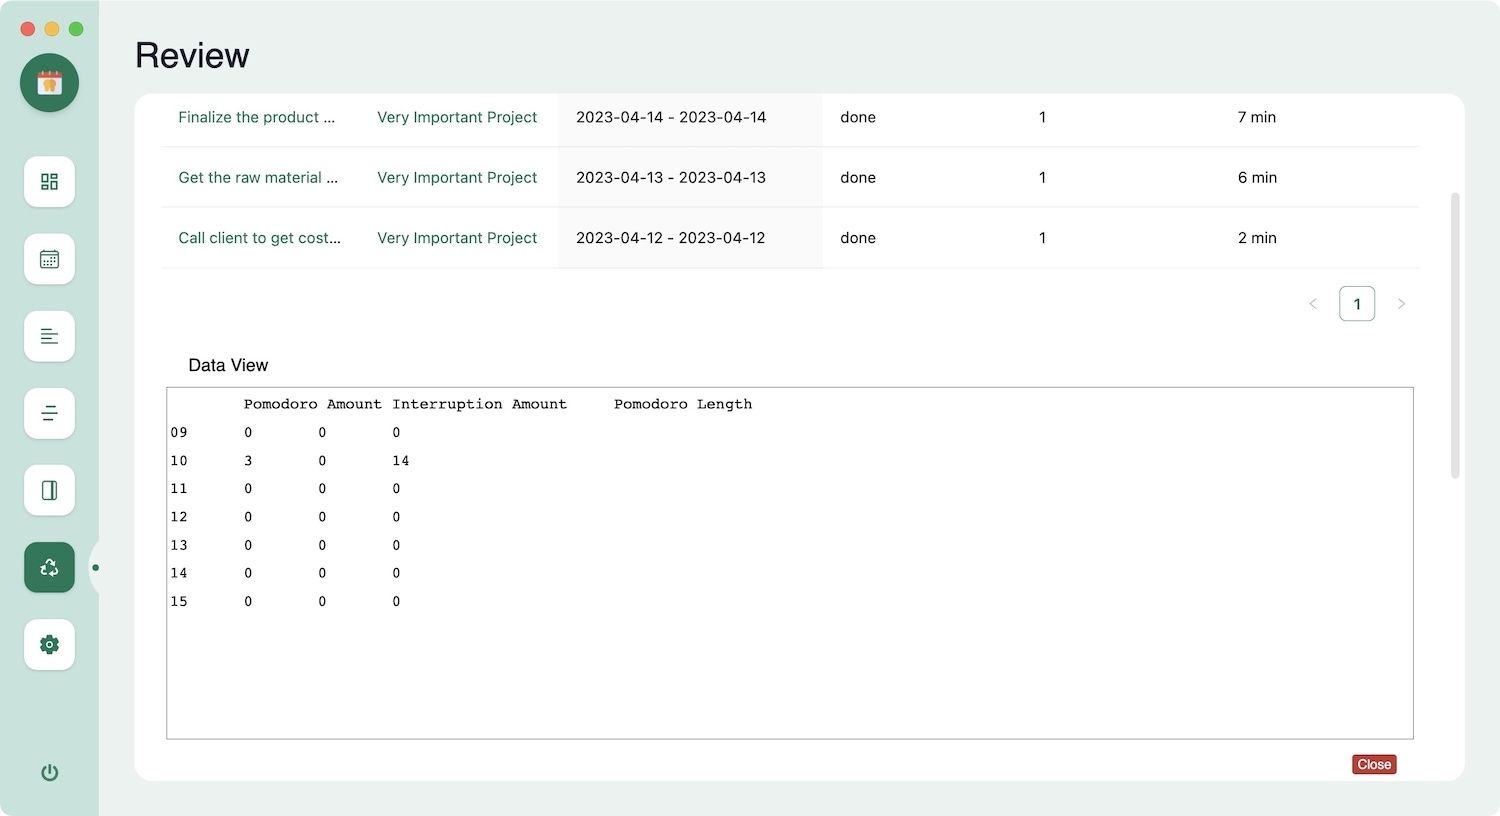
4. To check your logged time, open Agenda and select the Review tab. Use the Project field to choose your project.
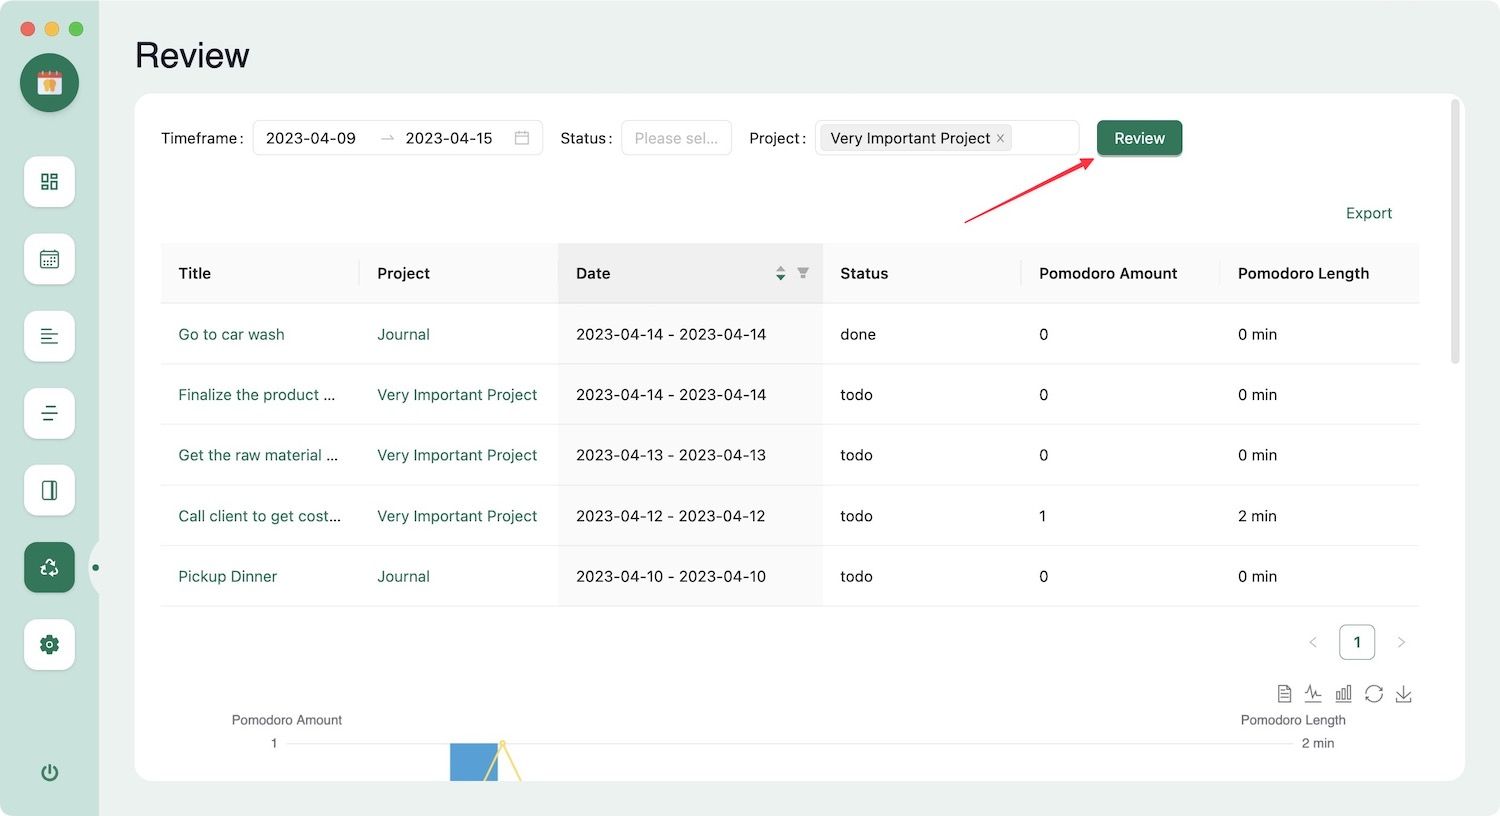
5. Now, click the Review button.
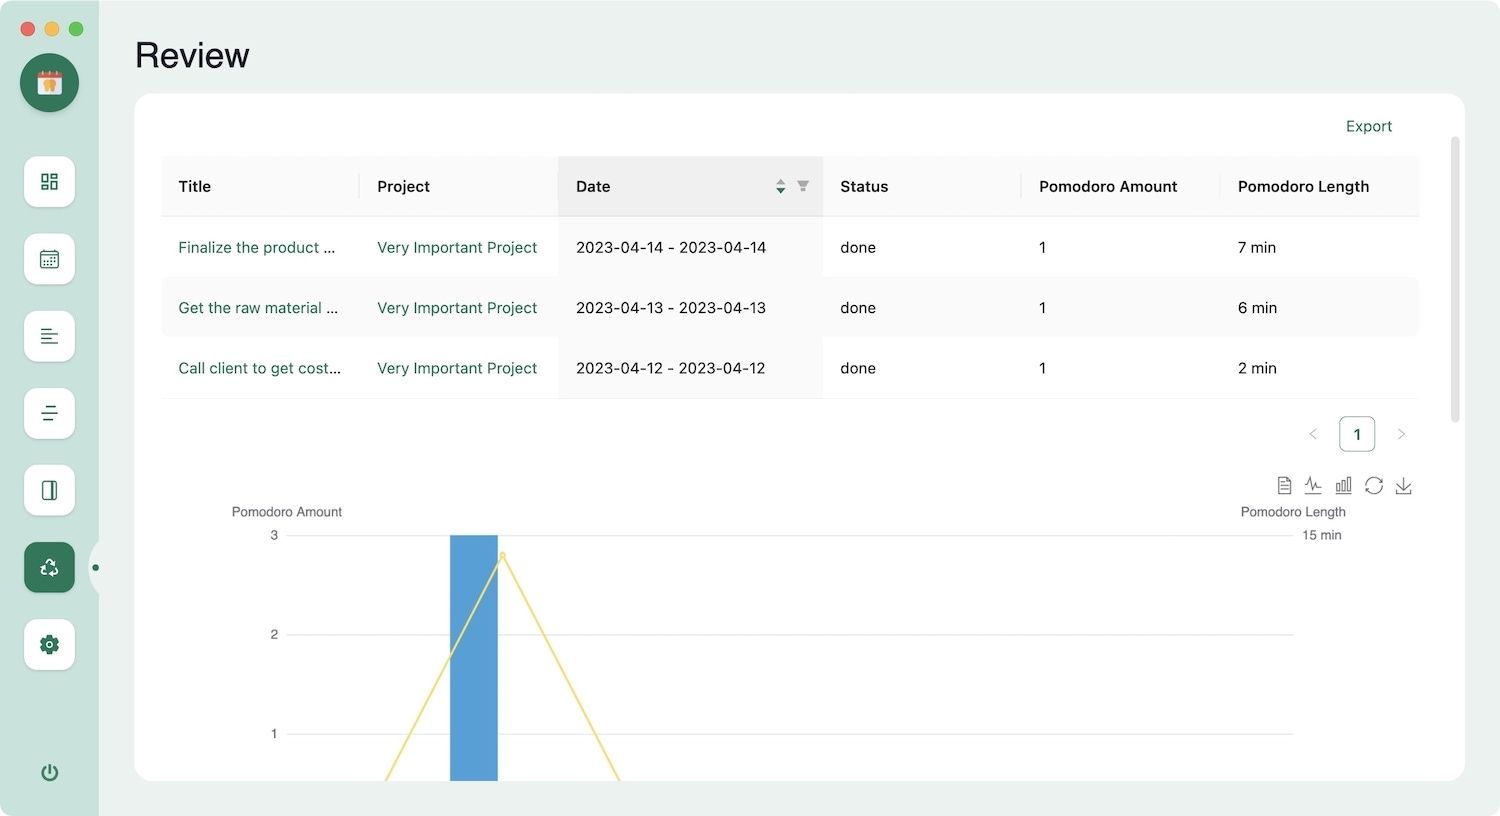
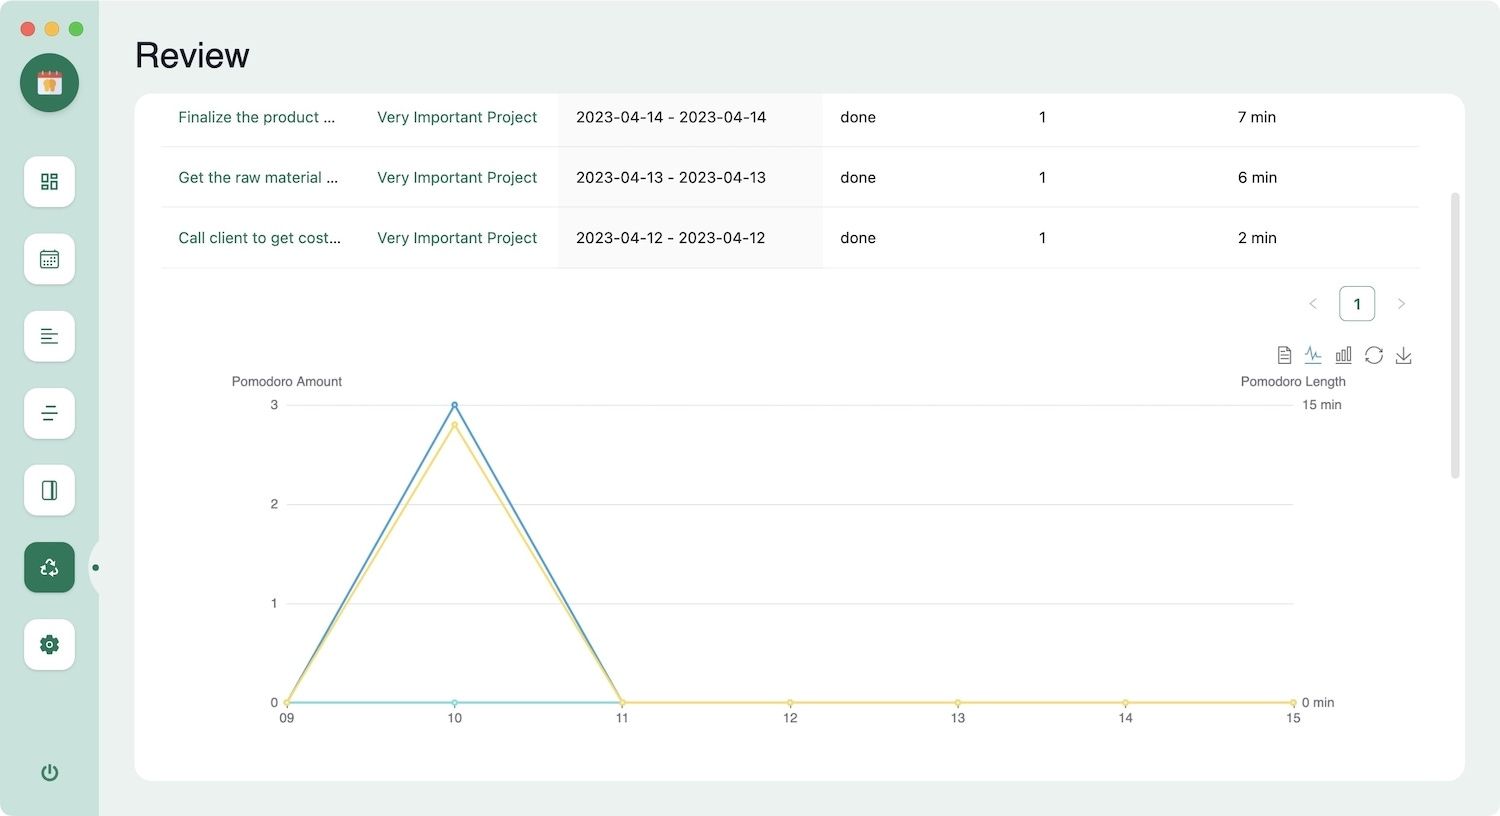
6. You can see in the screenshot below that Agenda has recorded the time. You can change the view into data, bar graph, or line graph, and see the data however you want.
You can use the Pomodoro timers to track time spent on tasks added to daily notes. The steps to start and record time are the same. When you want to see the logged time, choose the Journal project, and you will see the logged time spent on tasks added to your daily notes.
Import events from Google and iCloud calendars in Logseq
While we would love to have all our tasks inside Logseq, if you work with other people, chances are that most of your work projects live on your Google or iCloud calendar. The good news is that the Agenda plugin lets you import events from Google and iCloud calendars, thus allowing you to see all your tasks in one place.
Integrate Google Calendar with Logseq
The only way to integrate Google Calendar (or Apple Calendar) is to create a public copy of the calendar. Converting your calendar to a public calendar means anyone with your calendar link can access it online. You should read the implication of making a Google calendar public, before proceeding with the steps below.
1. Open the Arc browser (or the browser you use) on your computer and visit the Google Calendar website. Log in with your account details if you have not already done so.
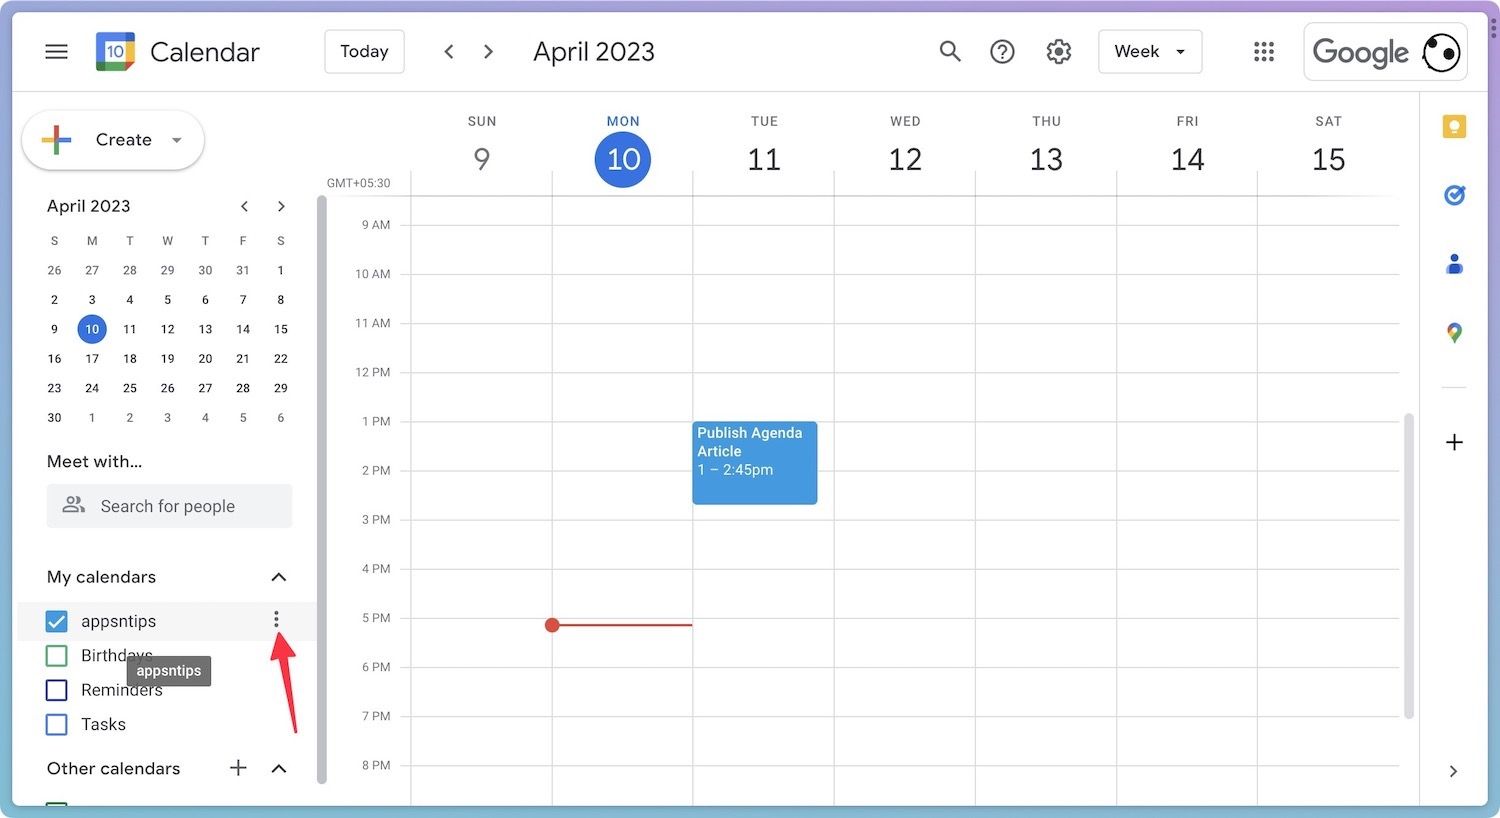
2. Click on My Calendars to see a list of your calendars, and click the three-dot menu next to the calendar you want to integrate with Logseq.

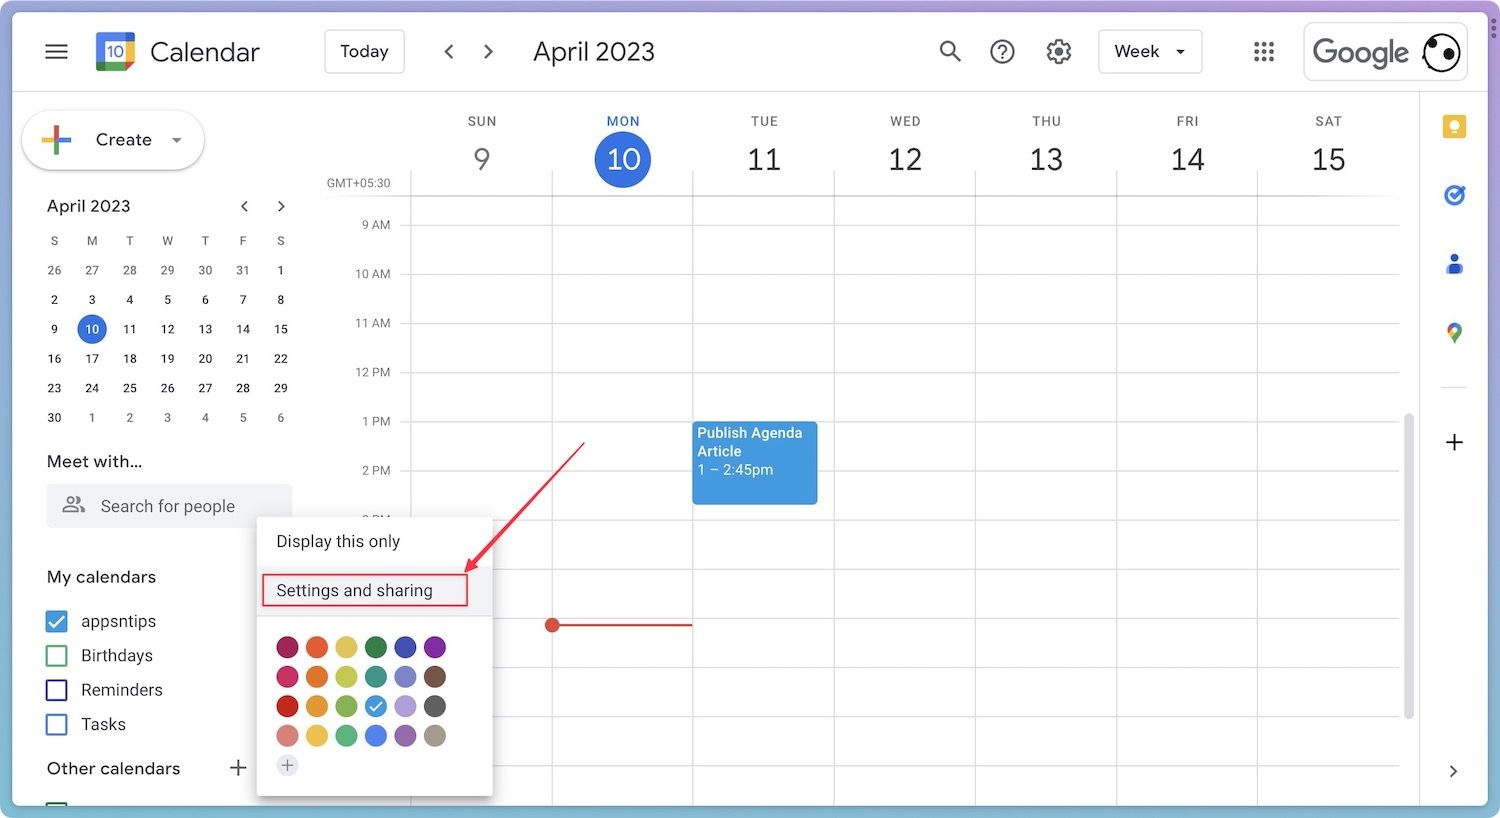
3. Choose the Settings and sharing option.
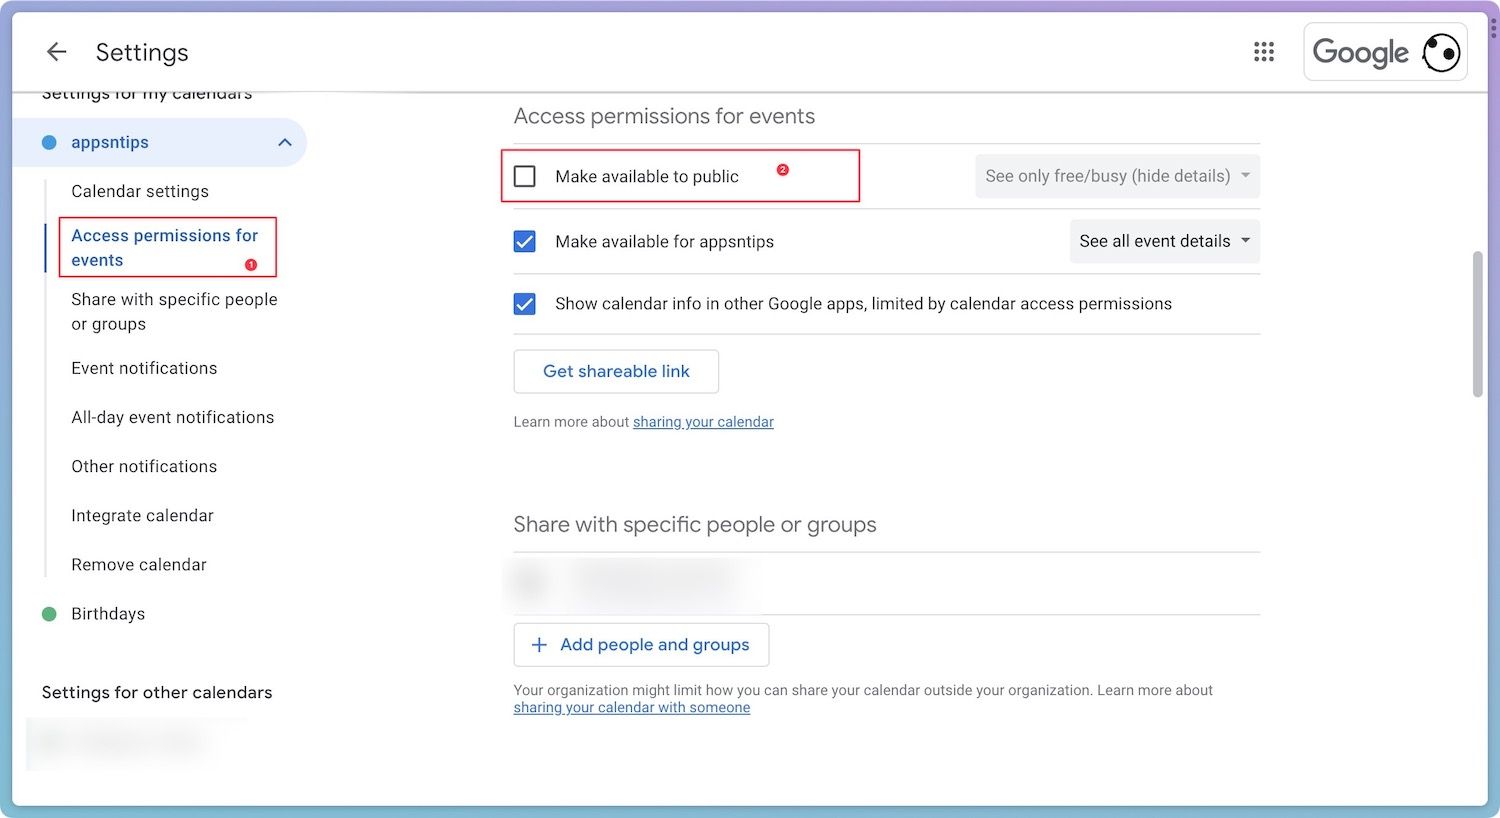
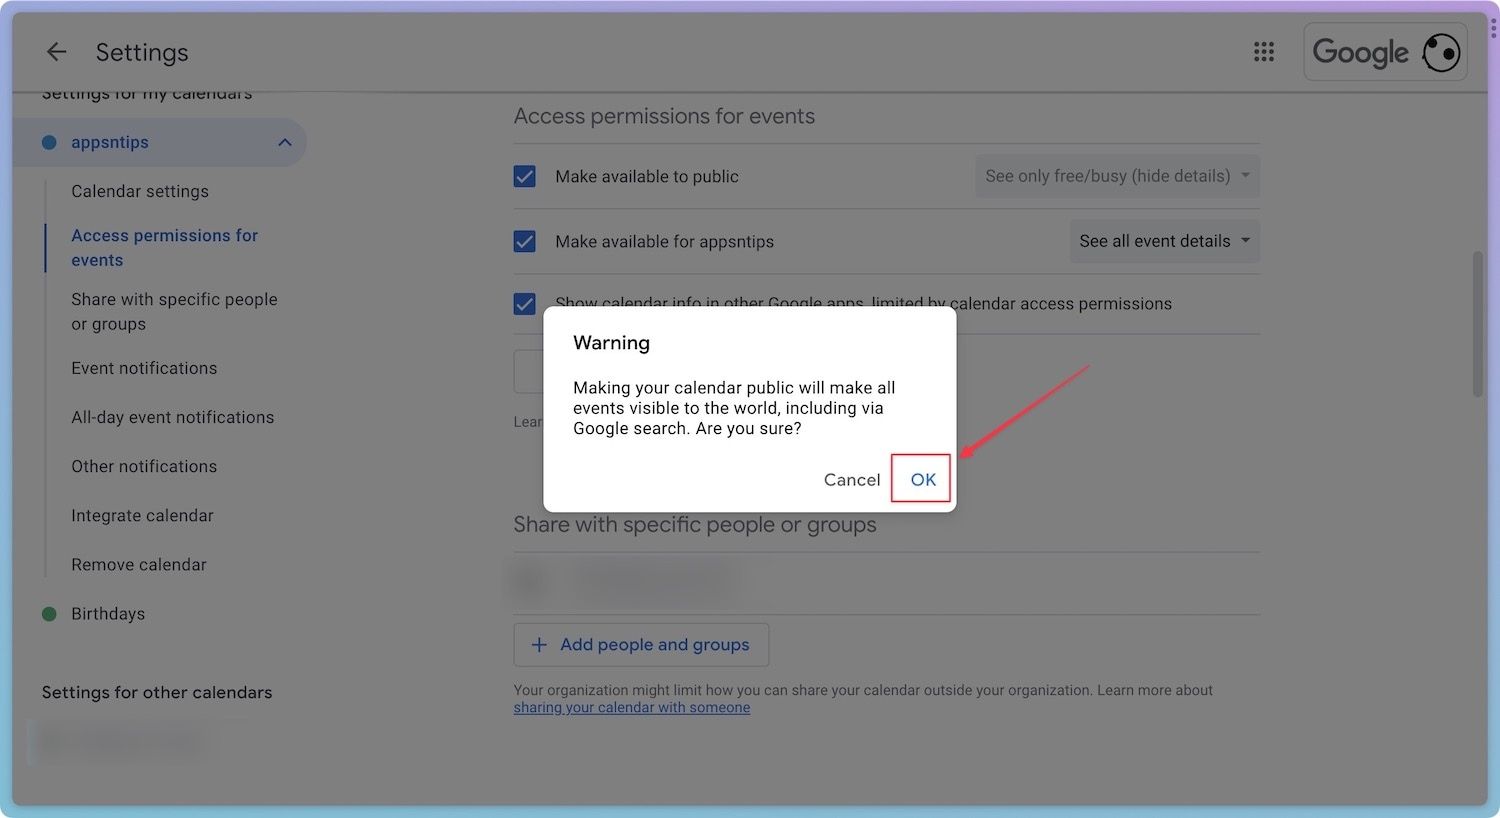
4. Select the Access permission for events option in the menu and enable the checkbox for Make available to public. Click OK in the popup menu to confirm.
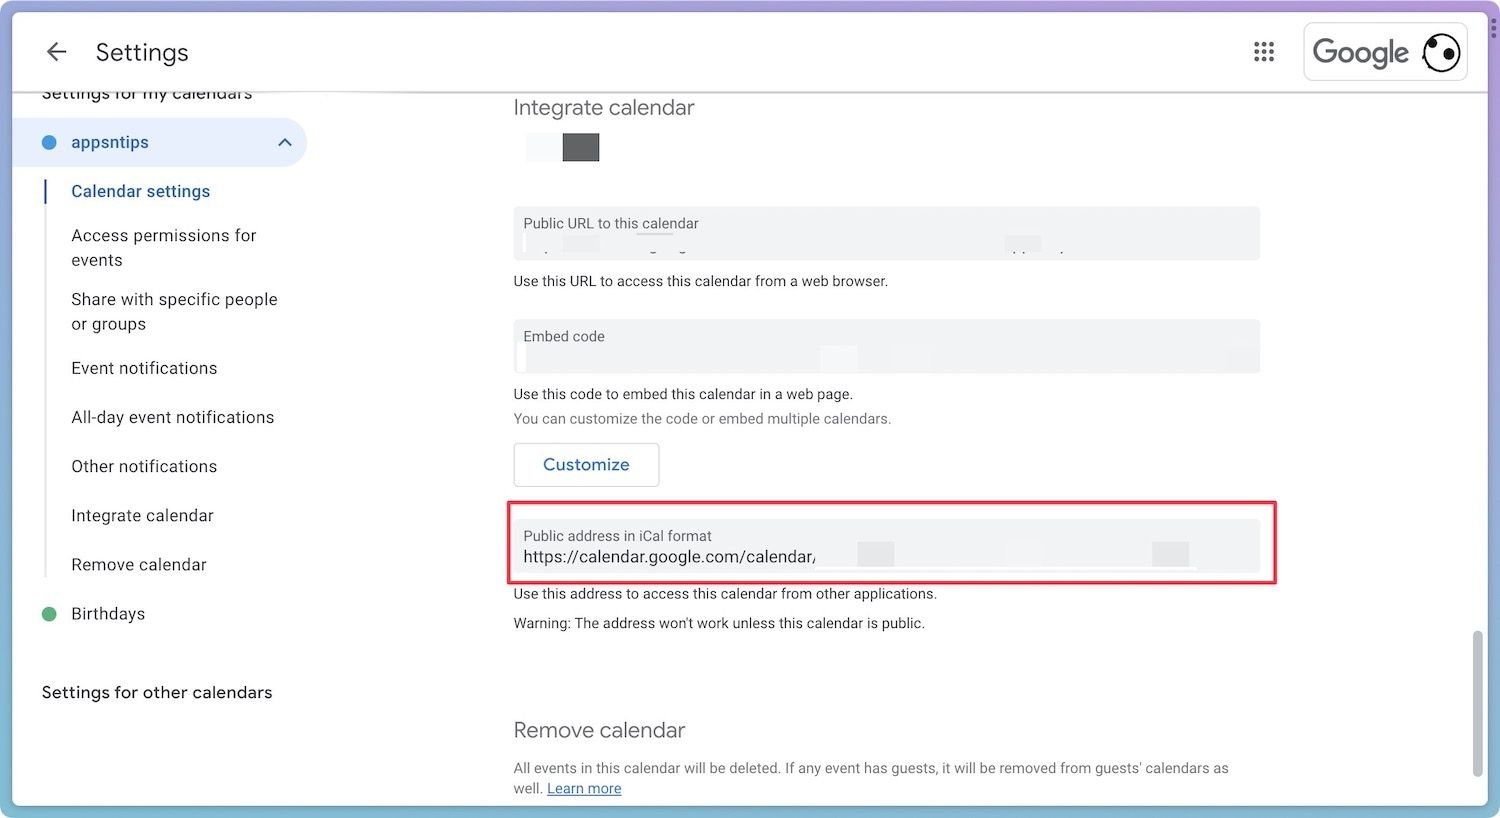
5. Now scroll down to find the Public address in iCal format and copy the URL.
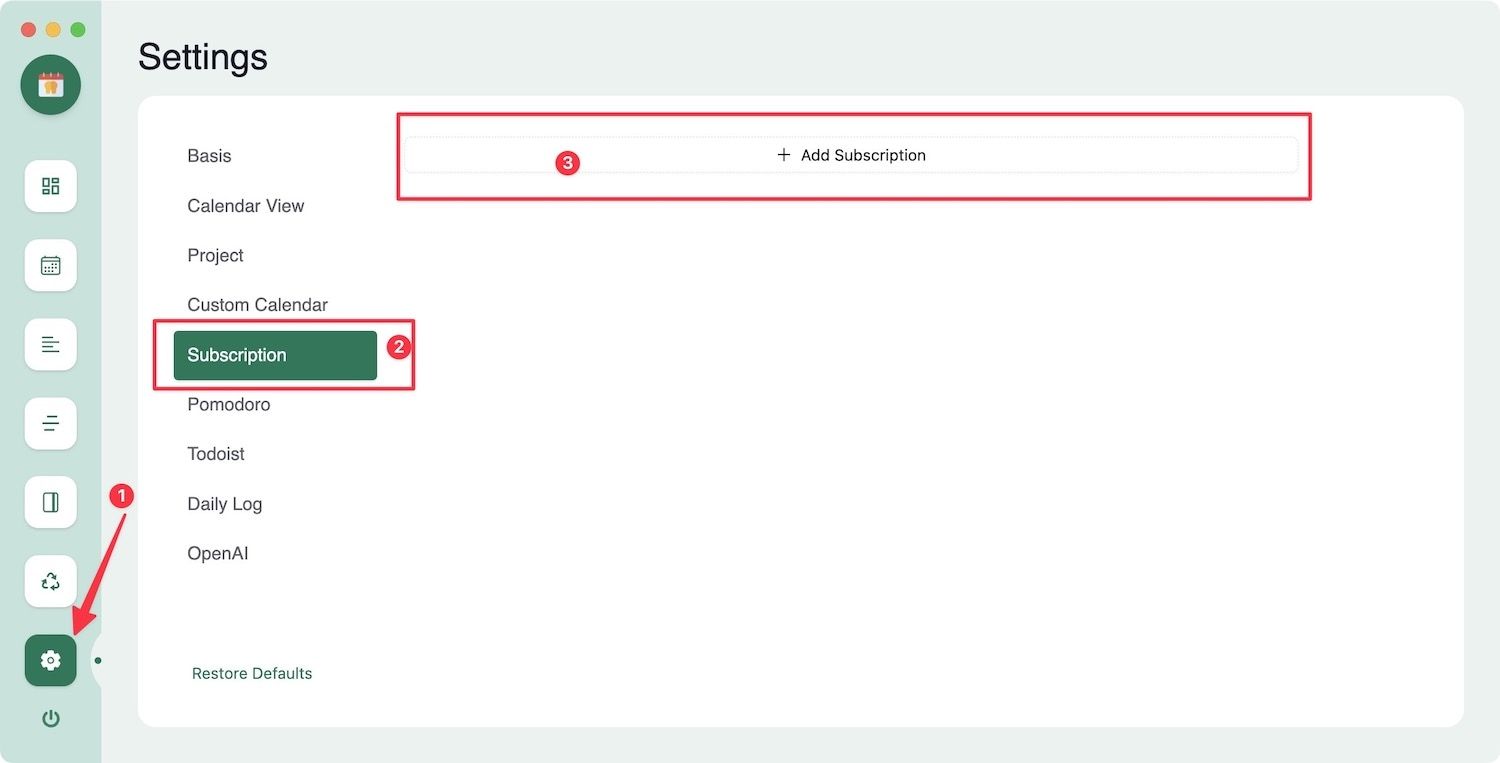
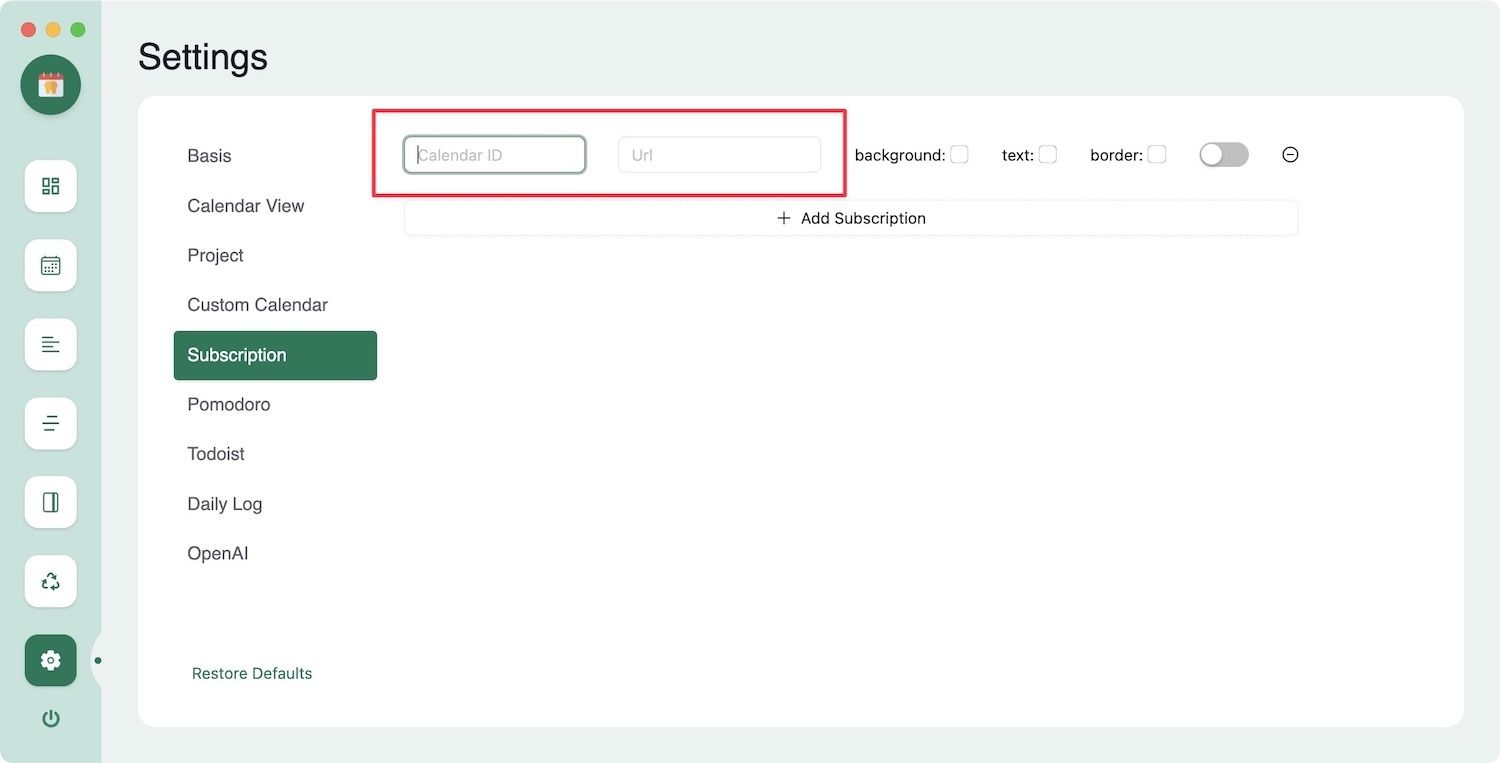
6. Open Agenda in Logseq and choose the Settings option. Now, select the Subscription option and click the Add Subscription button.
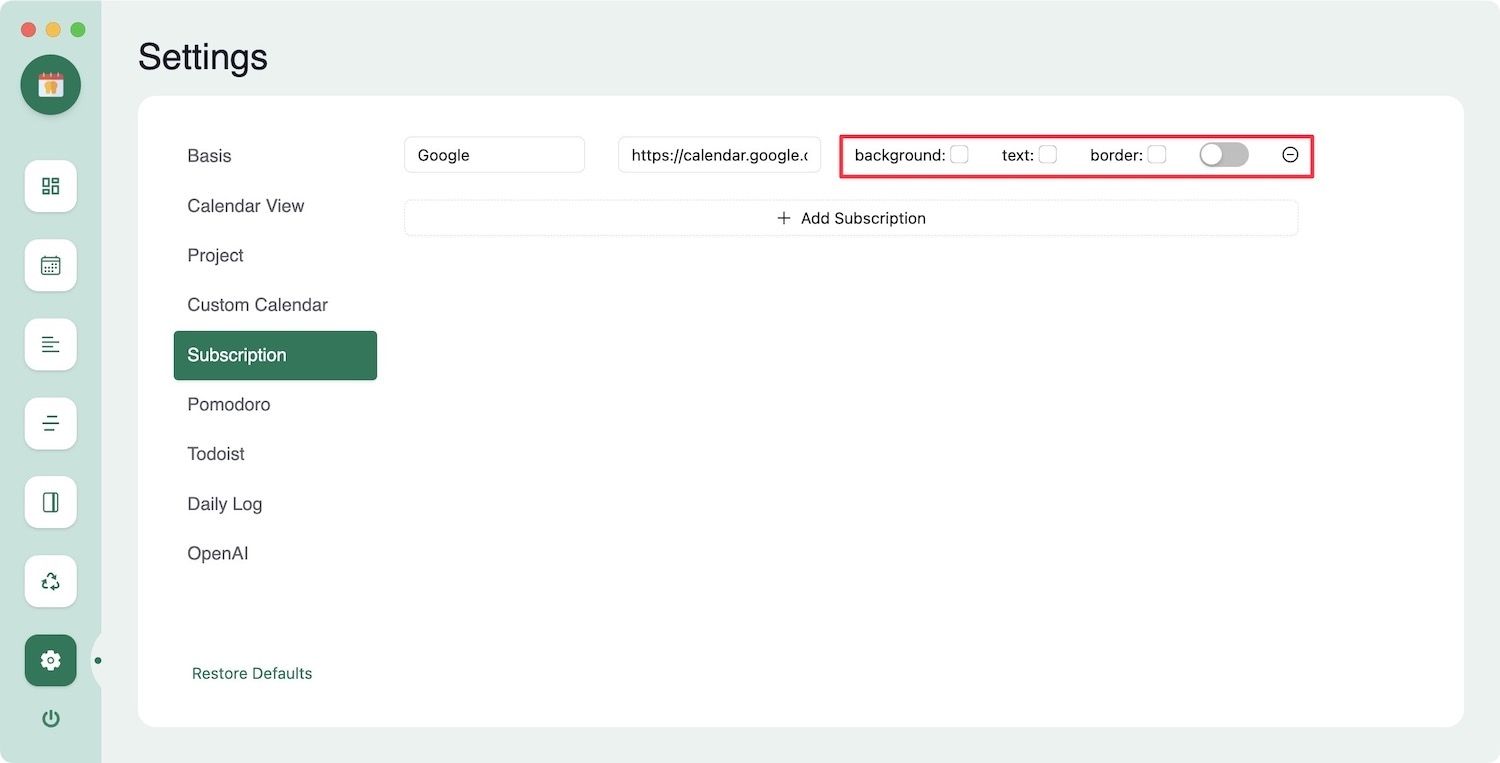
7. Enter the name in the Calendar ID field and paste the URL you copied in the URL field.
8. Customize the colors and enable the toggle to your Google Calendar events in Logseq.
9. Now open the calendar view to see your Google calendar events in Agenda.

As you will notice that our event details are not visible, it’s because we are using a work account and need the administrator's permission to create a calendar with visible event details. If you are using a work account, ask your account admin to enable these features. For personal Gmail accounts, you don’t need any such permissions.
See iCloud calendar events in Logseq using Agenda
Here are the steps to display iCloud calendar events in Logseq, using the Agenda plugin.
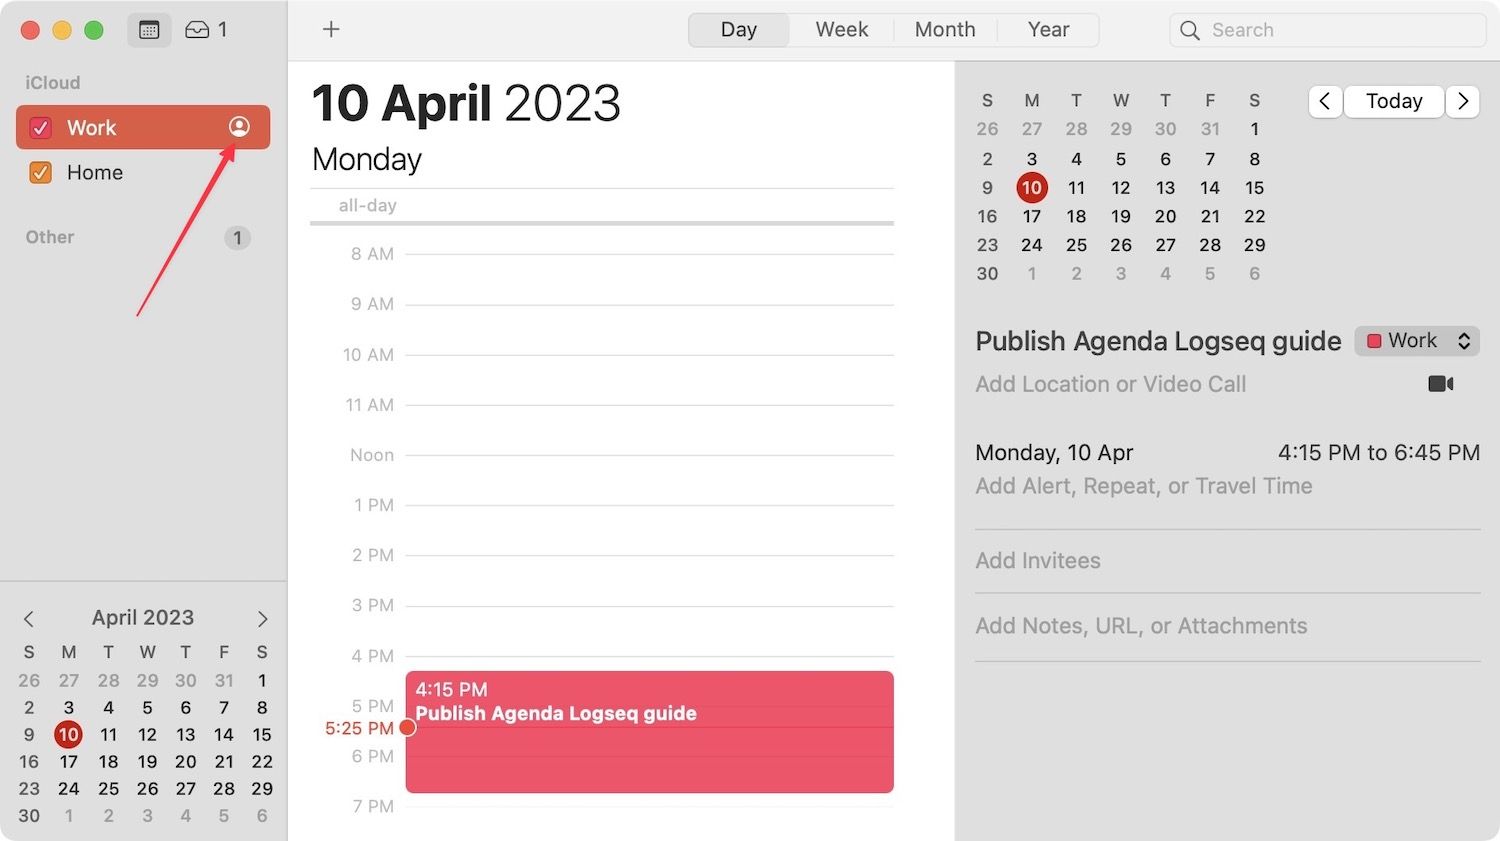
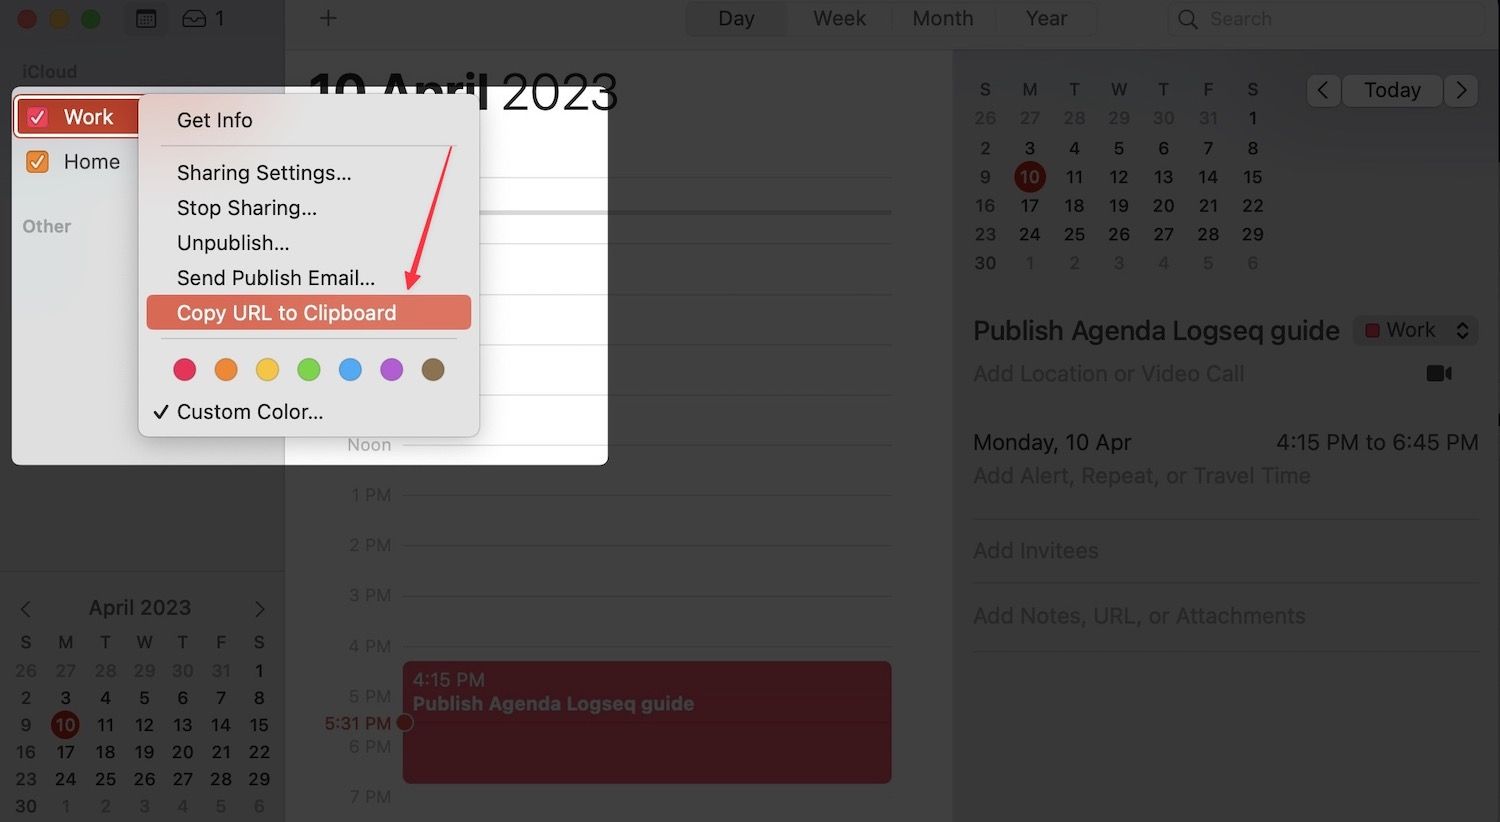
1. Launch the calendar app on your Mac and click on a calendar to reveal the Share button. Now, click the share icon.
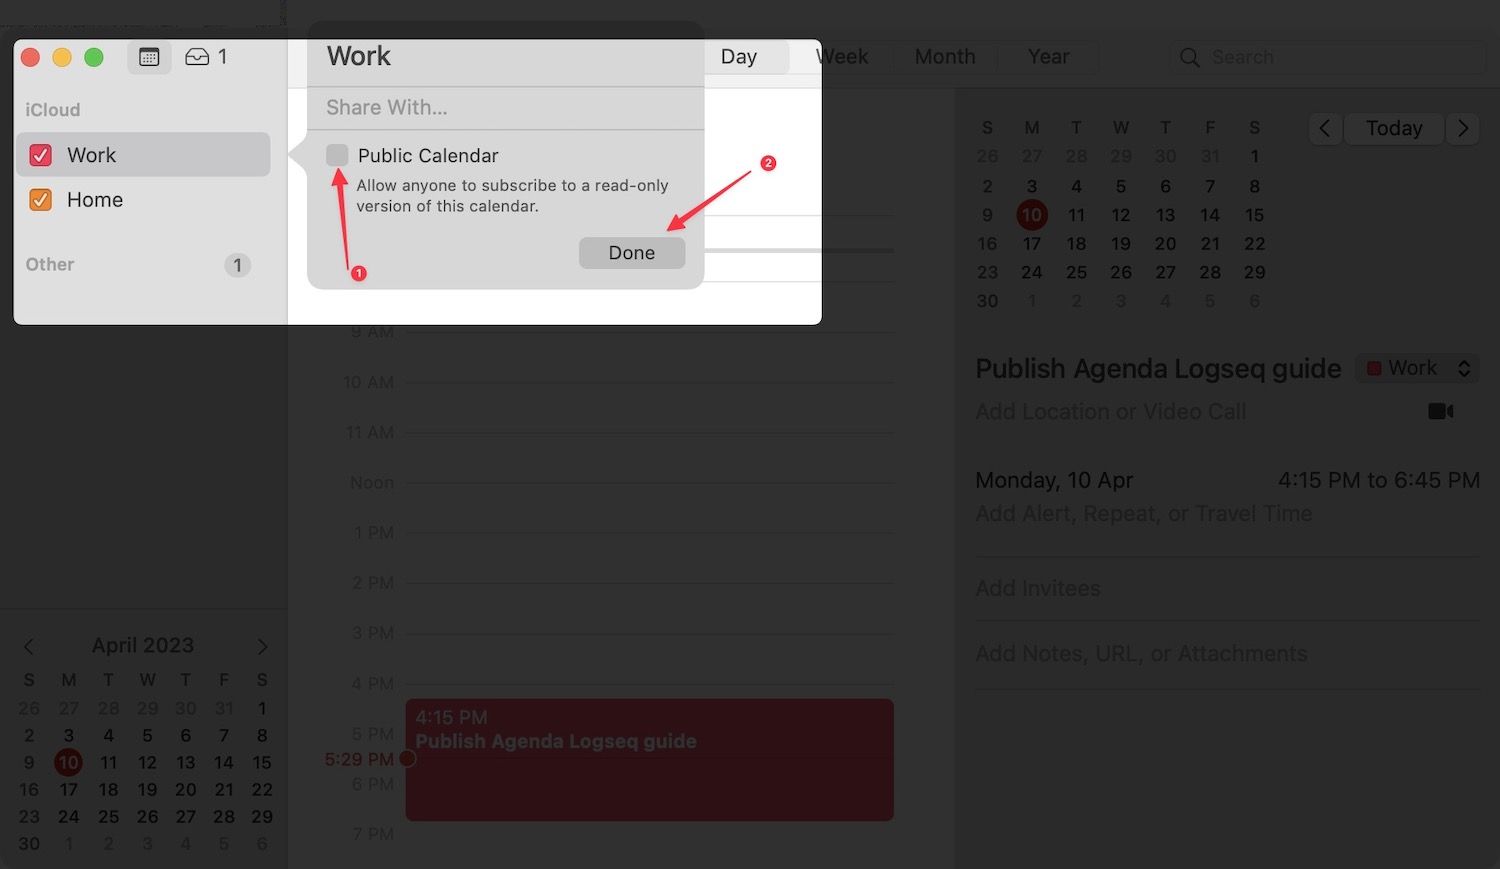
2. Enable the checkbox next to Public Calendar option. Click the Done button to save changes.
3. Right-click on the calendar and choose the copy URL to Clipboard to copy the link.
4. The steps to add the iCloud calendar to Agenda are the same. Go to Agenda → Settings → Subscription → Add Subscription, and paste the calendar URL you copied.
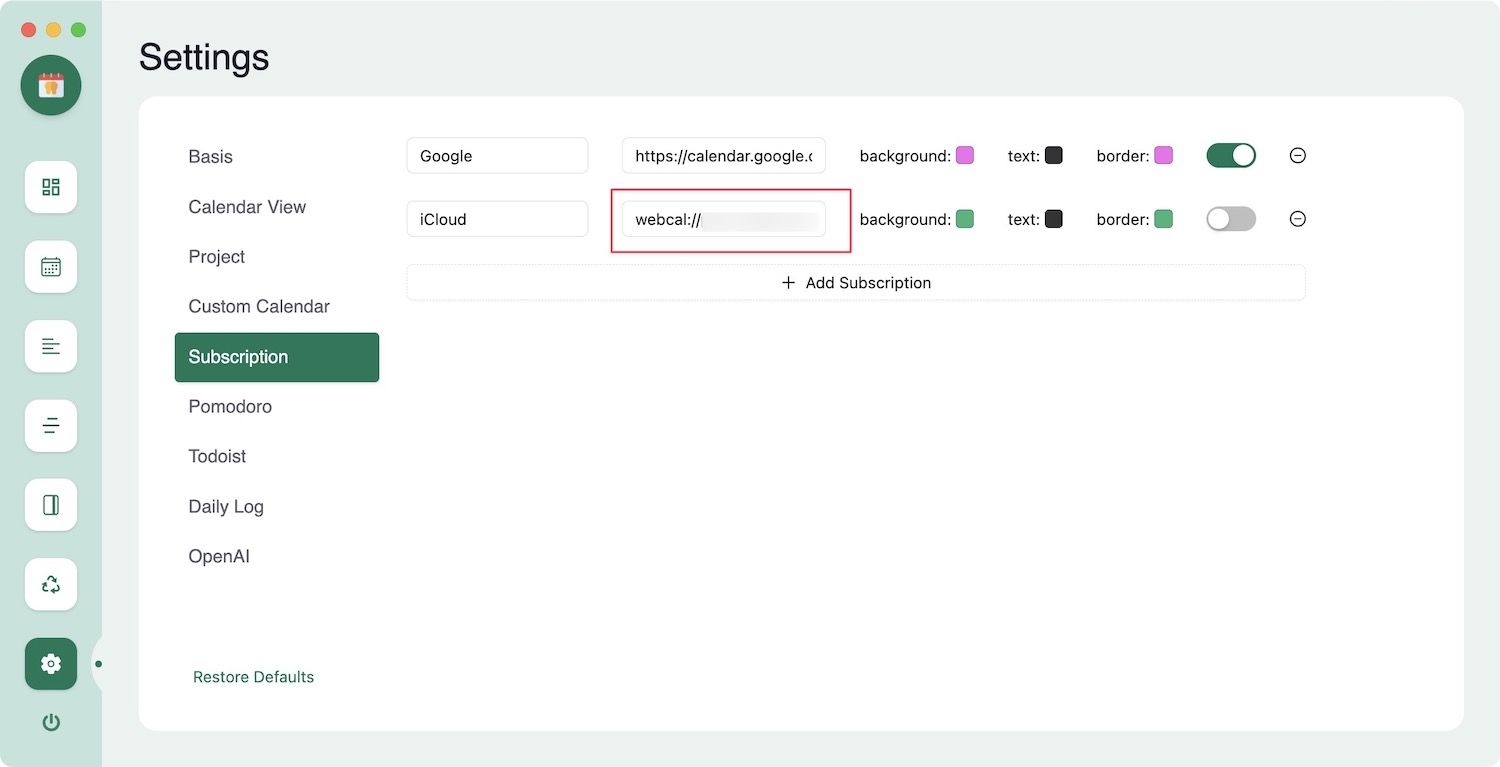
5. Once you paste the link, you will see an error. To solve this error, replace webcal with https as shown in the screenshot below. Now it will work without issues.
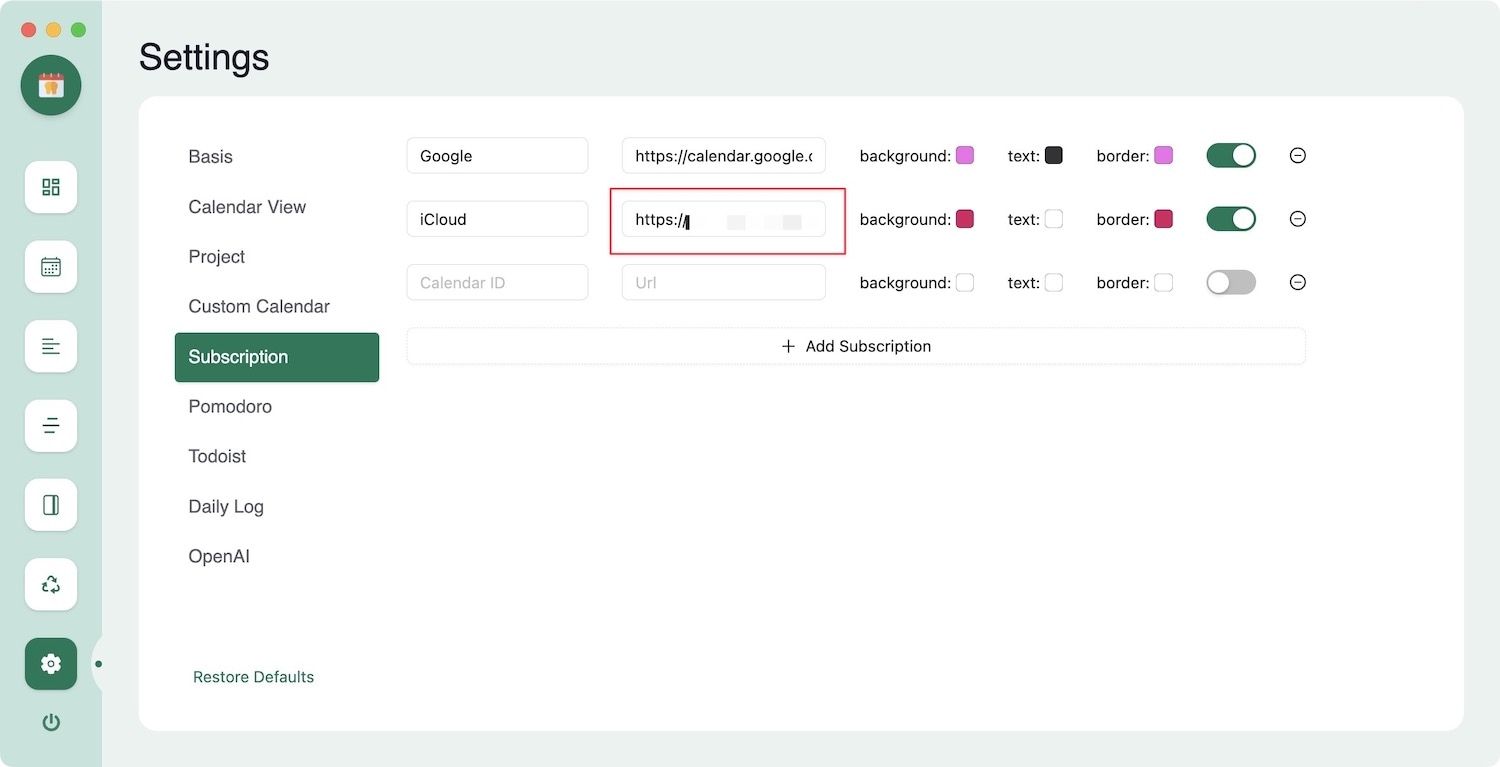
As you can see, our iCloud calendar events are now showing up in the Logseq Agenda calendar.

Logseq Agenda plugin: final thoughts
The Logseq Agenda plugin is an all-stop solution for managing tasks and projects inside Logseq. We have covered most of its prominent features in this guide so you can use it to its full potential. We love the Agenda plugin as it lets us put our tasks on the calendar for better planning. You can also track time spent on specific tasks or projects to get a holistic idea of productivity.
If you have any questions regarding this plugin, ask them in the comments below, and we will answer them. If you liked this guide, consider supporting us by buying us a coffee or sharing the article on social so it can reach even more people.


