Apple Reminders Guide: The Best Task Management App You Are Not Using
In our Apple Reminders guide, you will learn about the different types of reminders, different methods to create reminders, manage and organize reminders, share reminders, and some tips and tricks that will take your Reminders use to the next level.
Apple Reminders app doesn’t get the attention it deserves in the task management community. Since Apple Reminders is a built-in app, most of us don’t give it a second thought and move on to more complex task management apps like Things 3 and OmniFocus. While those are excellent apps that offer more features, I think they are overkill for most users. Over the years, Apple has introduced several pro-user features to Apple Reminders that make it the best task management for most Apple users. I have reverted back to a combination of Reminders and Logseq - my note-taking app - to manage my tasks, and the system has been working pretty well for me. In this guide, I will show you how you can unleash the power of Reminders to manage your tasks with ease.
Apple Reminders guide: what will you learn?
The Apple Reminders guide will teach you everything you need to learn about the Apple Reminders app to use it effectively. You will learn about the different types of reminders, different methods to create reminders, manage and organize reminders, share reminders, and some tips and tricks that will take your Reminders use to the next level. While we recommend reading the entire article to get the best value, you can use the table of content below to navigate between the sections.
Table of content
Types of reminders
Apple Reminders app lets you add several different types of reminders. You can create reminders to notify you on set times or locations and even create repeating reminders. Here are the different types of reminders you can create in the Apple Reminders app. You will learn more about creating these reminders in the next section.
Time-based reminders
The most common type of reminder that you can create is time-based reminders. These are the reminders that notify you of a pending task at a set time. You can add these reminders to get reminded about tasks like meetings, calls, shopping lists, etc.
Location-based reminders
Apple Reminders app also lets you set location as a trigger. You can set location triggers for your home and office addresses, a shopping center, when entering and exiting an Apple CarPlay paired car and more. These reminders are helpful when you want to get reminded about things when you reach a specific location. For example, you can set a reminder to notify you to buy eggs when you go to your local shop or notify you to message your partner when you leave from office, and so on.
Message-based reminders
One of the most useful reminders is the message-based reminder. You can ask Reminders to notify you when you are messaging with any specific contact on your phone. If you want to be reminded about something the next time you are chatting with someone, you can use this type of reminder.
Repeating reminders
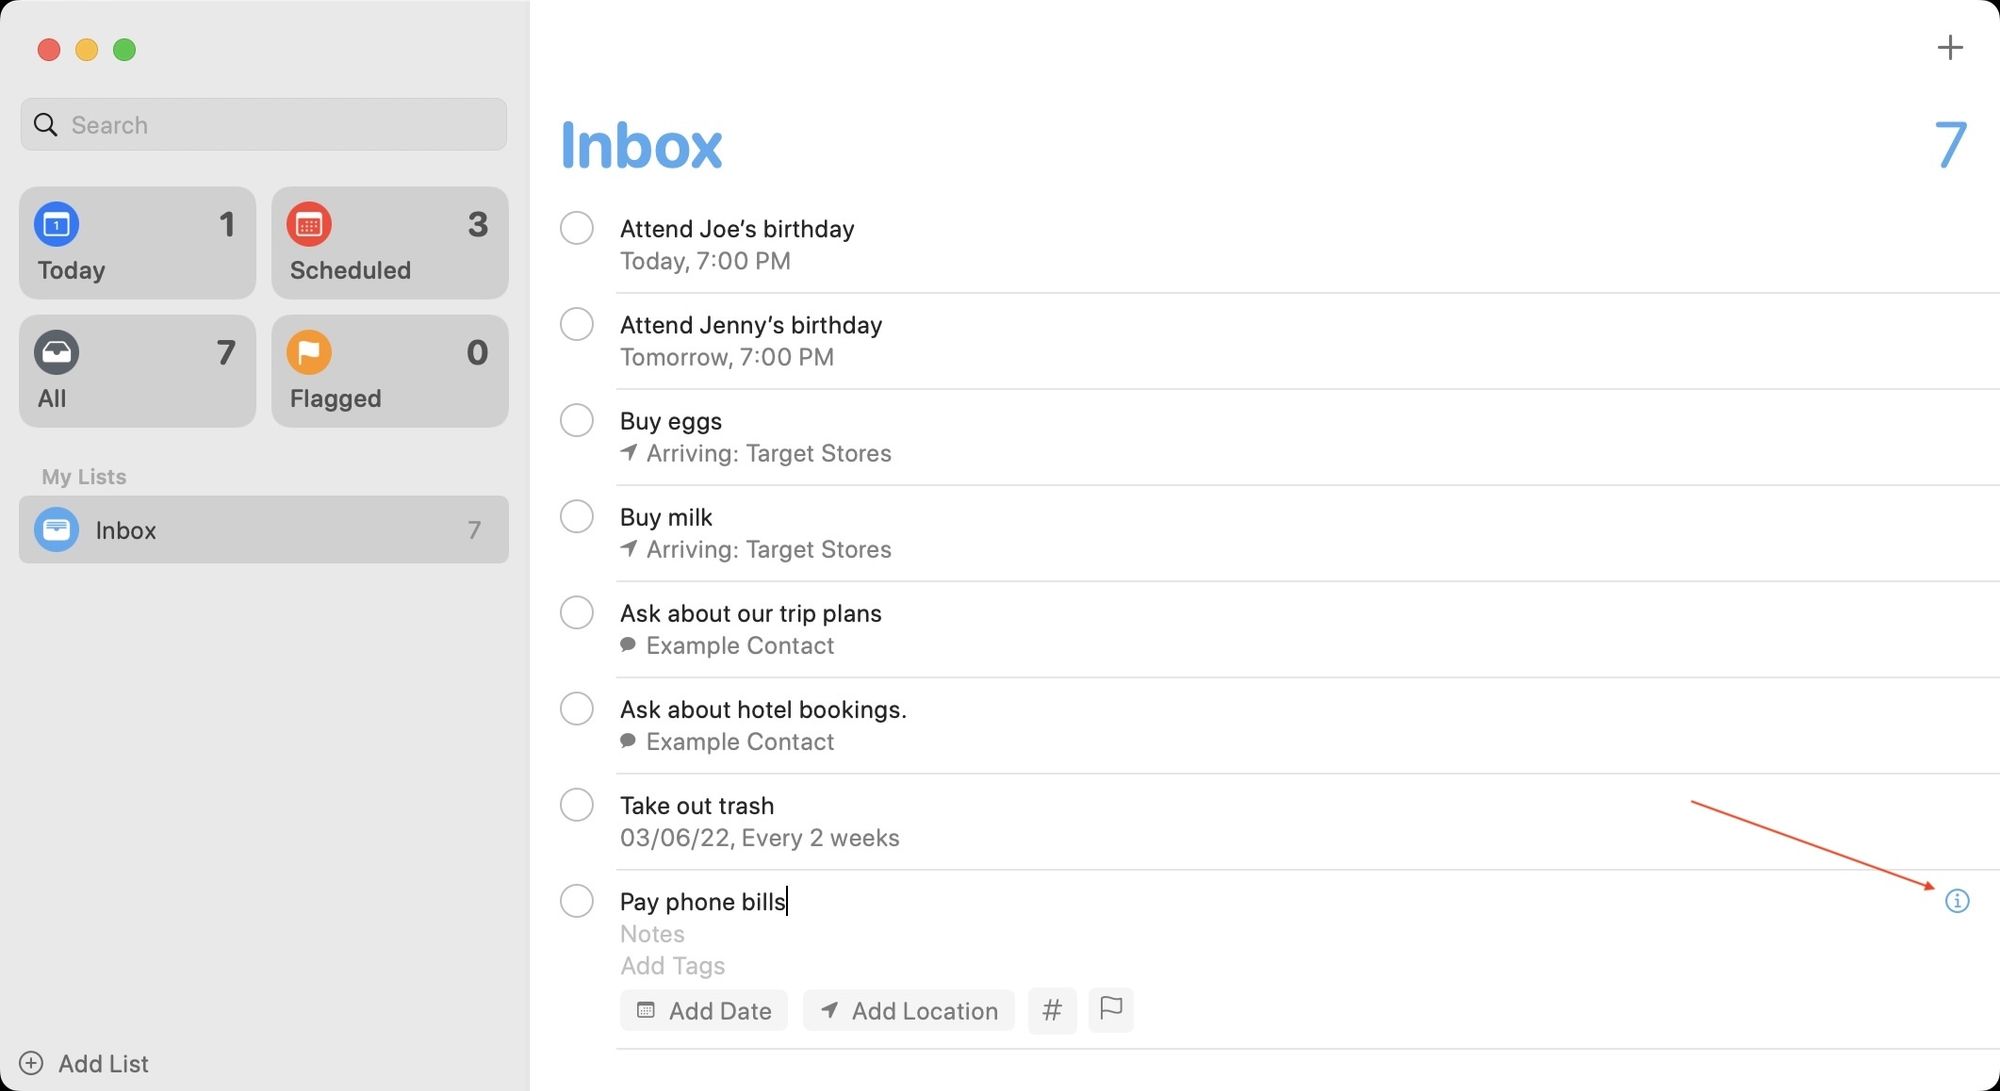
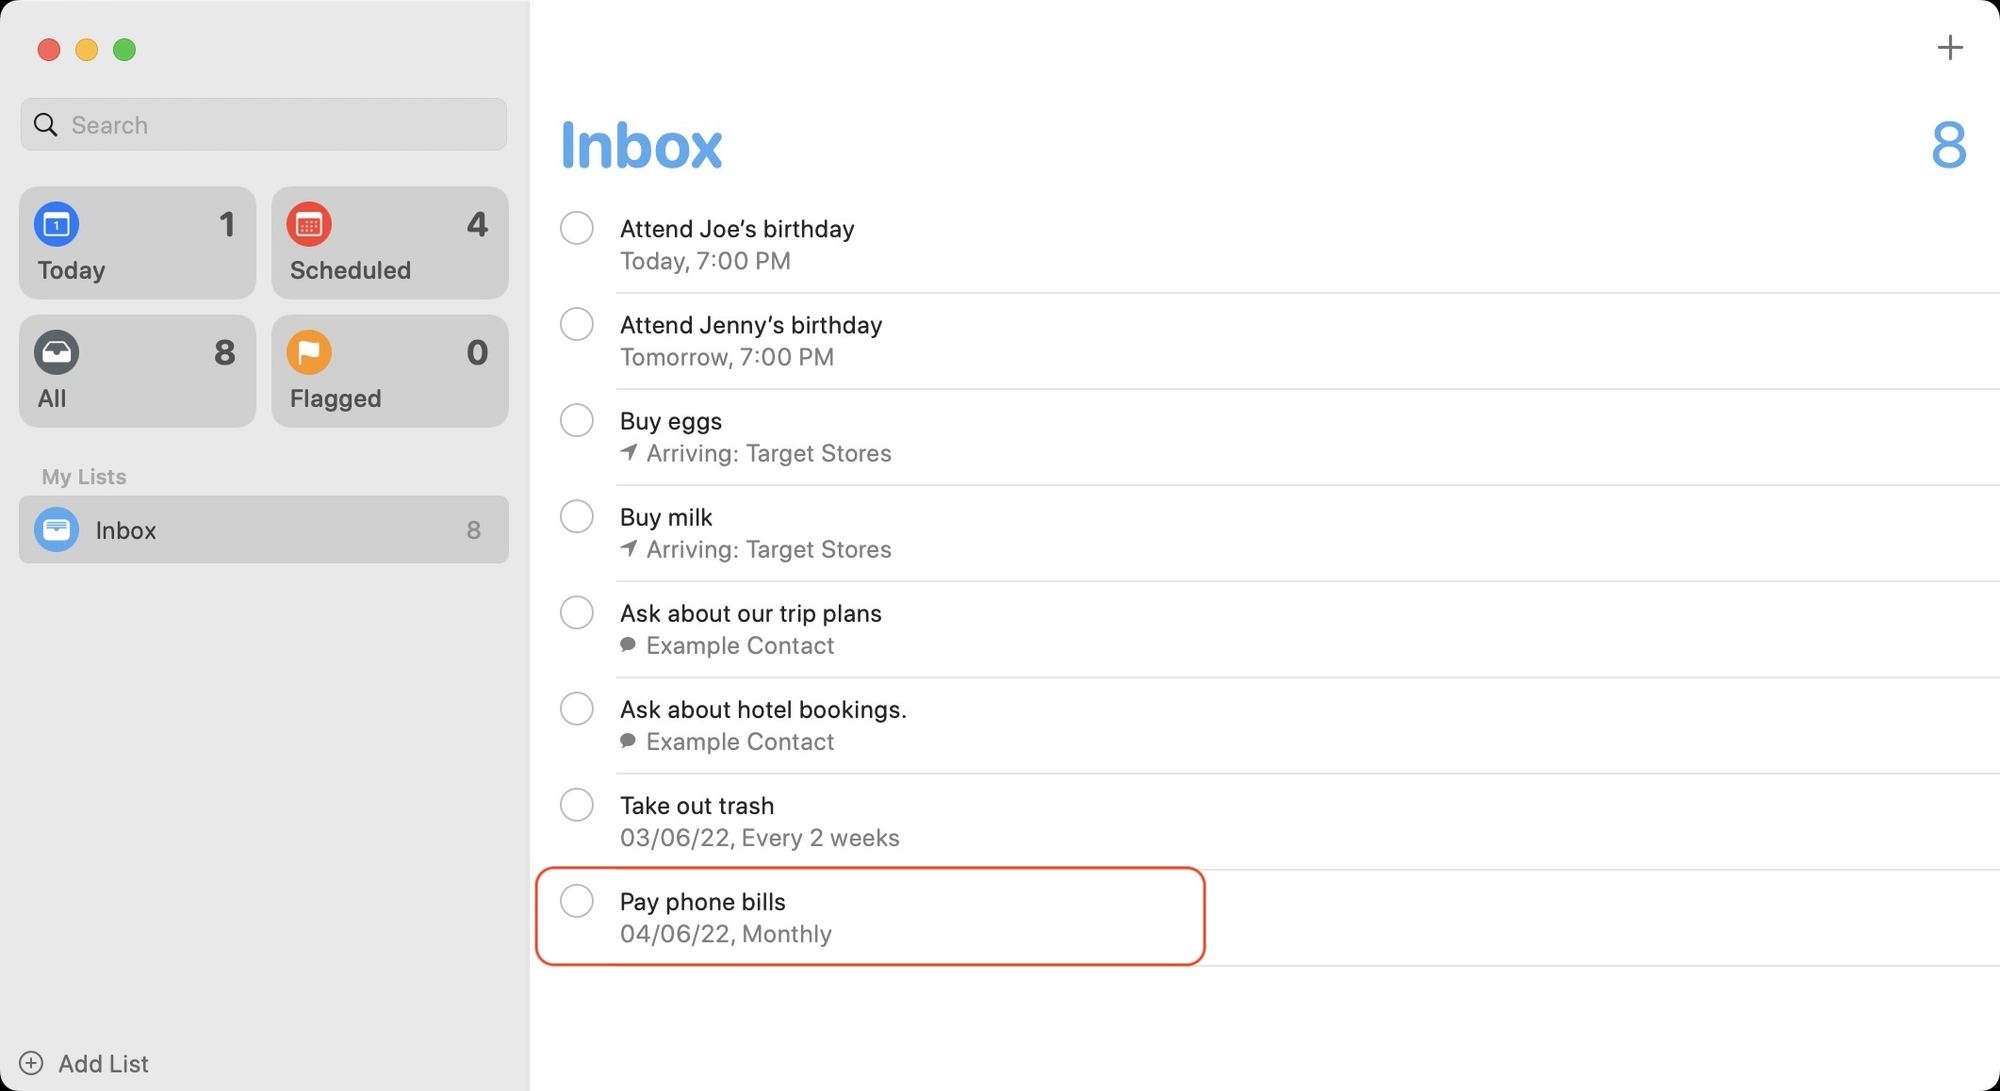
All of us have repeating tasks in our lives like paying bills, taking out the trash, buying groceries, etc. Instead of adding new reminders, you can set repeating reminders. For example, you can set a repeating reminder to pay your bills on the first of every month, and the app will notify you to pay bills on schedule.
Create reminders
In this section, you will learn how to create the different types of reminders along with several methods that you can use to create them.
Create reminders using the app
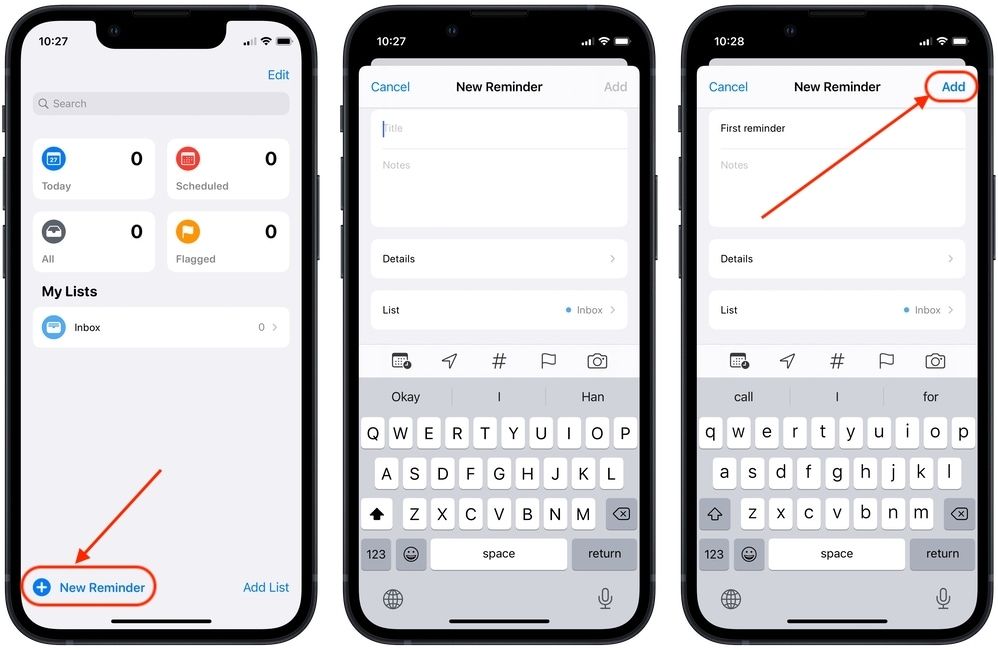
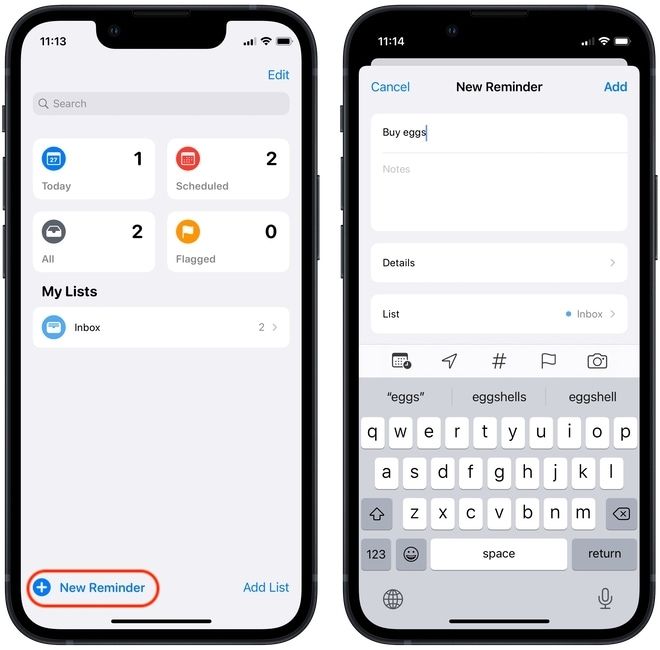
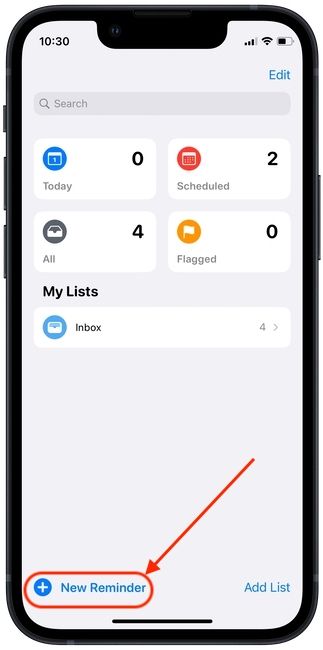
The most common way to create reminders is by using the Apple Reminders app. To create a reminder, launch the app on your iPhone and tap on the New Reminder button in the bottom left corner. Now, type in your reminder or task, and click on the Add button at the top.
On your Mac, you can use the keyboard shortcut CMD+N or use the (+) button at the top-right corner.
The above steps will help you add a simple reminder to the app. However, since we have not added any triggers to the reminder, any reminders you have added will behave like a simple checklist. To turn the checklist into actual reminders, we will add triggers depending on the type of reminder you want to create.
How to create time-based reminders
As I said, time-based reminders are those reminders that notify you of a task at a set time. Here’s how you can create them.
Create time-based reminders on iPhone
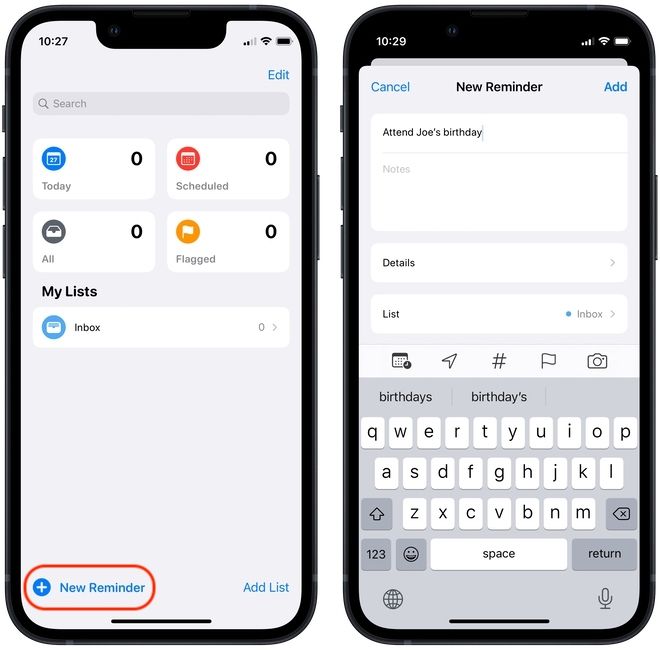
- Launch the Reminders app and tap on the New Reminder button in the bottom left corner. Now, add the task for your reminder. Let’s say, you want to create a reminder to attend your friend's birthday bash.
- Tap on the calendar button above the keyboard and then on Date & Time.
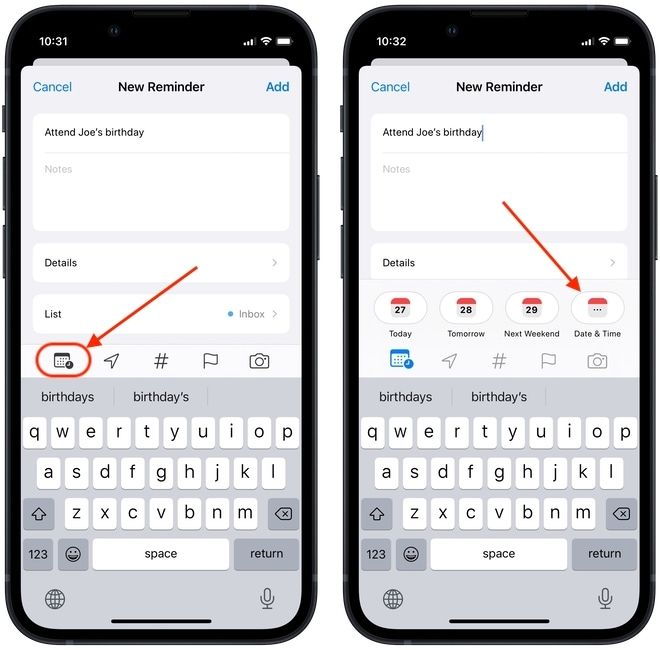
- Select the date and turn on the toggle next to Time. Use the scroll wheels to set the time. Tap on the Apply button at the top-right and the Add button to save the reminder.
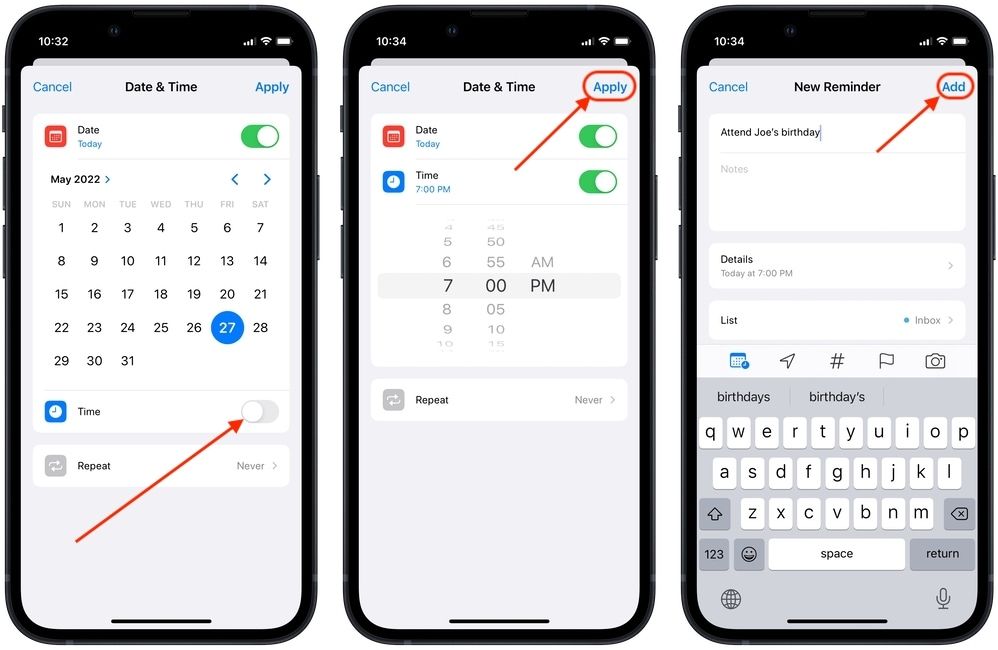
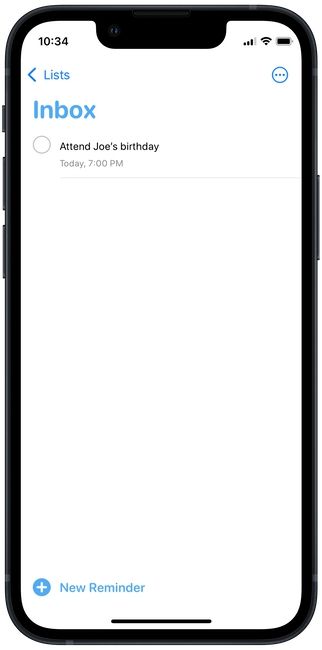
- As you can see, the reminder is now set for the selected time and date, and it will notify you at the right time.
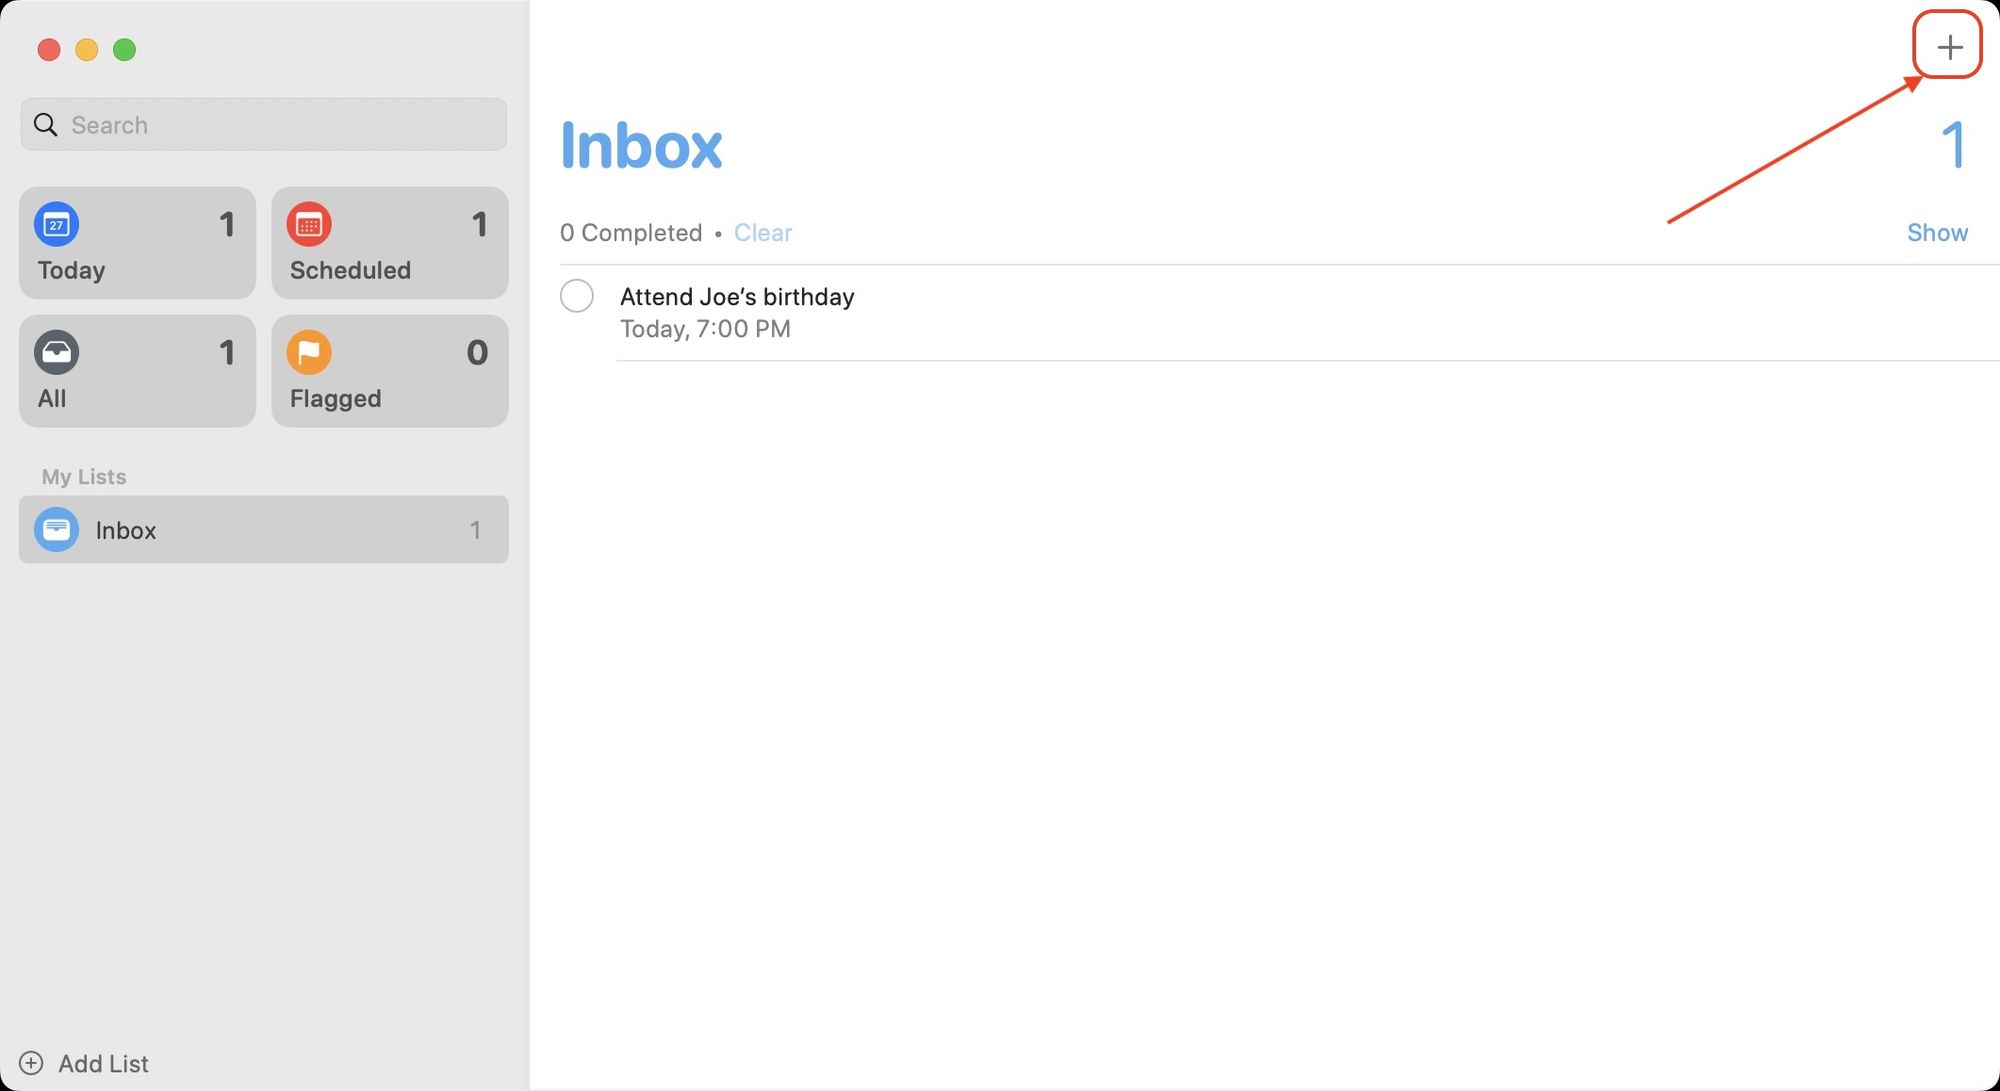
Create time-based reminders on Mac
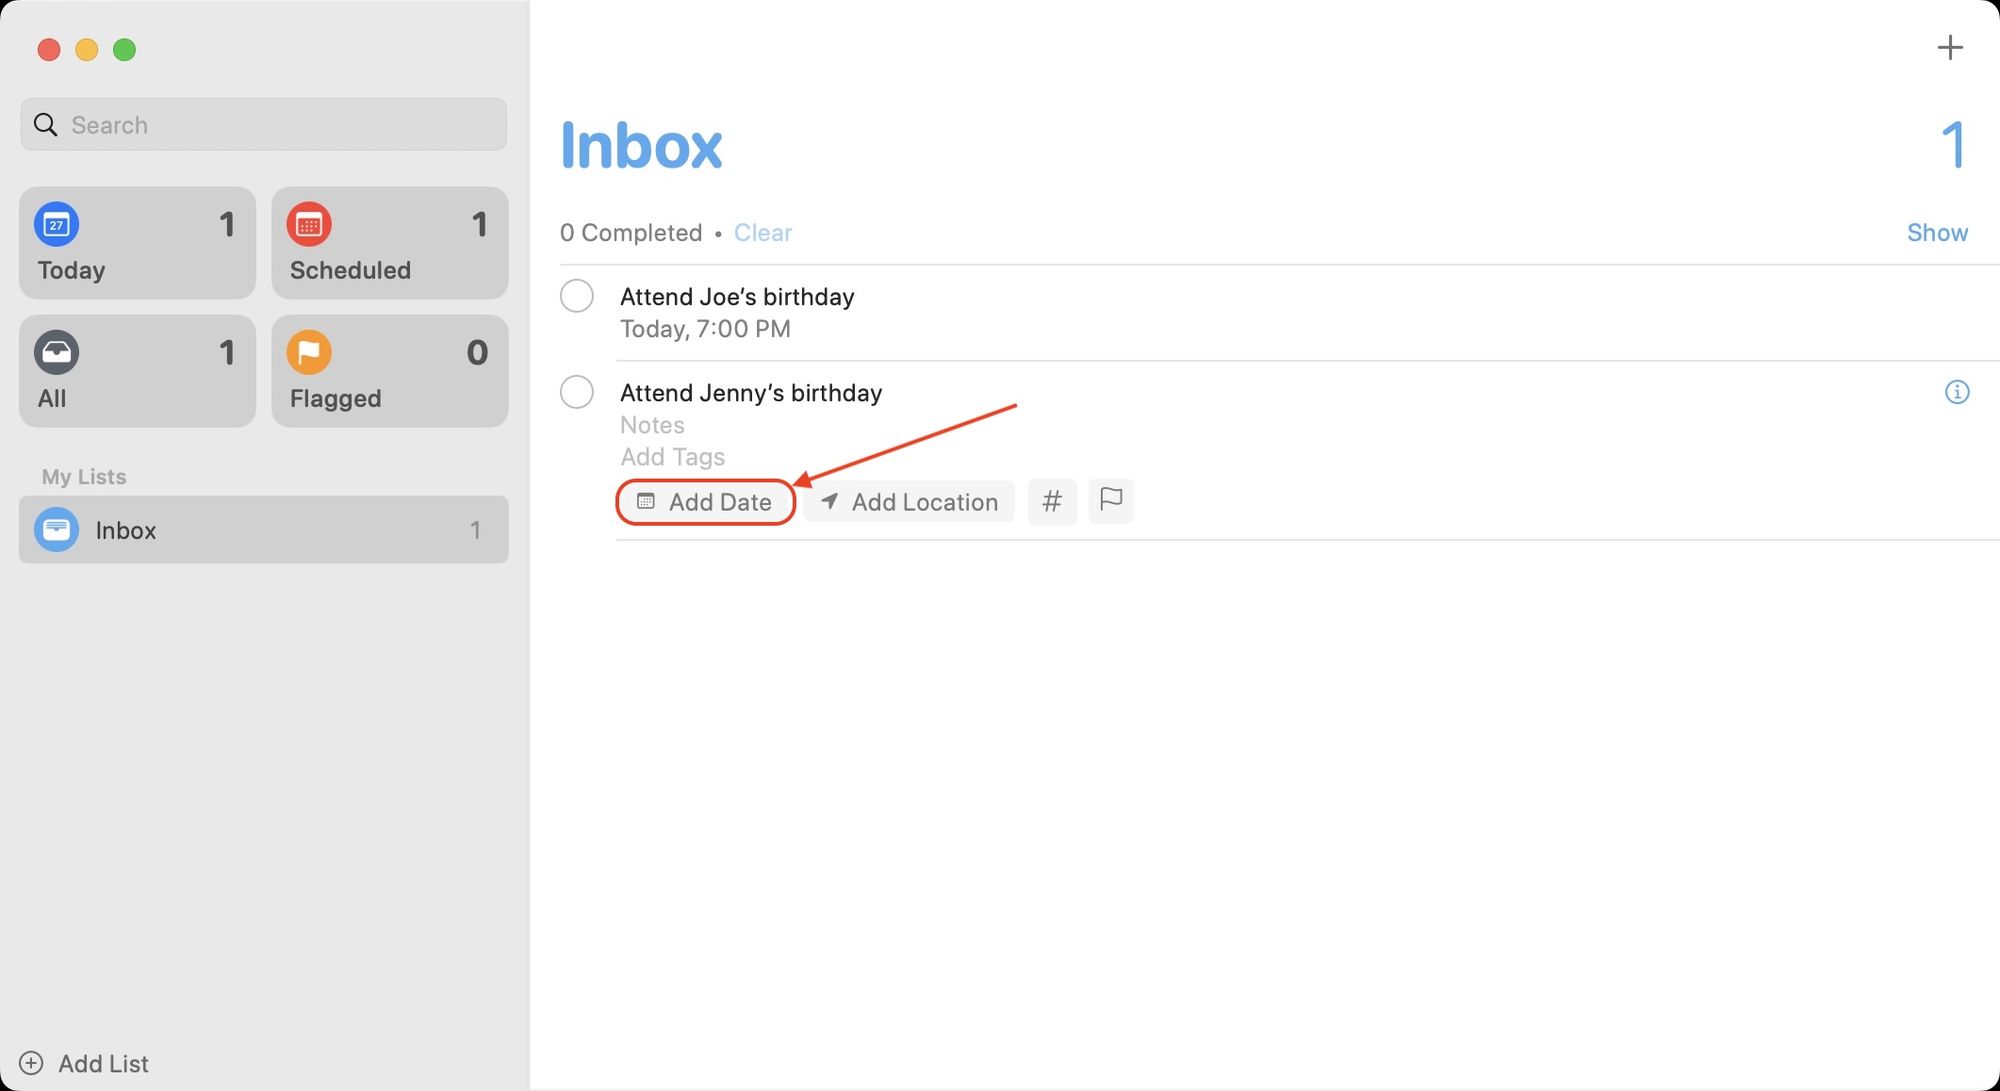
- Click on the (+) button at the top-right or use the keyboard shortcut CMD+N to create a new reminder.
- Click on Add Date button.
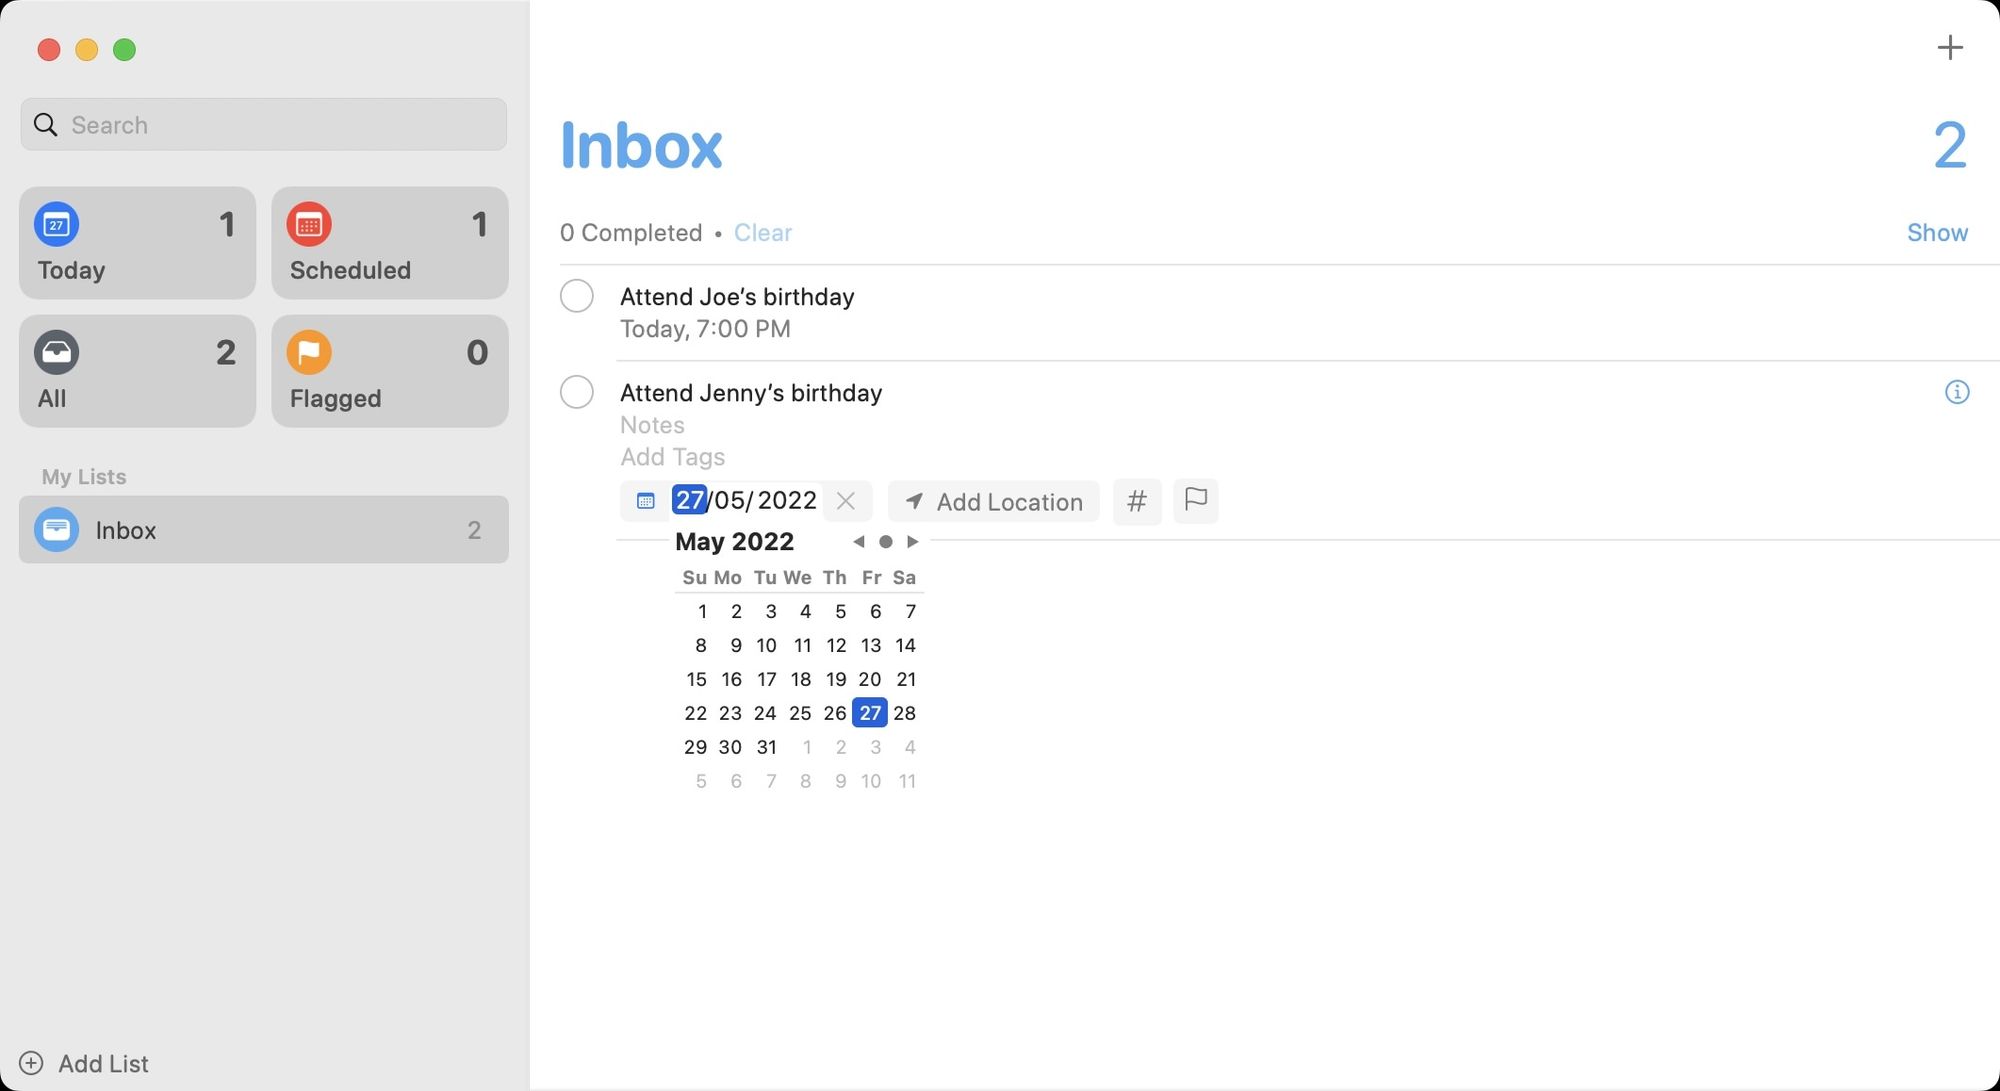
- You can select the suggested date if they are correct or click on Custom to set the date manually.

- You can either type the date or use the calendar to select the desired date.
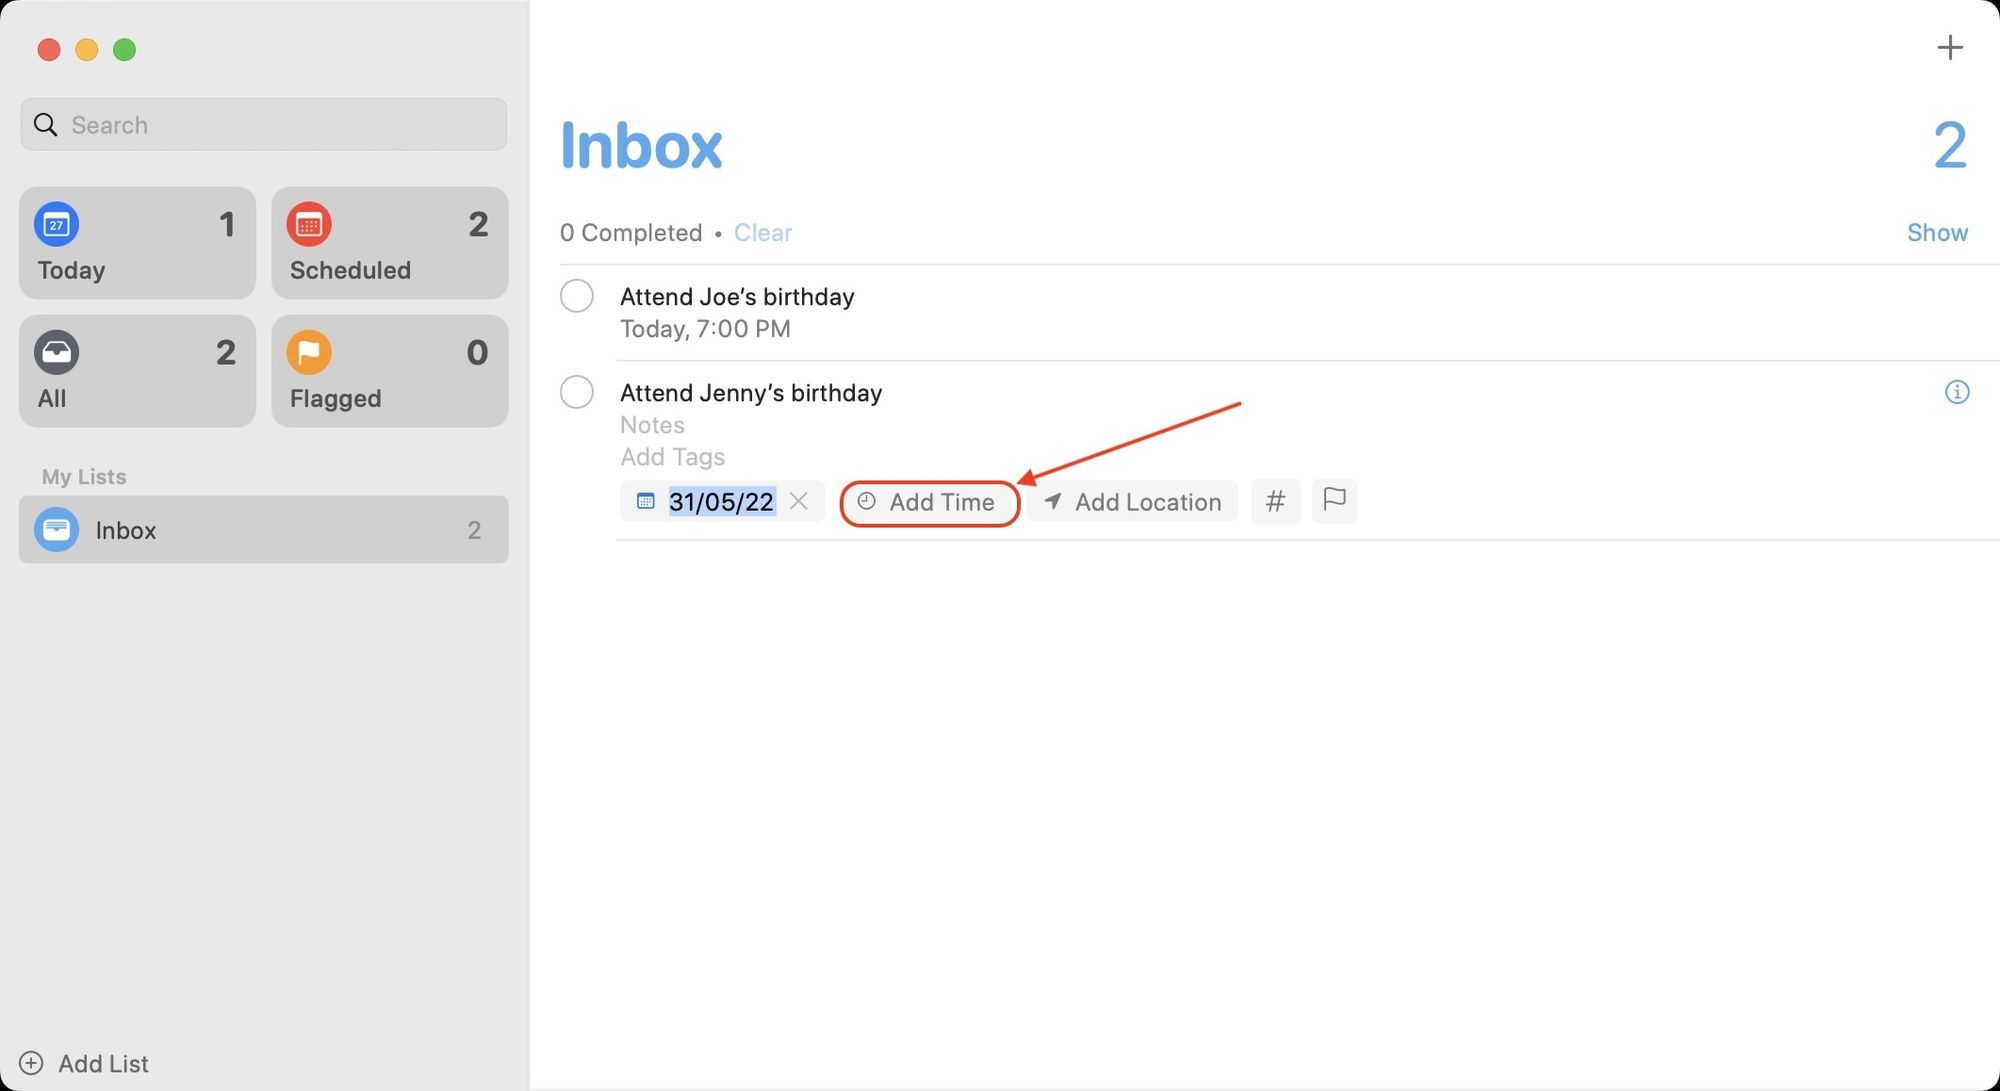
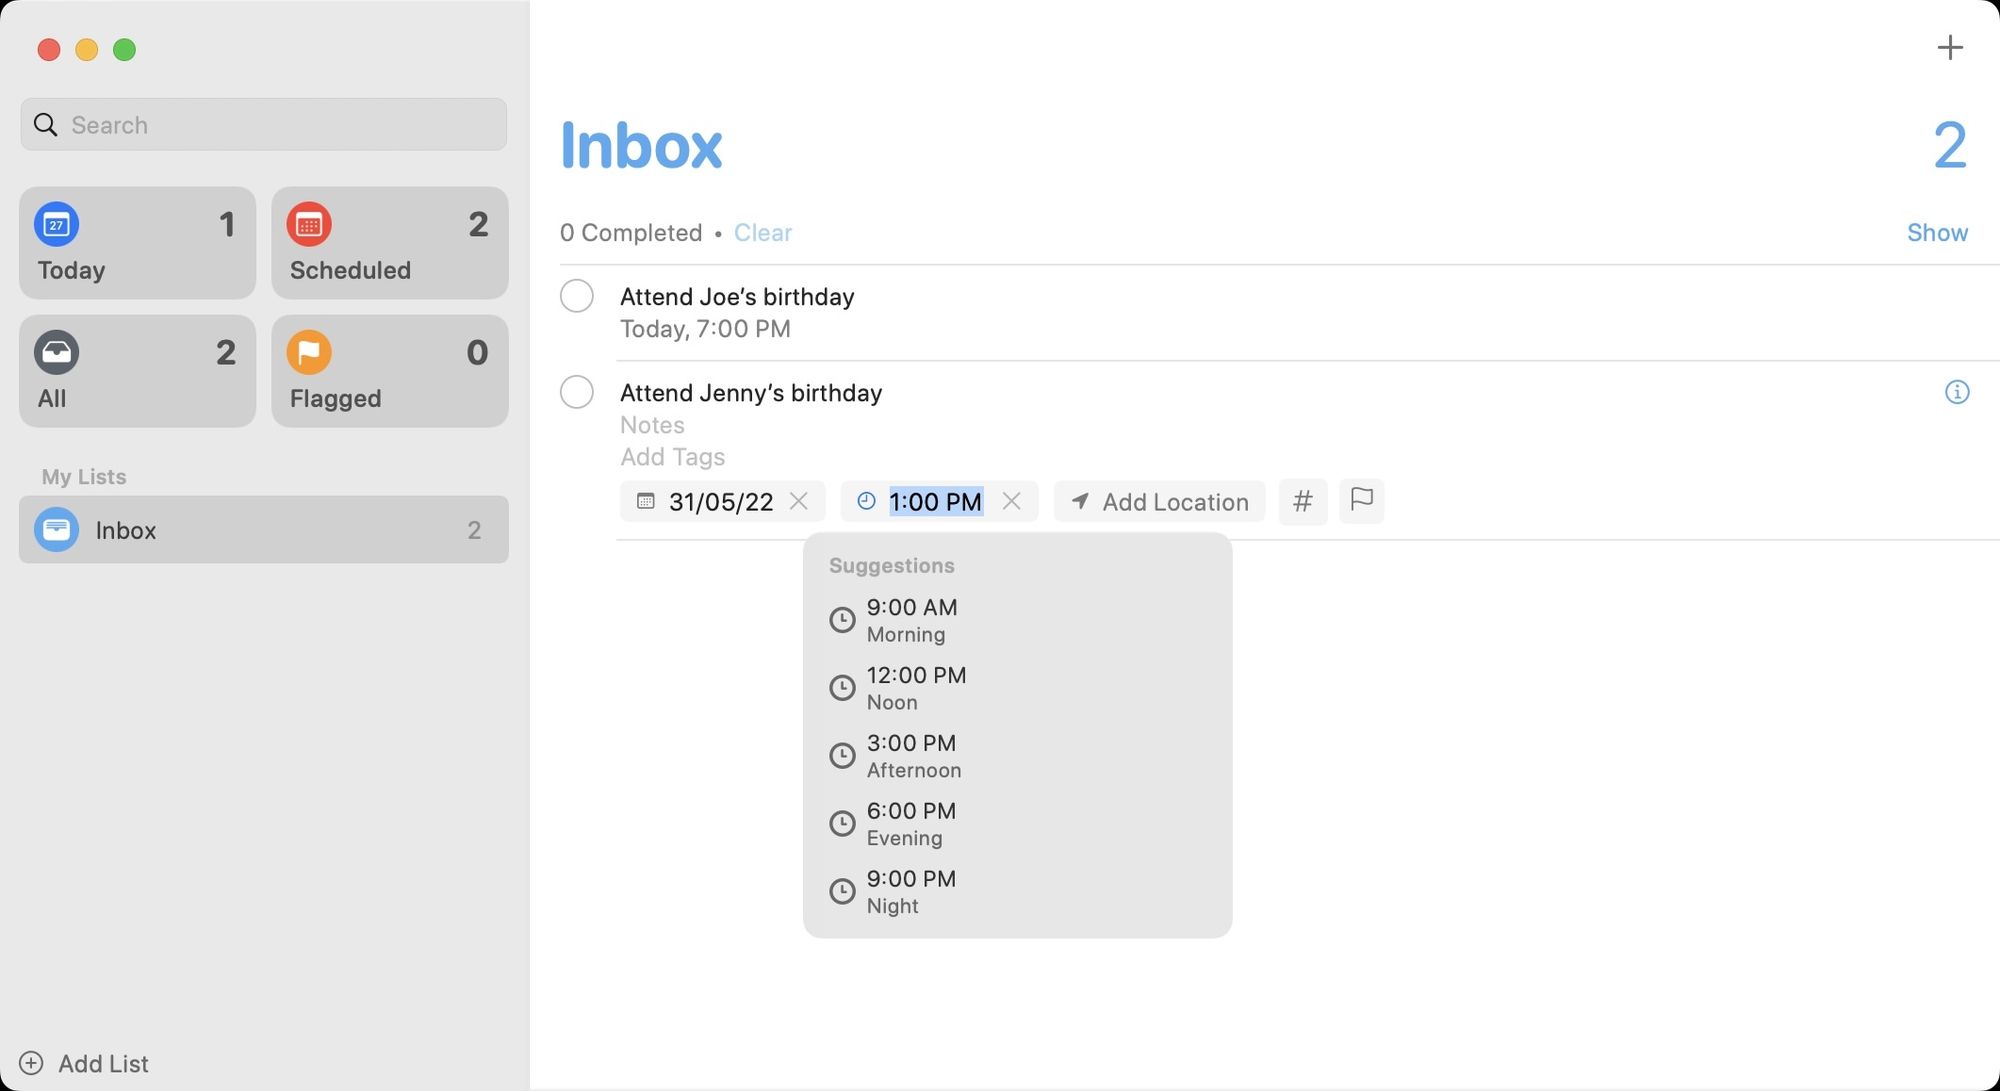
- You will now see a new Add Time option. Click on it and enter the time or select from the list of suggested times.
- As you can see, the reminder is now set for the selected time and date, and it will notify you at the set time.
How to create location-based reminders
Create location-based reminders on iPhone
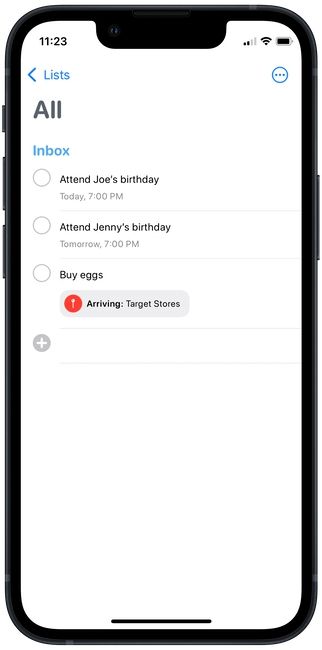
- Tap on the New Reminder button in the bottom left corner. Now, add the task for your reminder. Let’s say you want to be reminded about buying eggs when you reach the grocery store.
- Tap on the location button above the keyboard and then on Custom.
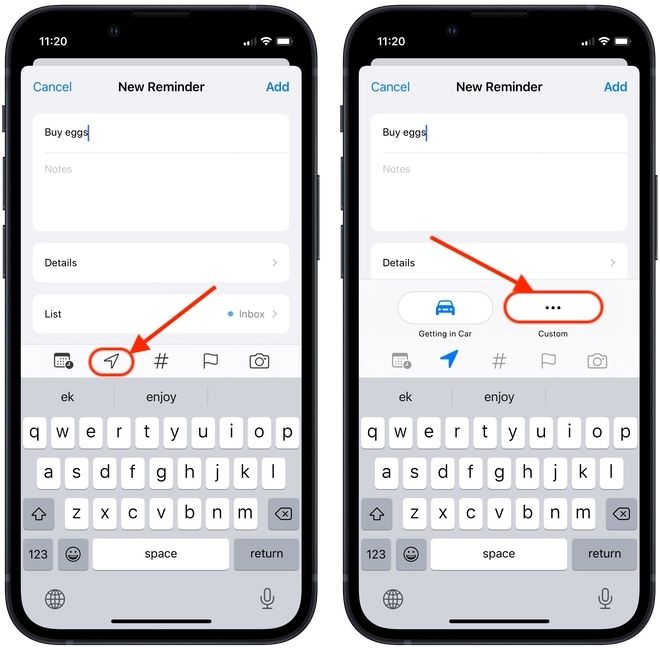
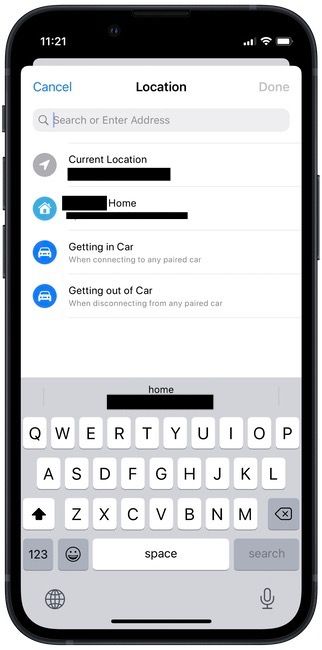
- The app will now show you several options, including your home and office address (if you have added them to your contact card), your current location, and your connected car options.
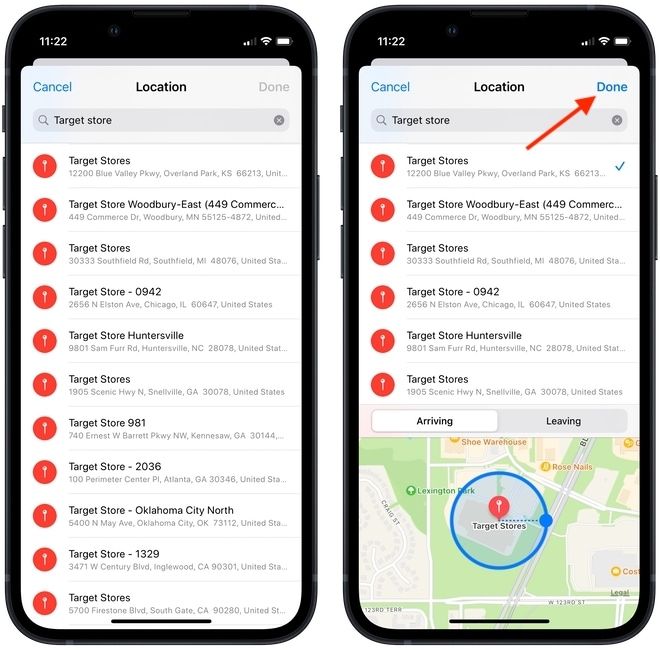
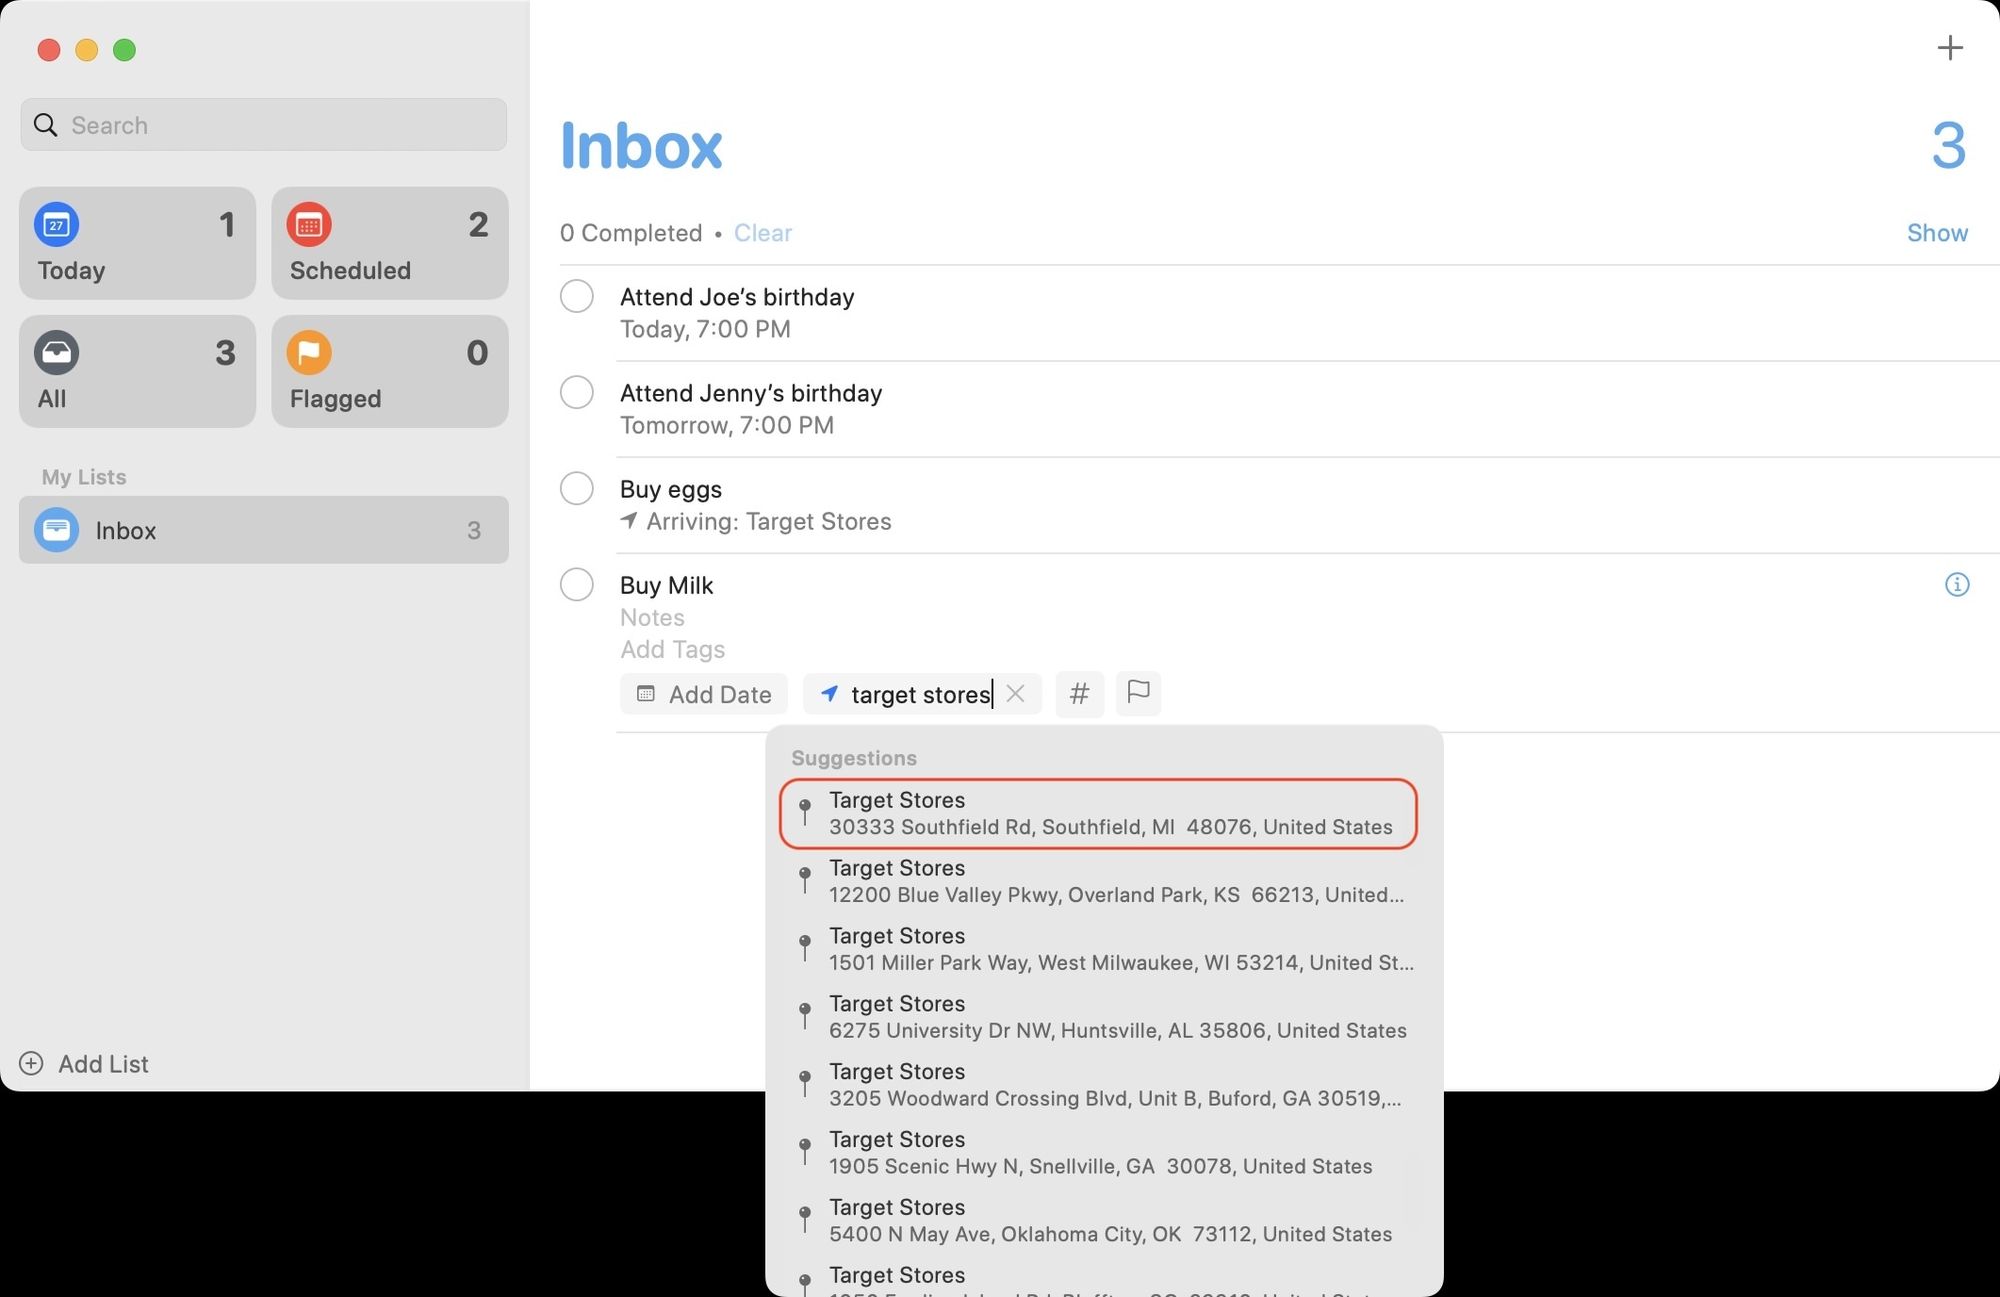
- To set up a custom location trigger, search for the store’s name ( I am using a random target store address) using the search field and tap on it to add. Now, tap on Done and add the reminder.
- Your location-based reminder is now set. You can see that reminder is showing a location.
Create location-based reminders on Mac
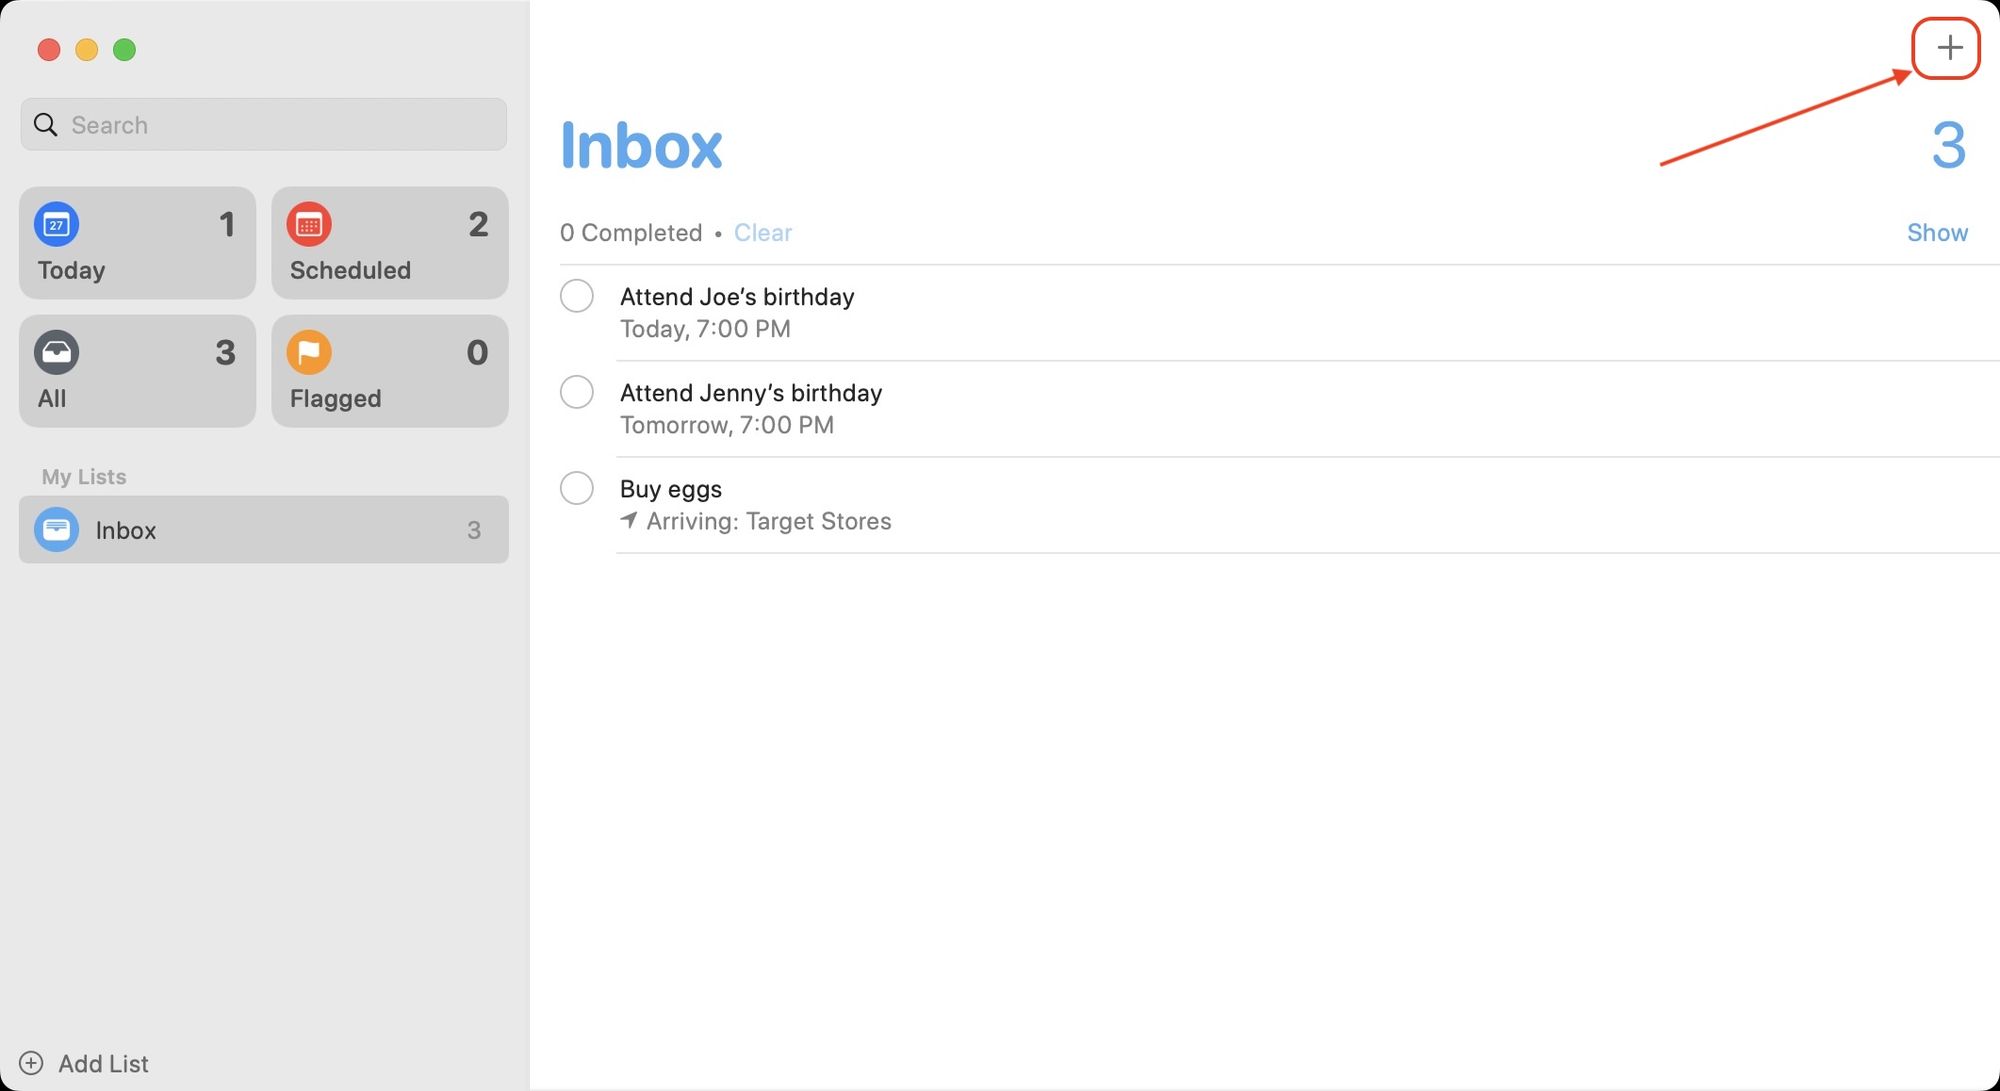
- Hit the CMD+N keyboard shortcut or hit the (+) button at the top-right and add the task. Let’s say you want to be reminded about buying milk.
- Click on the Add Location button. Like on iPhone, it will show you pre-configured locations.
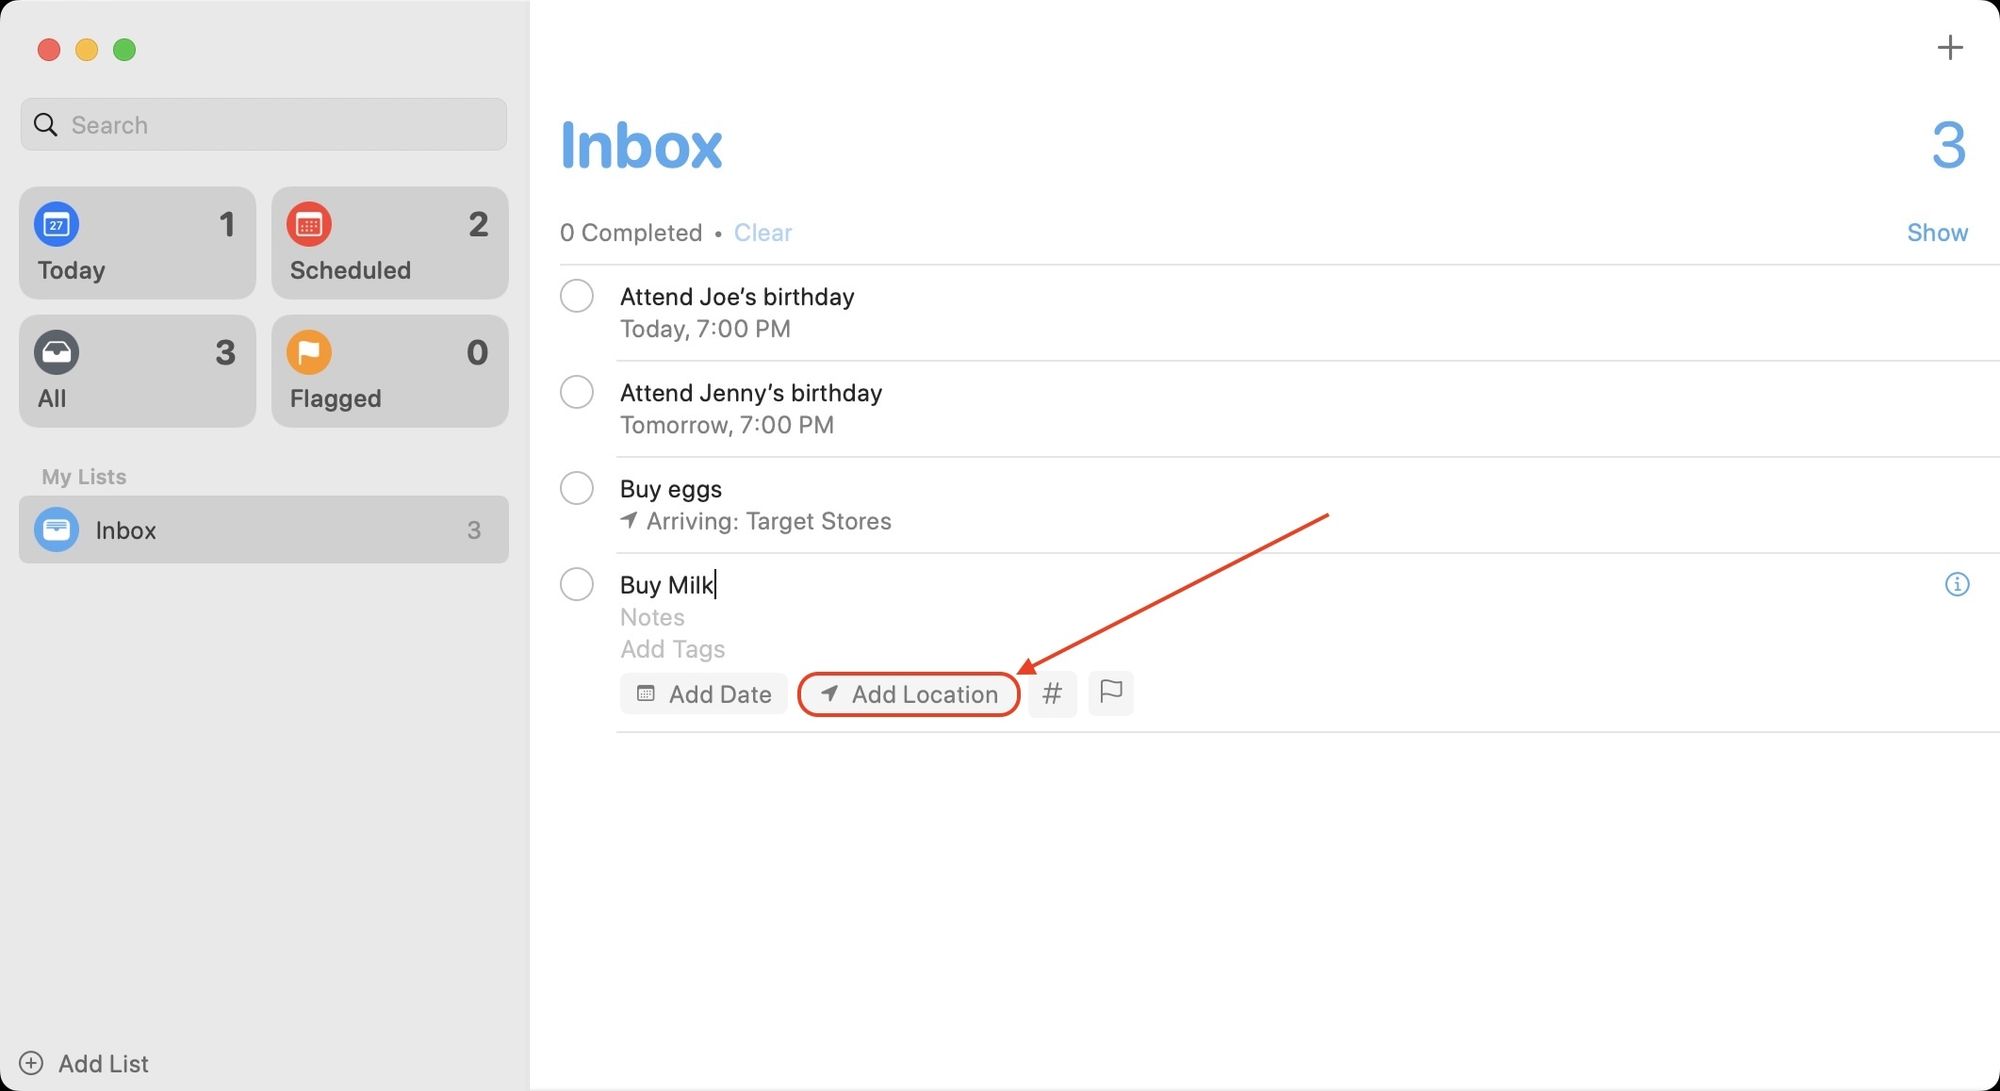
- To add a custom location, start typing the address (I am using the same random target store).
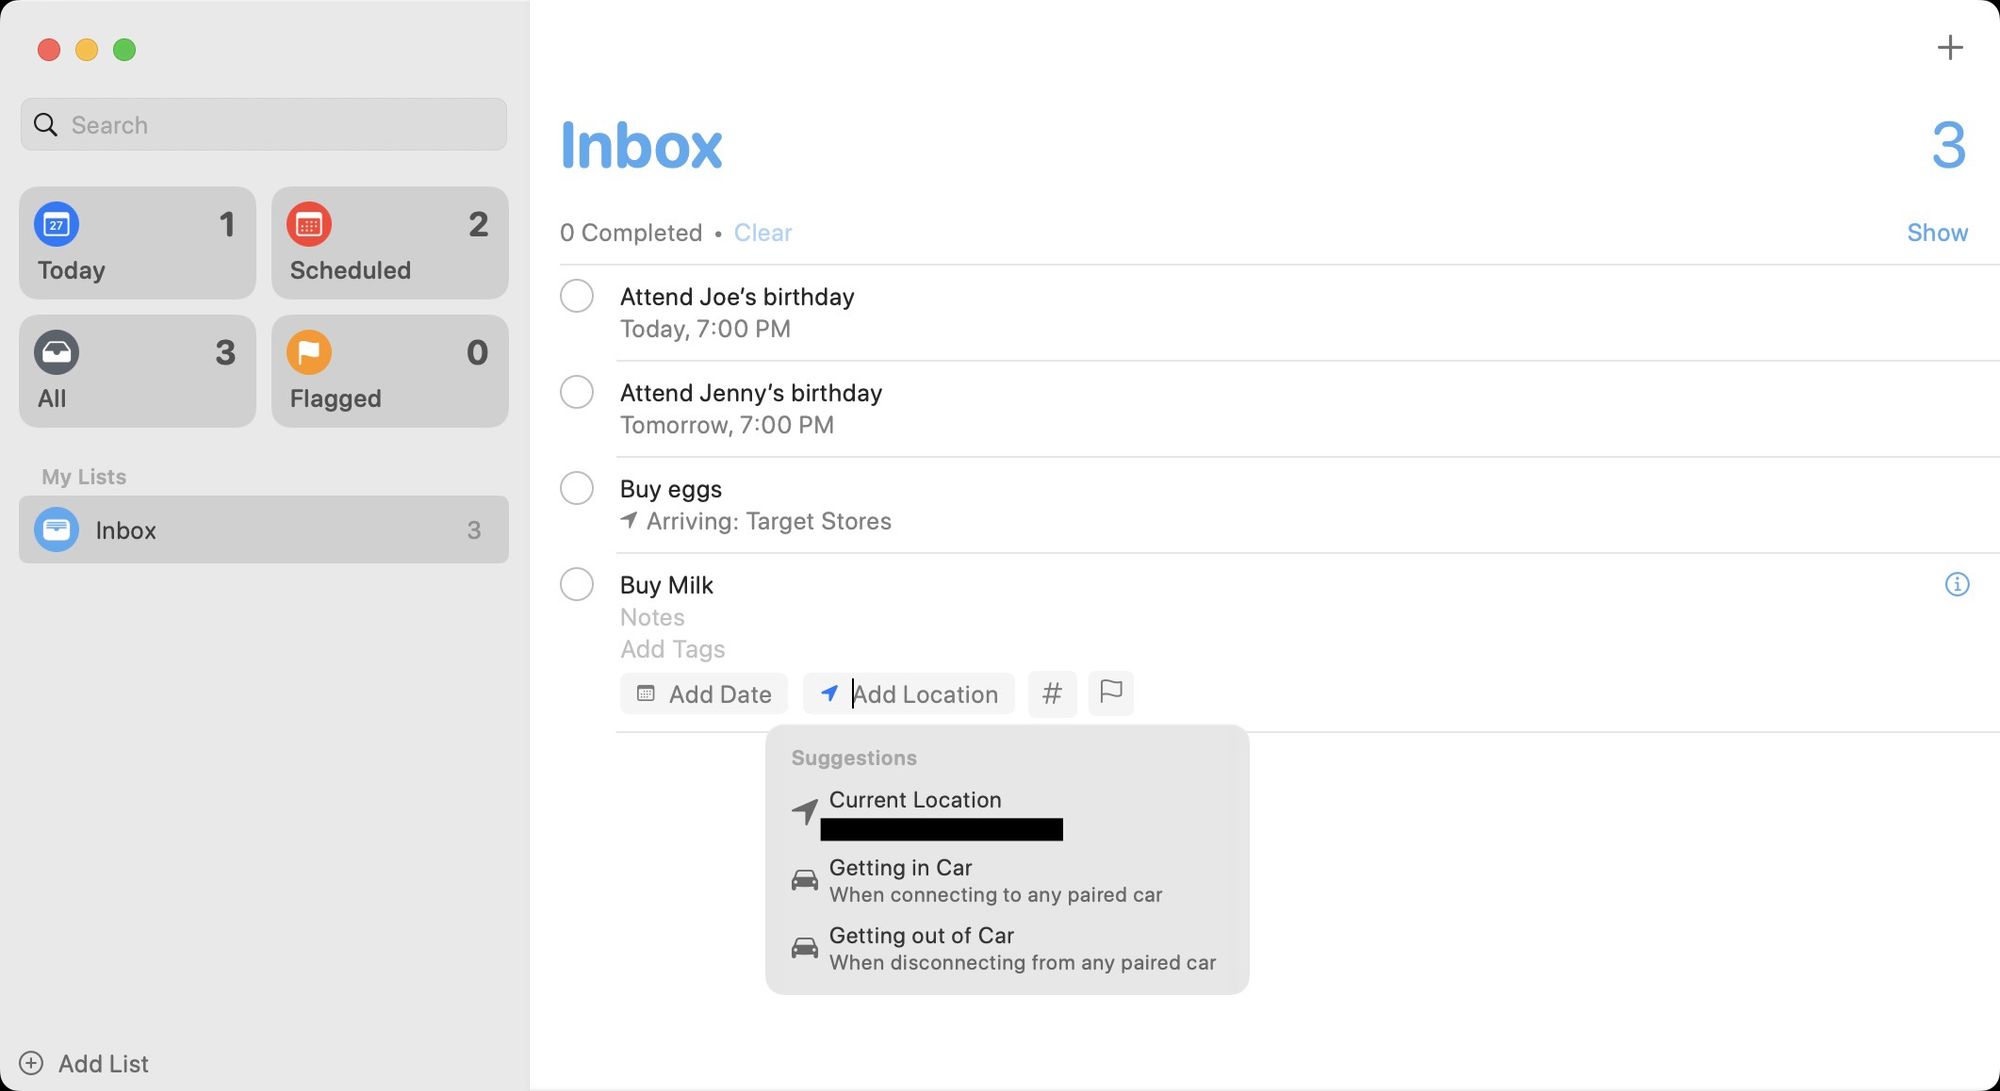
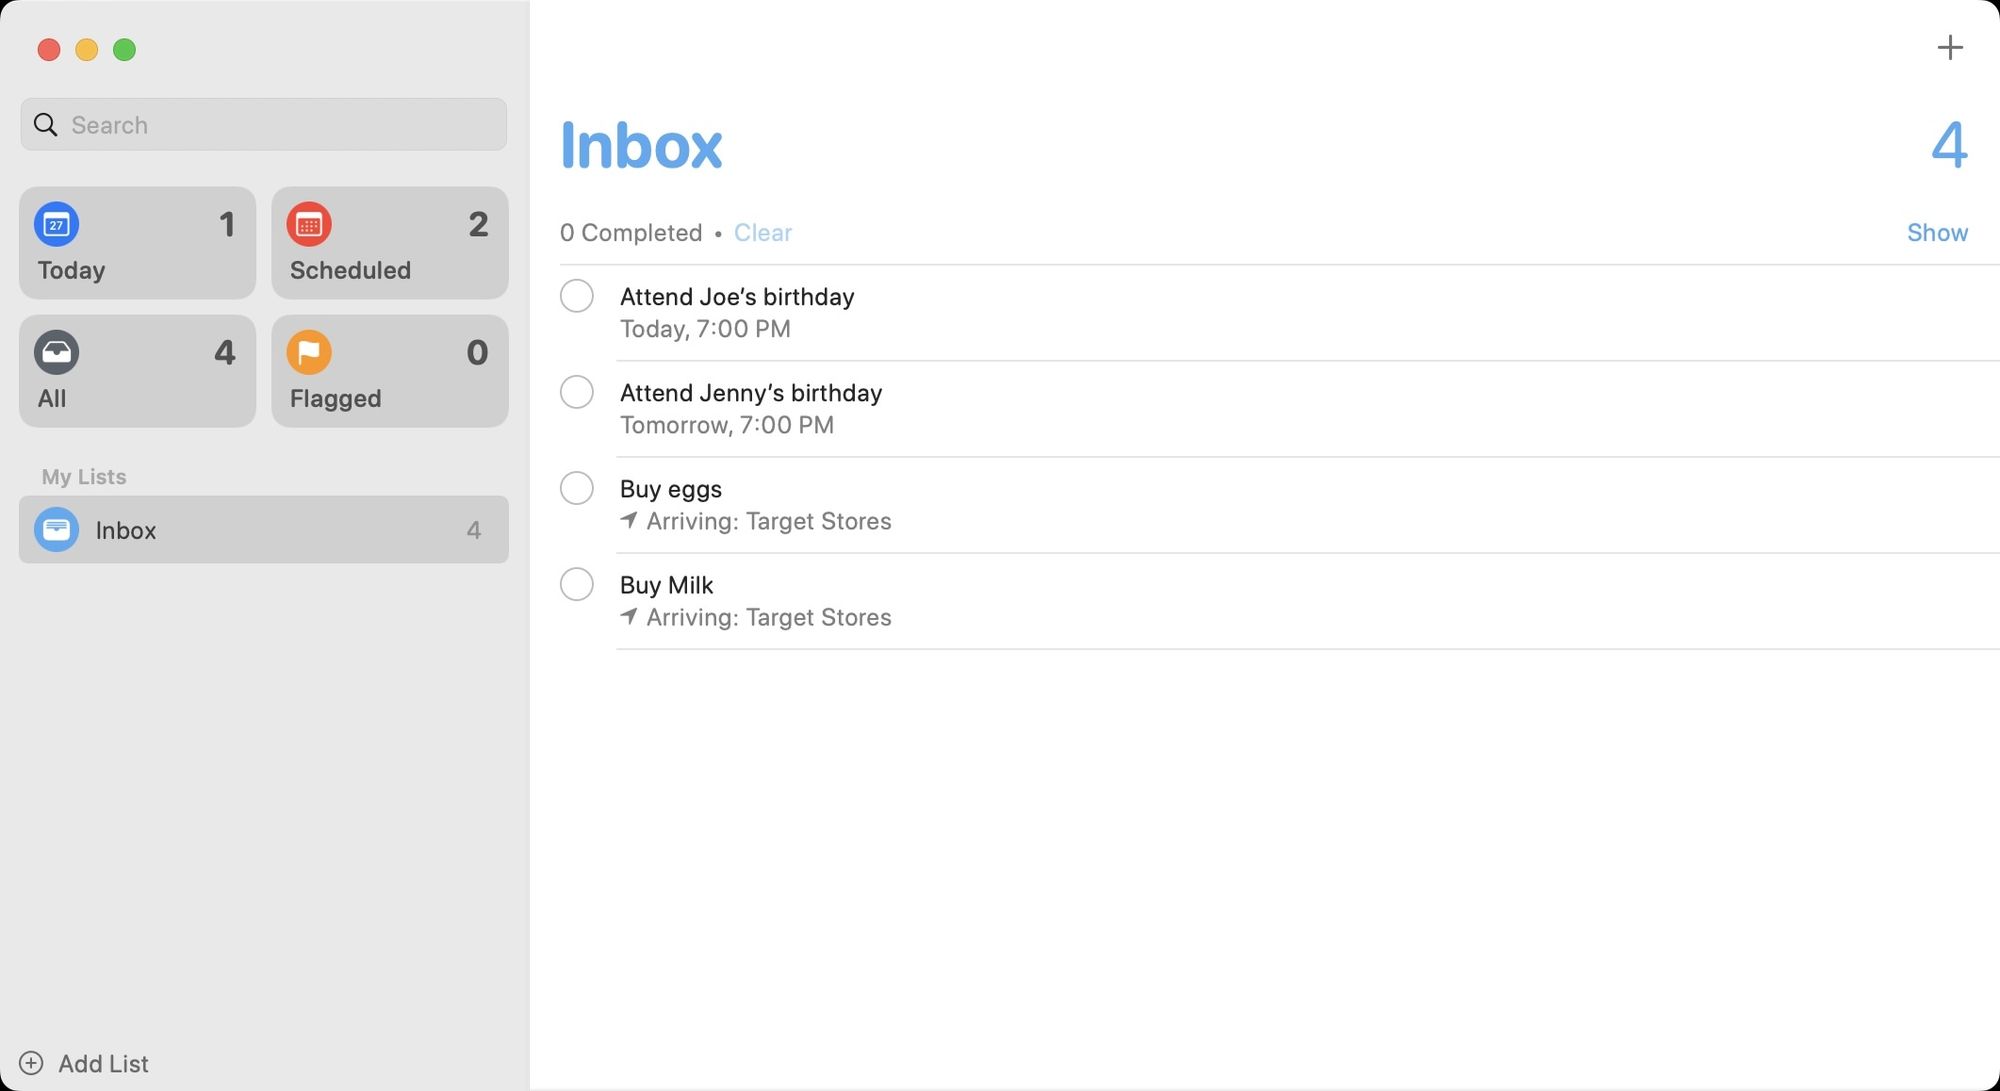
- Tap to select the correct address, and your location-based trigger will be set.
- You can see how the new reminder looks below.
Create message-based reminders
Before we begin, you should note that this feature will only work with Apple’s own Messages app and doesn’t support third-party chat applications like WhatsApp and Telegram.
How to create message-based reminders on iPhone
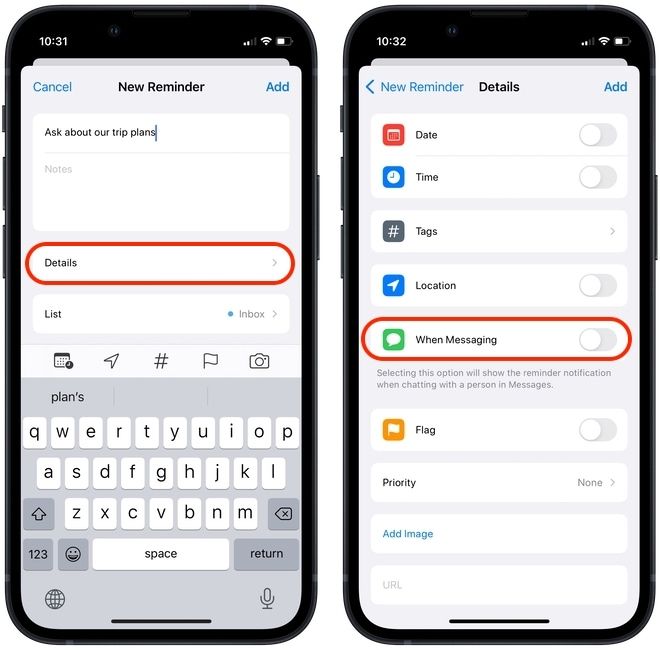
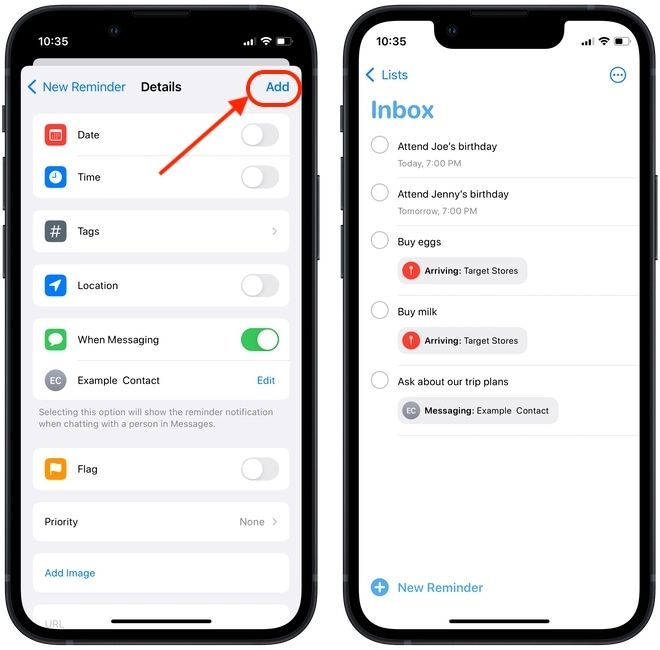
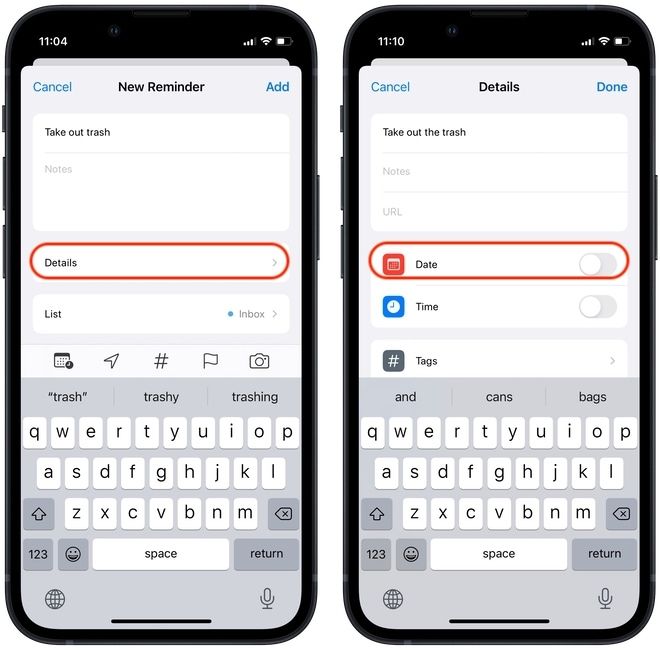
- Launch the Reminders app and tap on the New Reminder button in the bottom-left corner.
- Enter the text and then tap on Details. Now, enable the toggle next to the When Messaging option.
- Tap on Choose person. Search for the contact you want to add and tap on the contact to add it to the reminder.

- Tap on the Add button to add the reminder. Next time you are messaging the selected contact, Reminders will notify you.
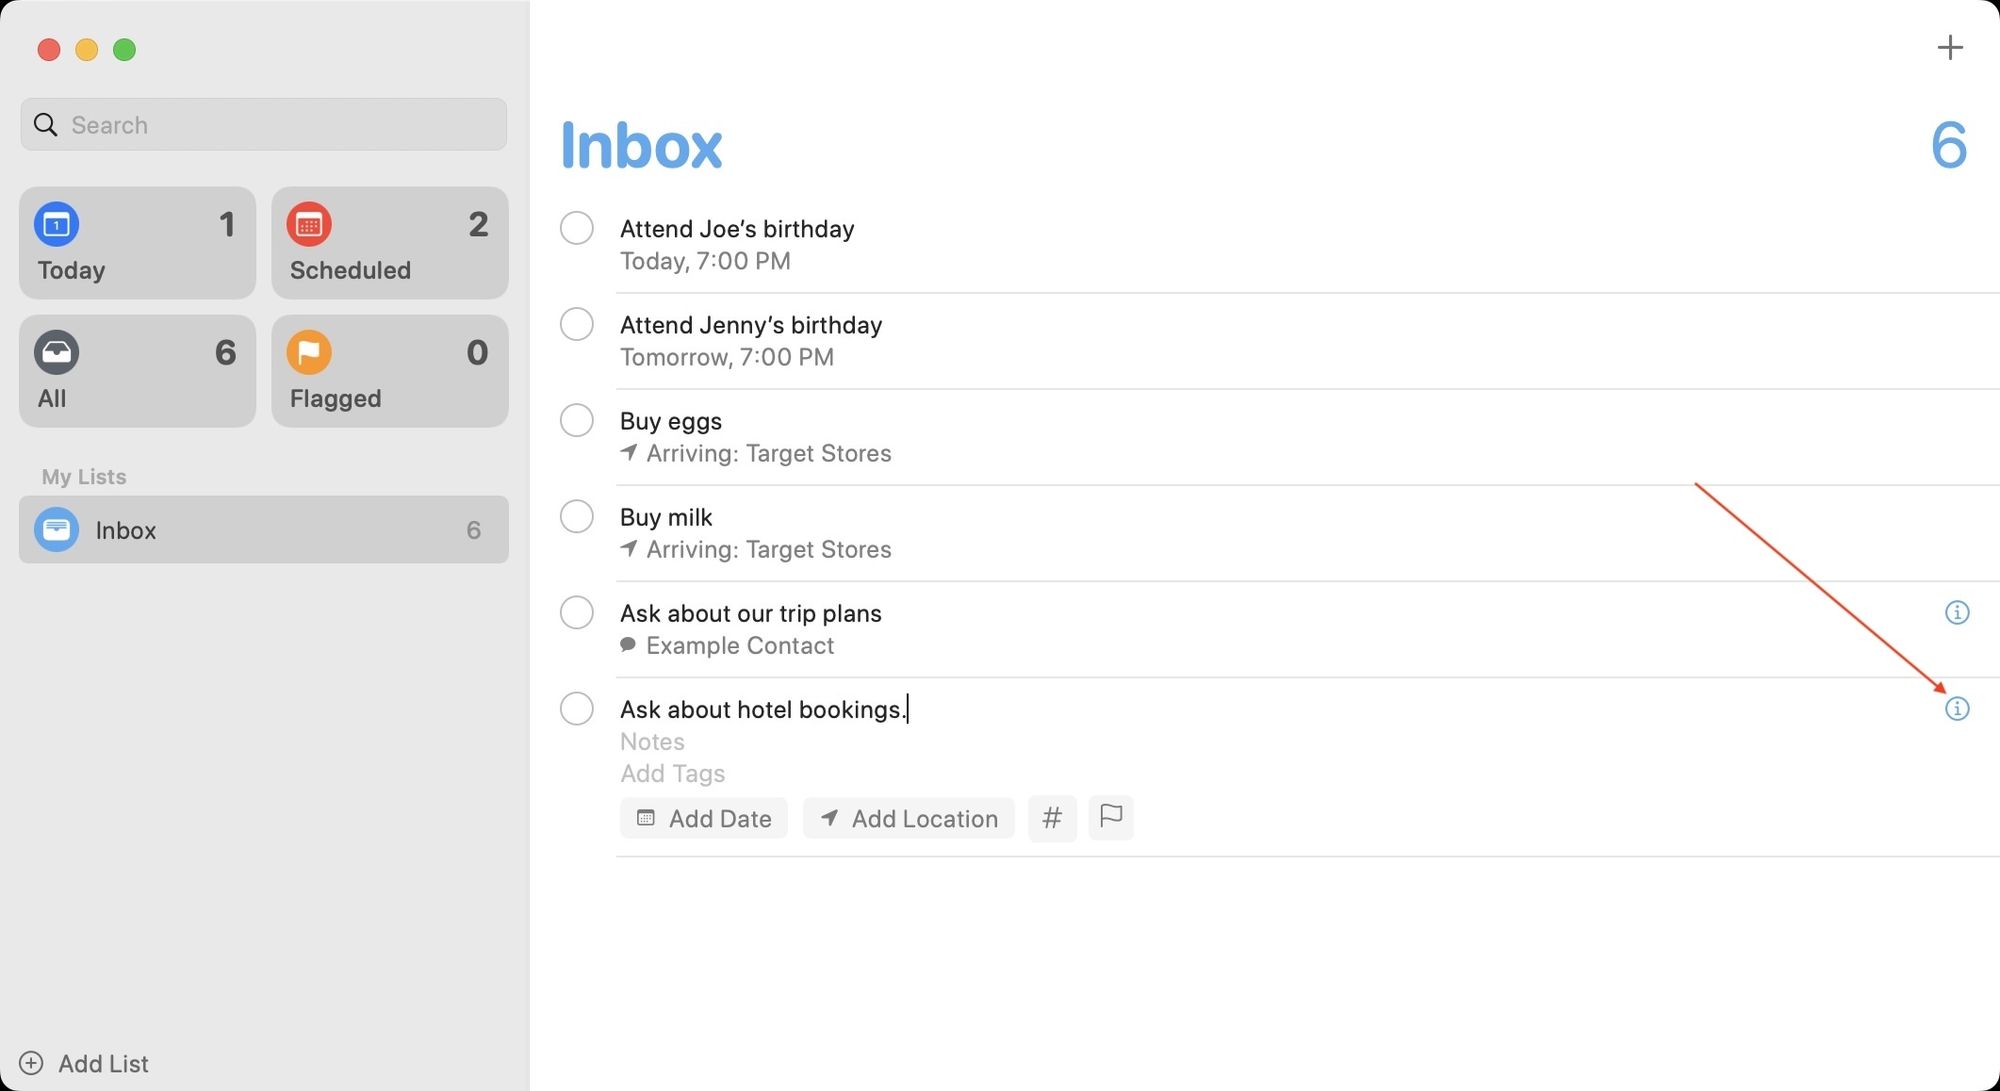
How to create a message-based reminder on Mac
- Click on the (+) button at the top-right or use the keyboard shortcut CMD+N to create a new reminder. Add the item you want to be reminded about, and then click on the (i) button next to the reminder.
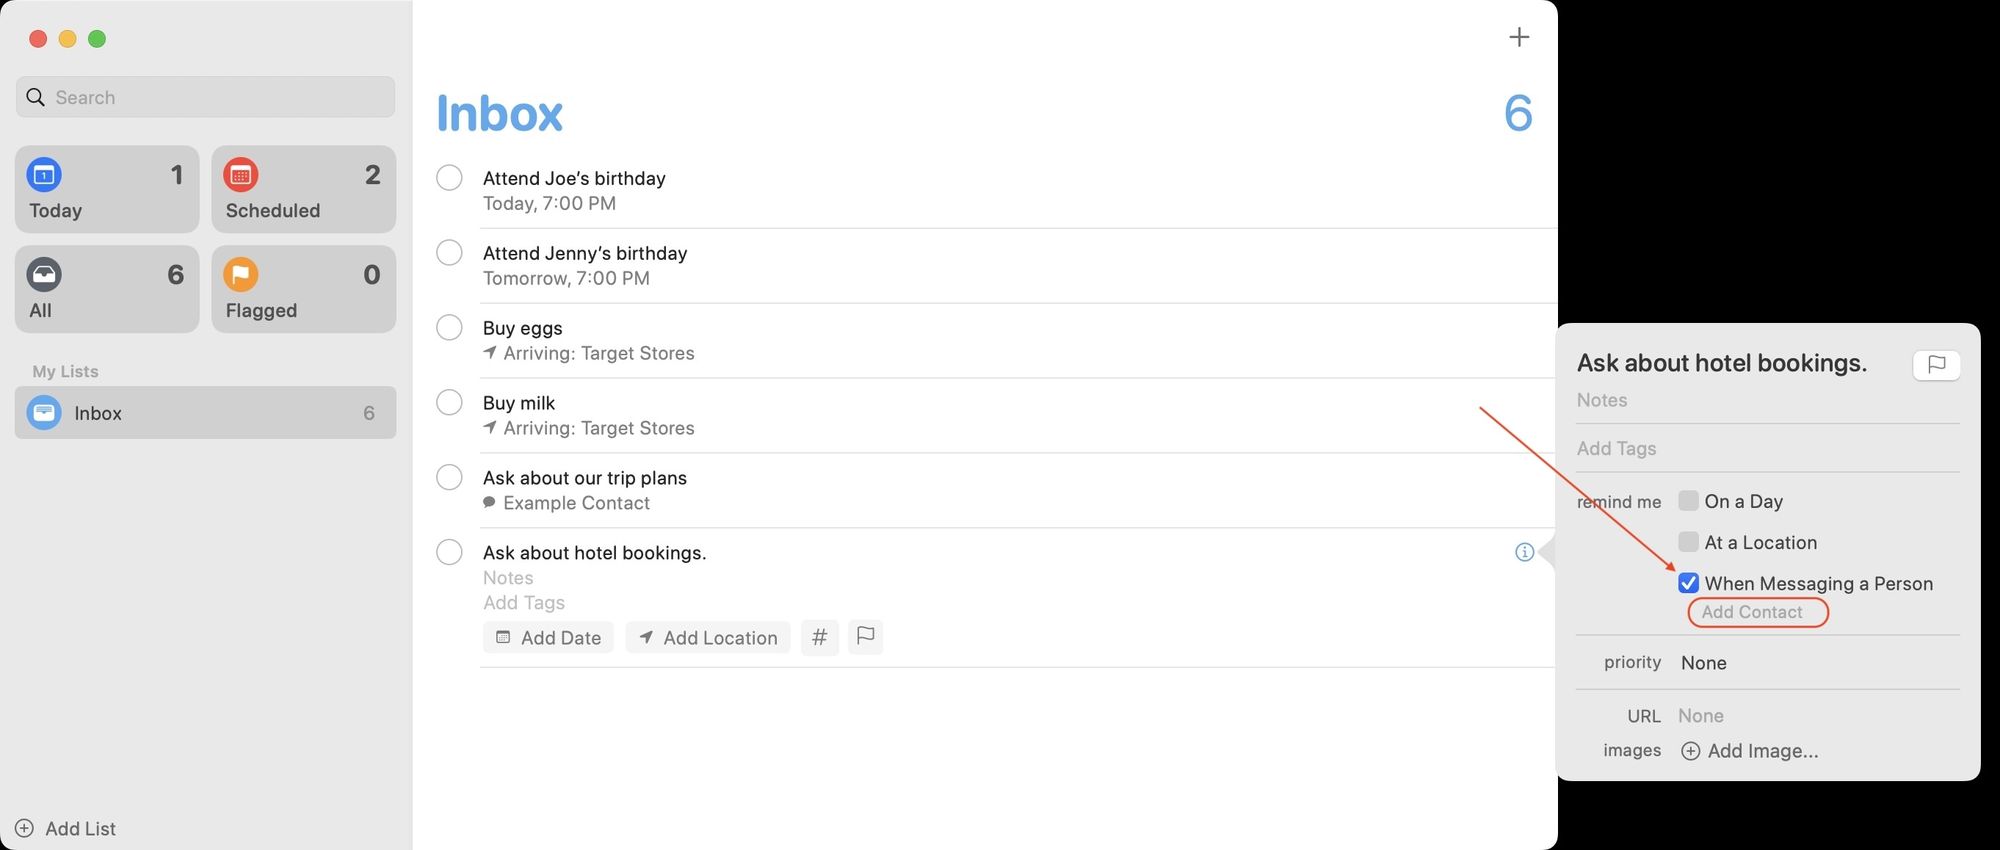
- Enable the checkbox next to the When Messaging a Person option and click on Add Contact.
- Search for the relevant contact and click on it to add it as a trigger for the reminder.
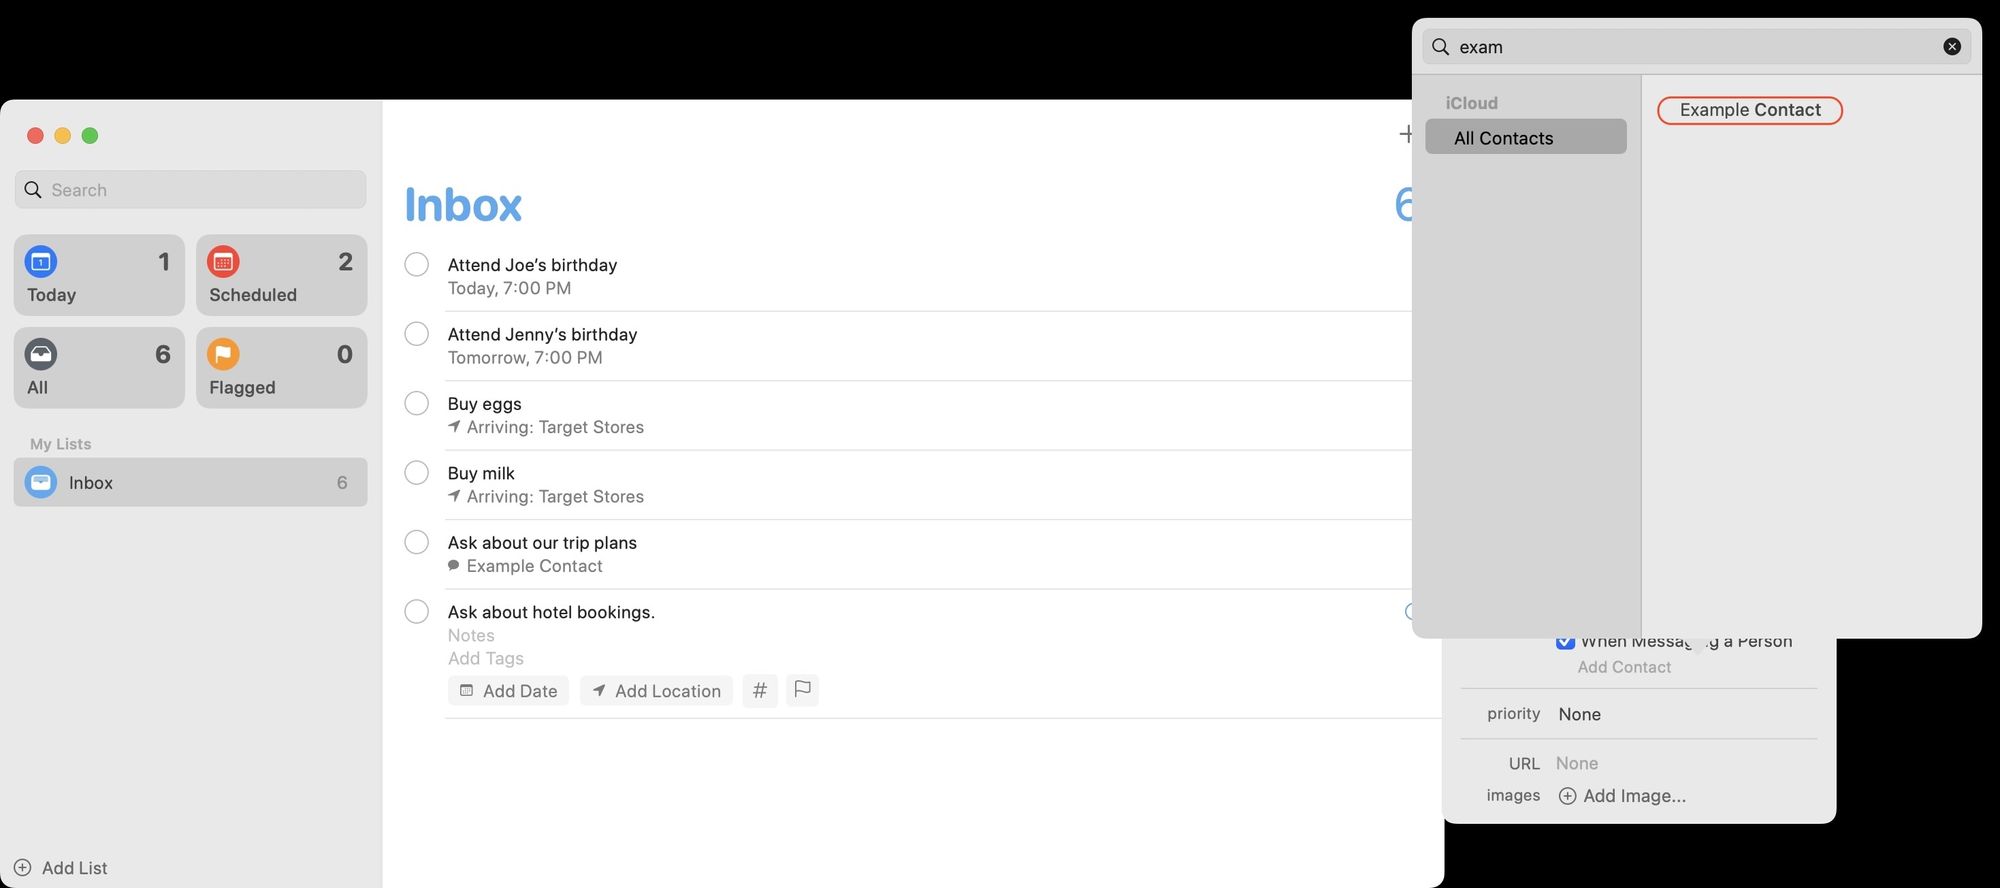
- Your reminder will now notify you when you are texting with the selected contact in the future.
Create repeating reminders
Repeating reminders are great for getting reminded of repeating tasks like paying the bills, taking out the trash, etc. Here’s how you can create them.
How to create repeating reminders on iPhone
- Launch the Reminders app and tap on the New Reminder button in the bottom-left corner.
- Enter the text and then tap on Details. Now, enable the toggle next to the Date option.
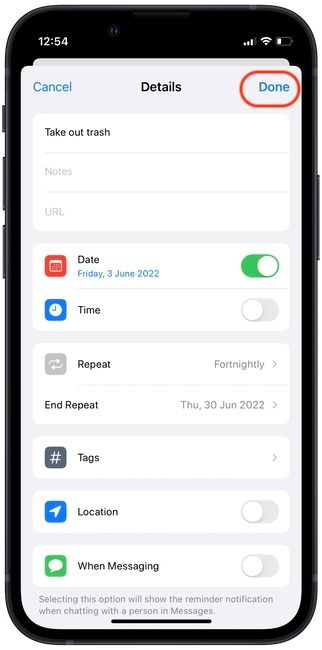
- Tap on the Repeat option and select the desired frequency. You can choose from the list of presets or tap on Custom to create your own frequency. Let’s select the Fortnightly option for this one.
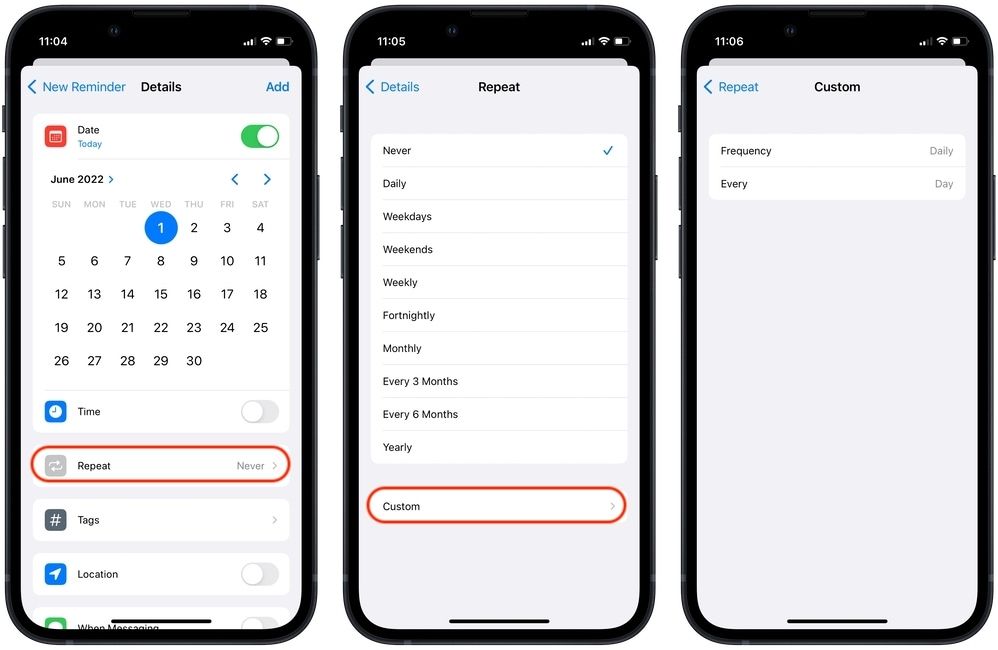
- You can also choose whether you want this reminder to end or not. Tap on End Repeat to select the end date for this repeating reminder.
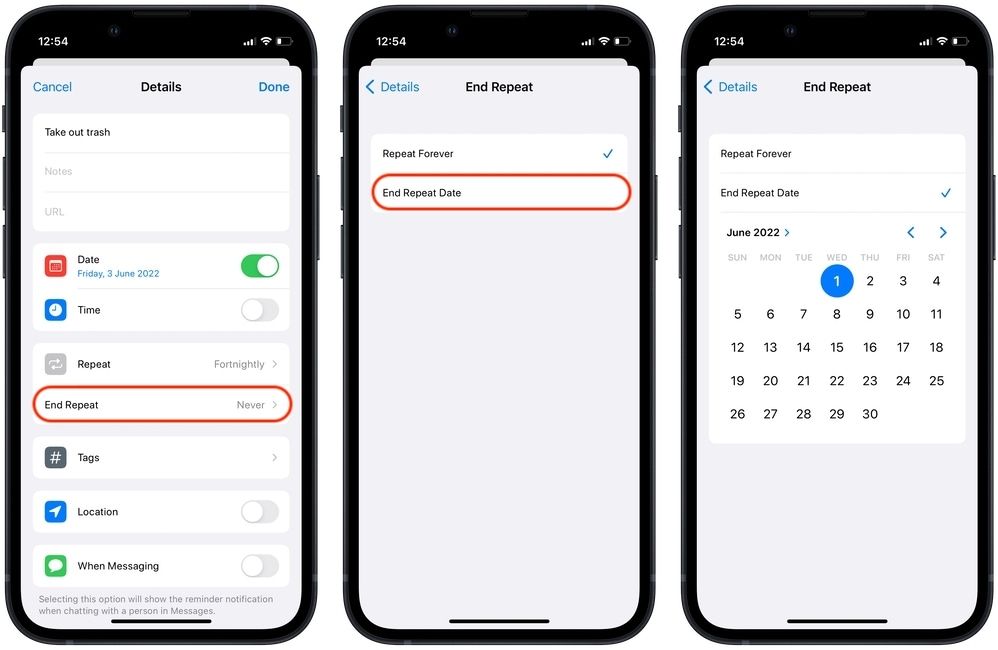
- Finally, tap on Done to create the reminder.
How to create repeating reminders on Mac
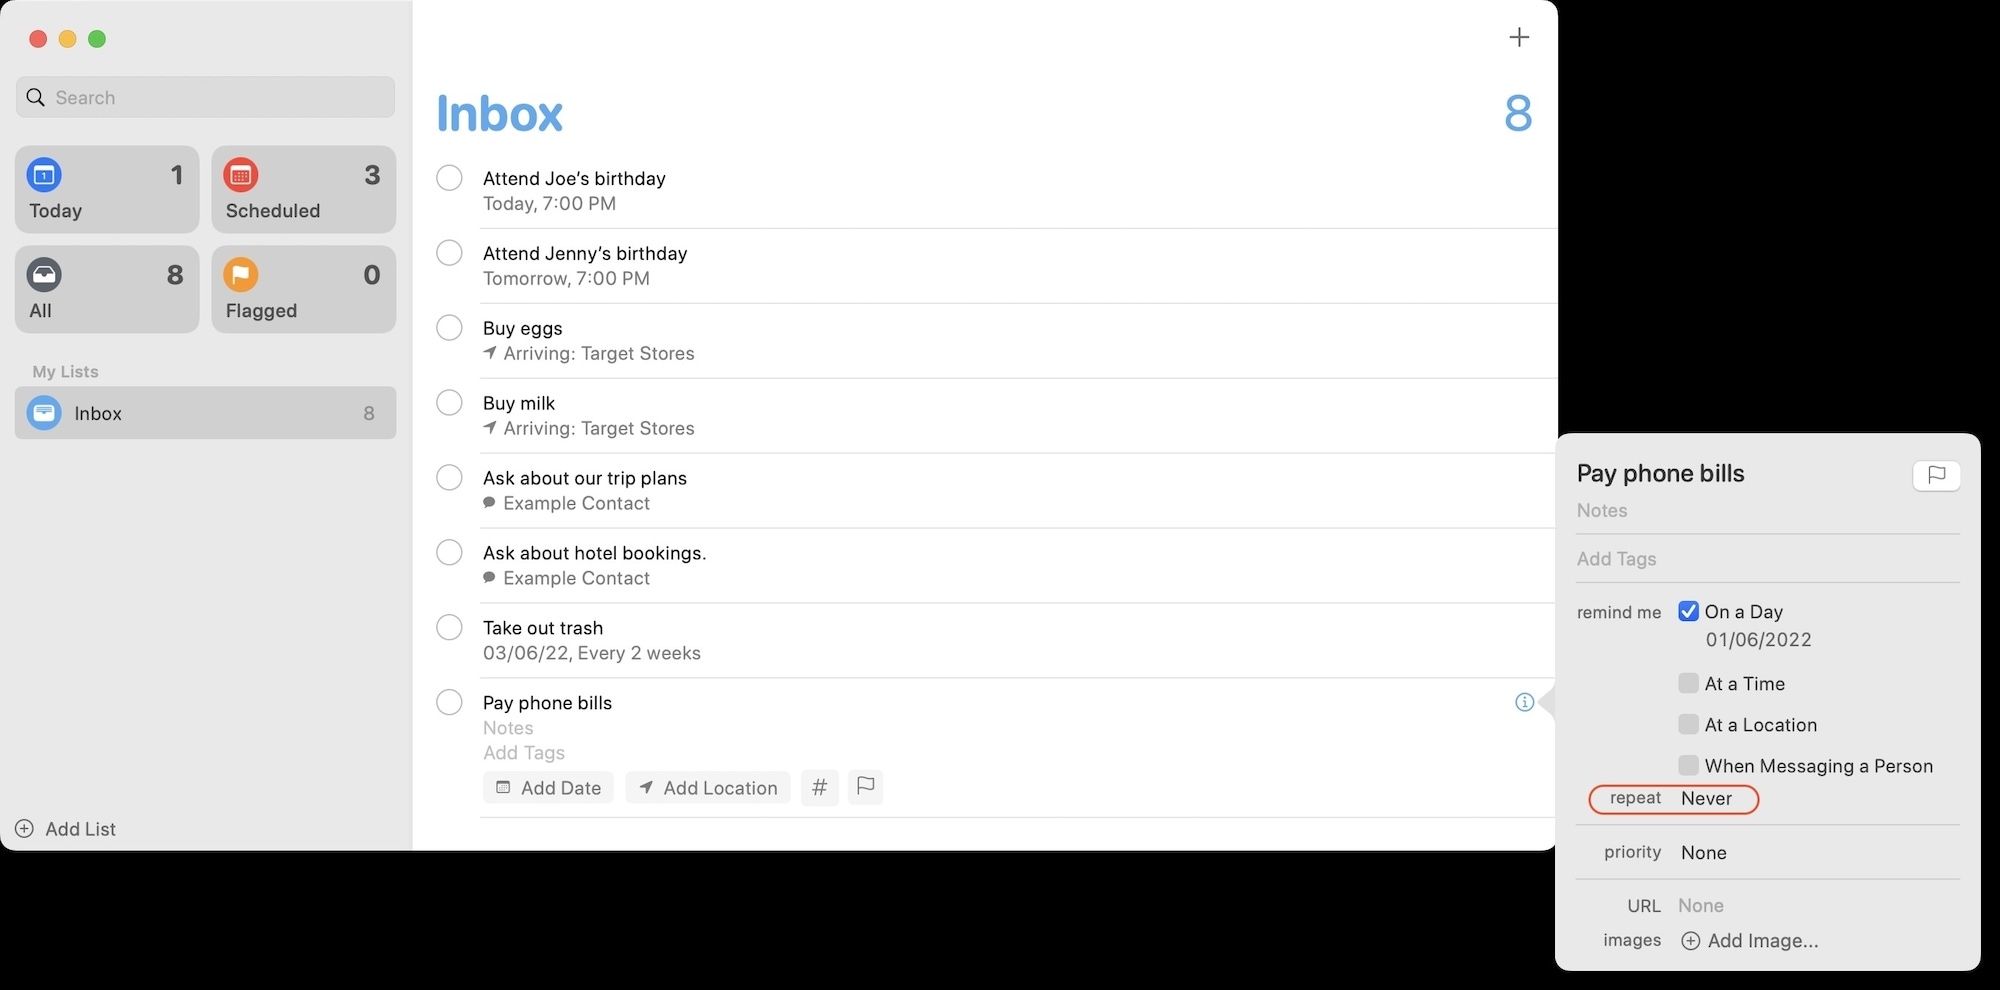
- Hit the CMD+N keyboard shortcut or hit the (+) button at the top-right and add the repeating task. Now, click on the (i) button next to the reminder.
- Enable the checkbox next to the On a Day option.
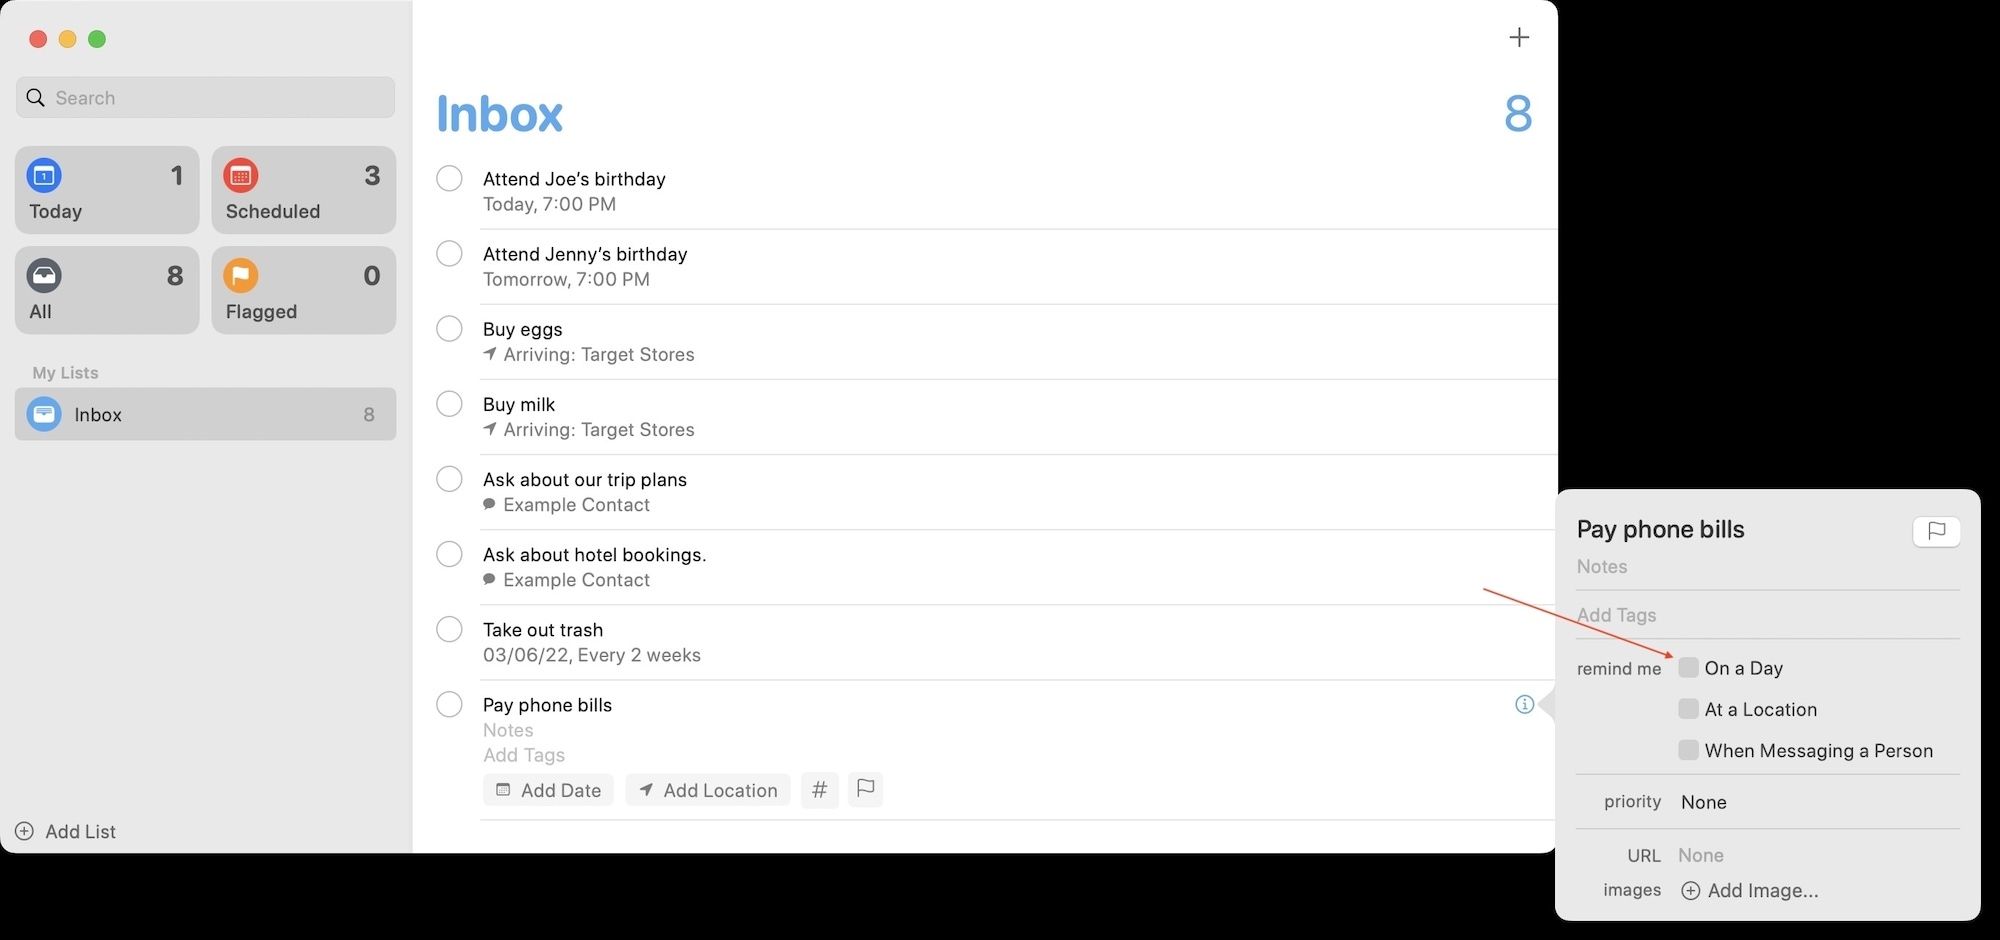
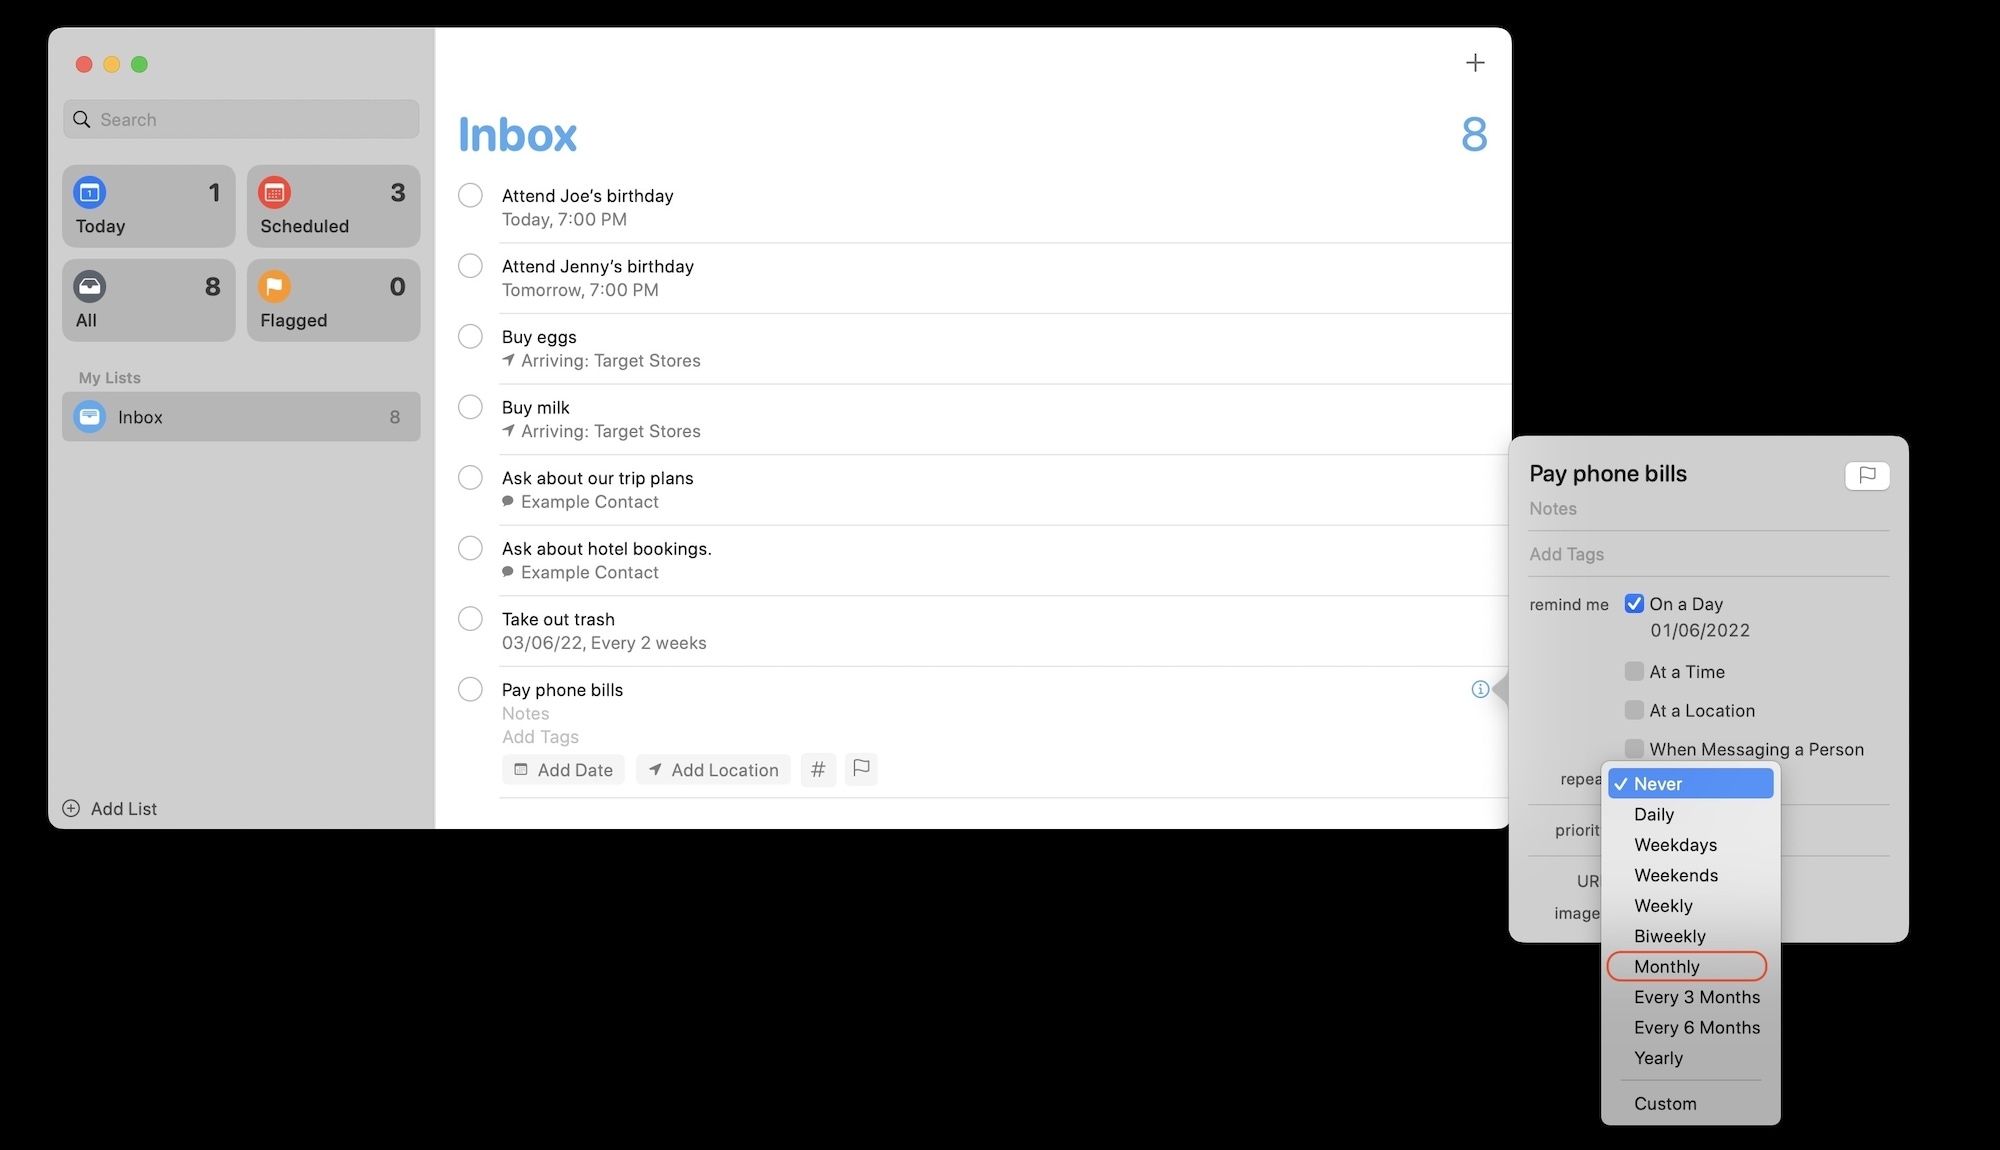
- Now, click the Never option next to repeat.
- Select the repeating frequency. Let’s make this one a monthly repeating reminder.
- Now, select the starting date for the reminder.
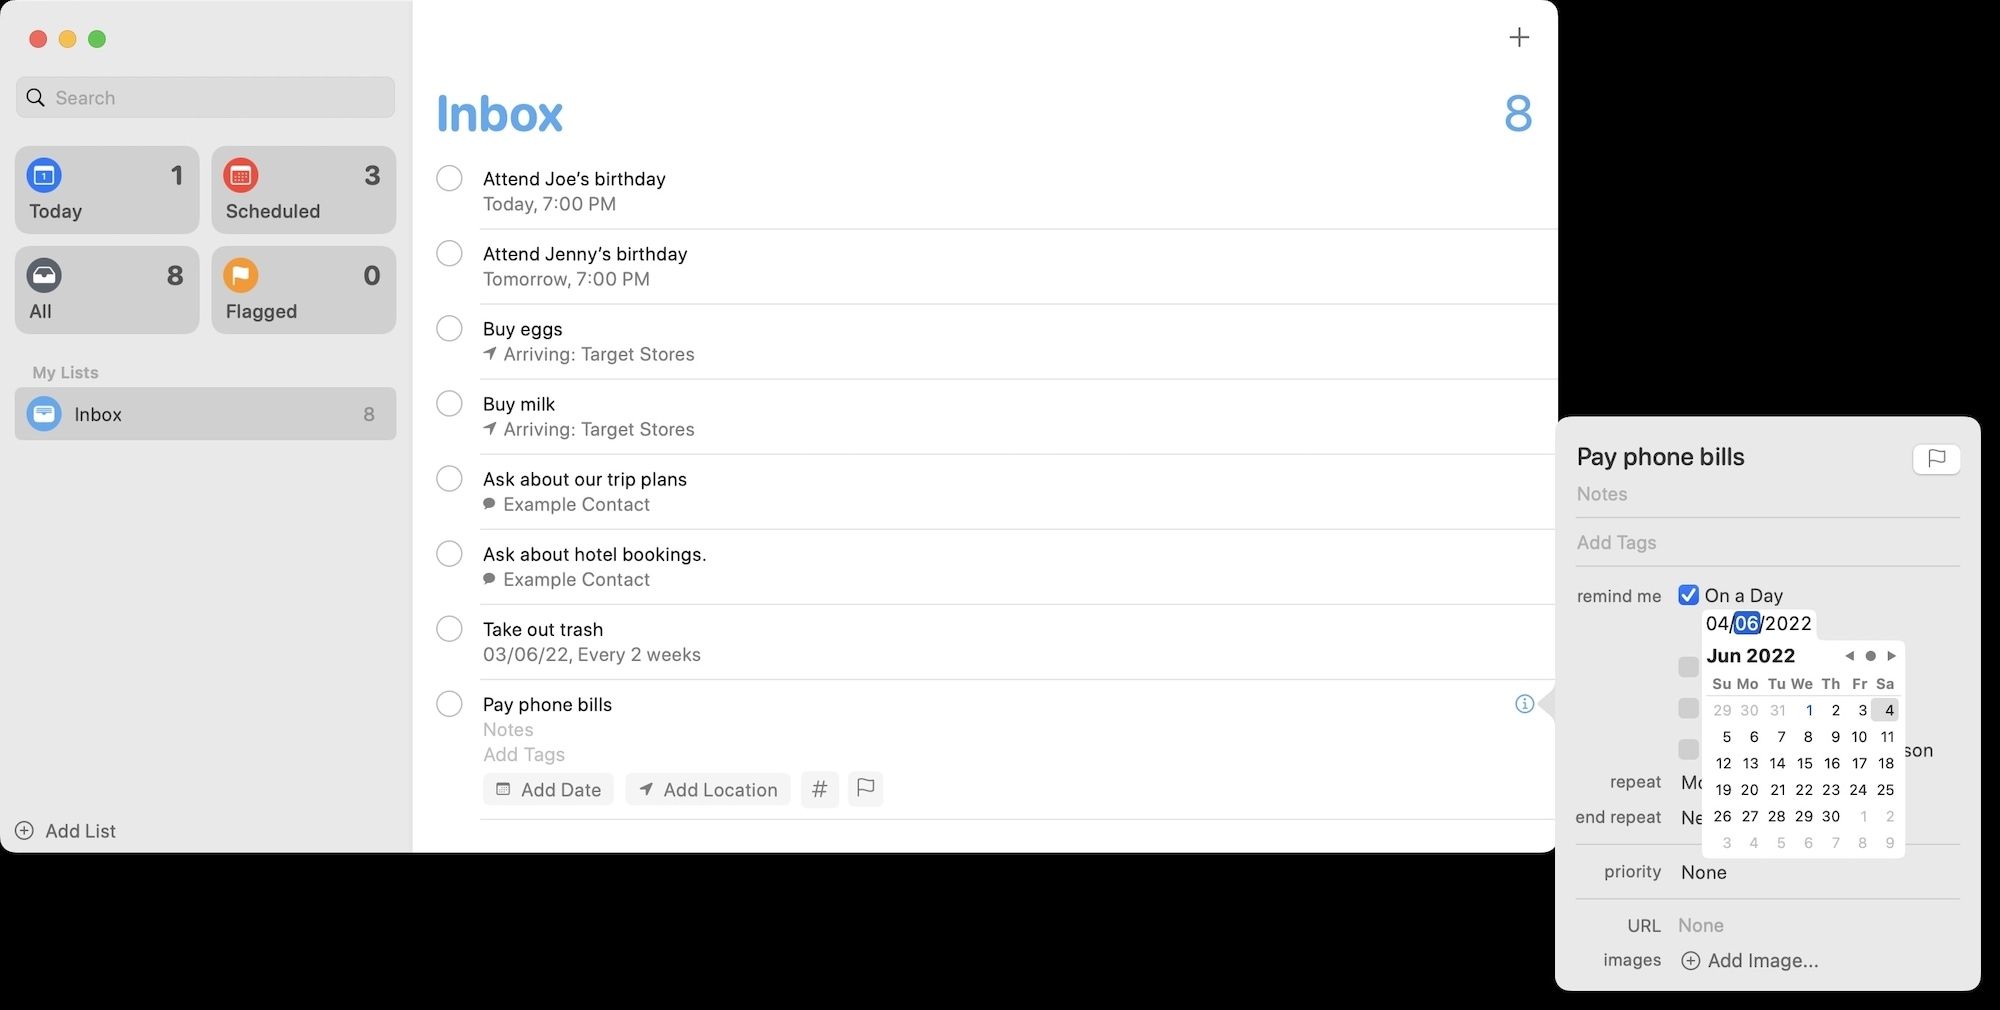
- You can also end the repeating task by using the end-repeat option.
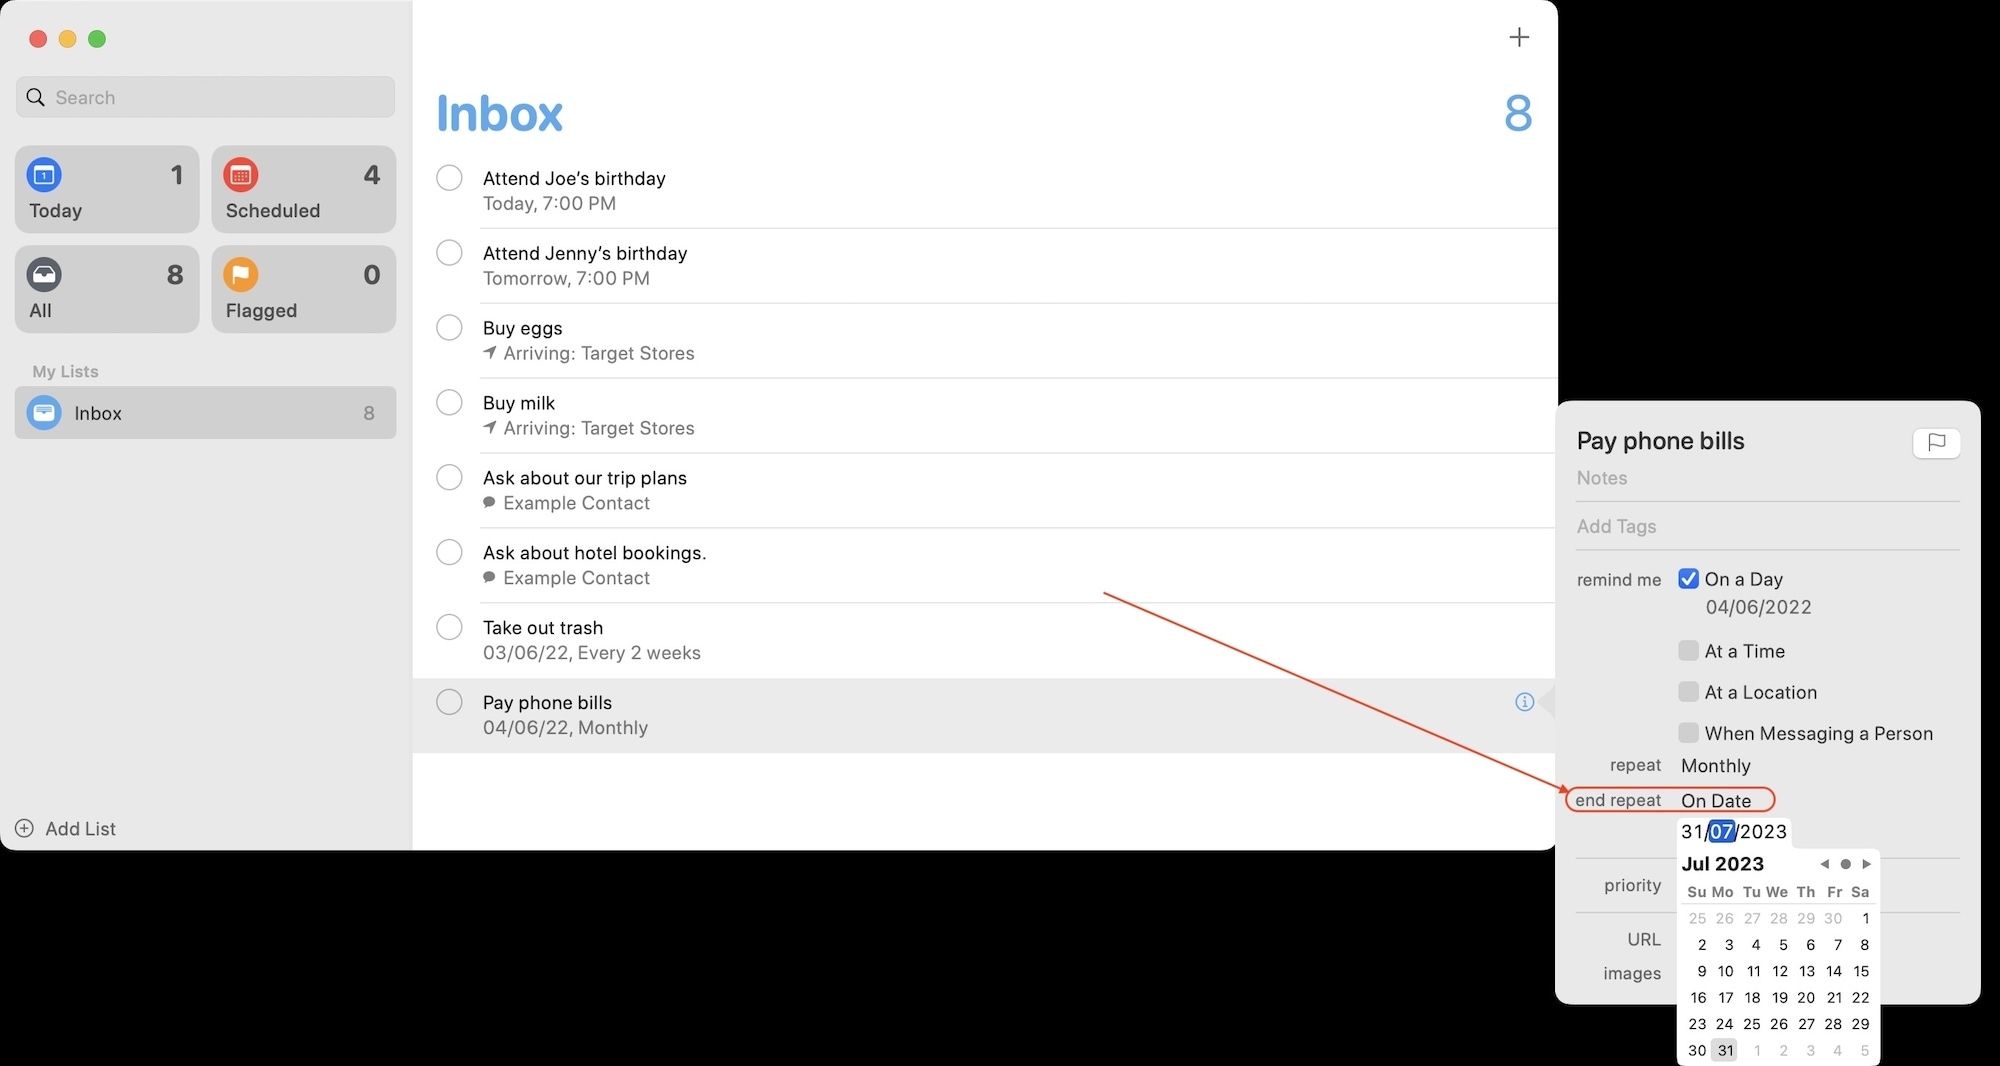
- You have now created a monthly repeating reminder.
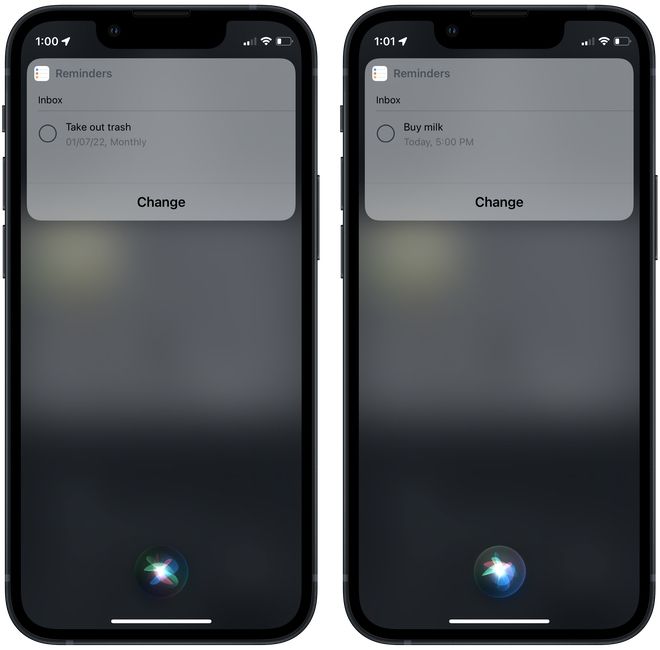
Create reminders using Siri
One of the things that I love most about the Reminders app is that it allows you to add tasks with your voice. Using Siri removes the friction of adding tasks and ensures that I never forget anything. Here are some of the commands you can use to create reminders using Siri.
- Hey Siri, “Remind me to buy milk today at 5 PM.”
- Hey Siri, “Remind me to take out the trash on the 1st of every month.”
Create reminders using the share sheet
You can also create reminders using the share sheet on iPhone and Mac. I use this function to quickly convert a piece of text to a task or even save links to interesting articles or videos that I might want to watch later.
How to create reminders using share sheet on iPhone
Let’s see how you can create reminders using the share sheet in Safari on iPhone.
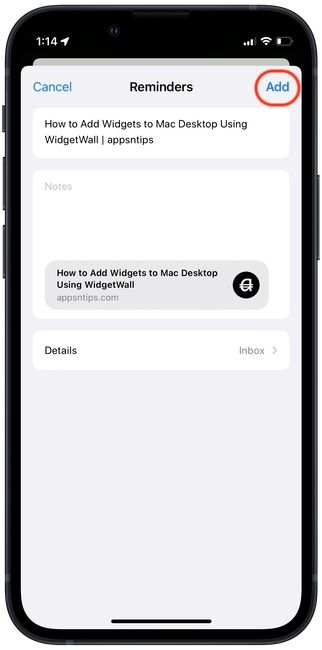
- When you come across an interesting article that you might want to revisit later, tap on the Share button in the bottom middle of the app.
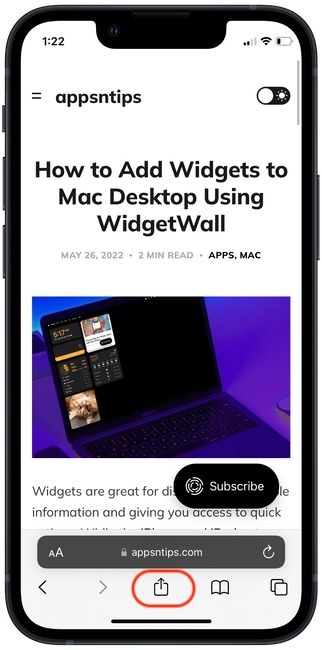
- Now, swipe from right to left on the Apps section and tap on Reminders when you find it.
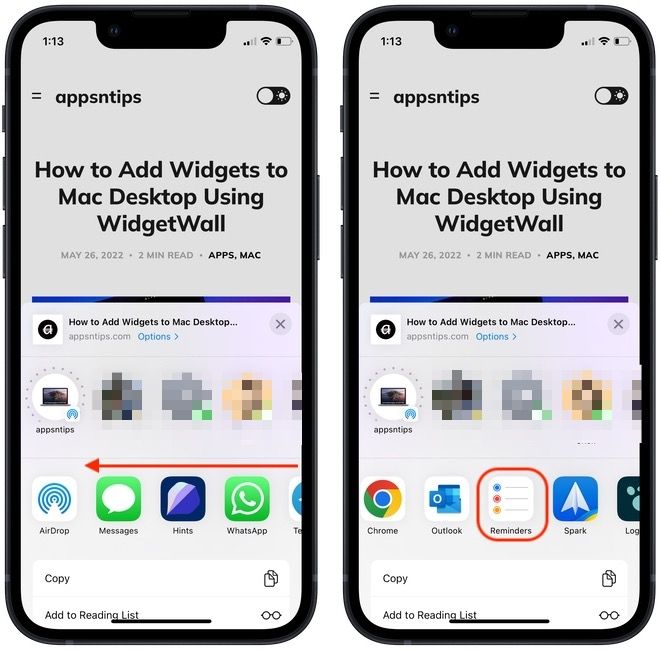
- As you can see, Reminders automatically fills the task with the article headline and puts the link of the article in notes. You can tap on the Add button to save the reminder.
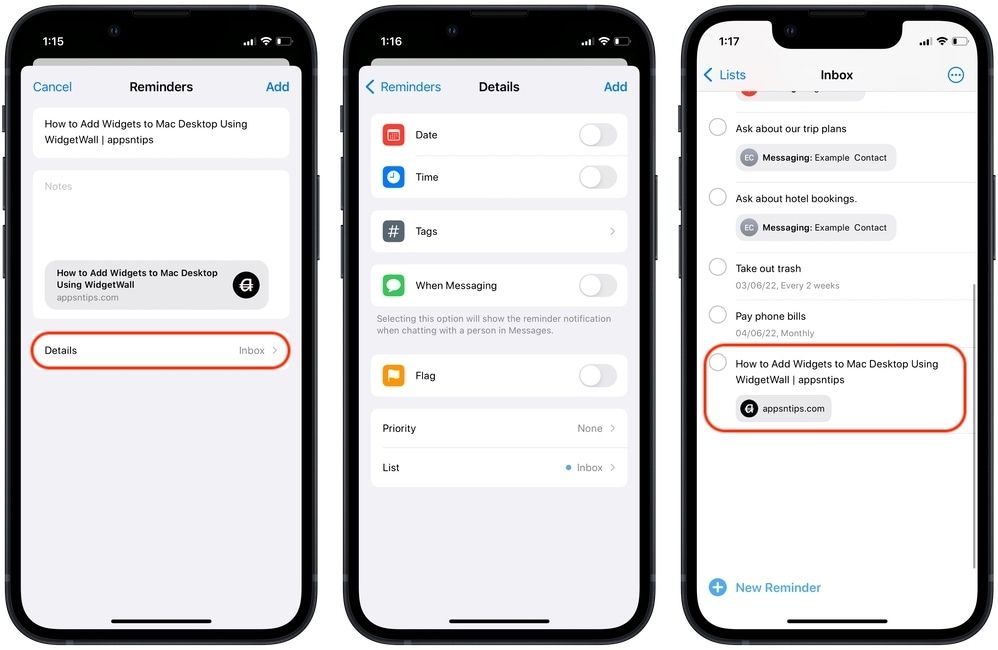
- If you want to add a time or date or customize anything else, tap on the Details button. After making the changes, tap on the Add button to add the reminder.
How to create reminders using share sheet on Mac
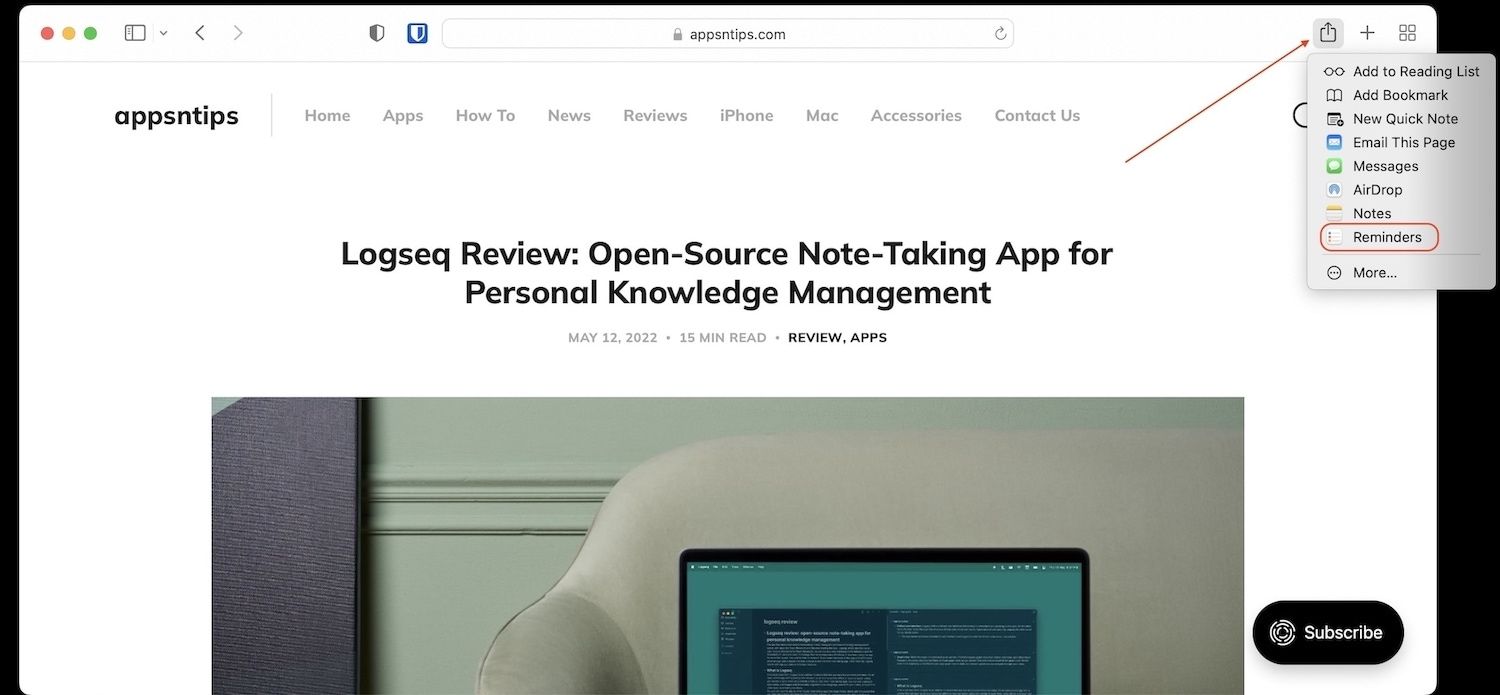
On Mac, you can use the share menu to send almost anything to reminders. Since we have used Safari as an example on iPhone, let’s do the same here.
- Open a webpage and click on the Share button in the top-right. Here, choose the Reminders option.
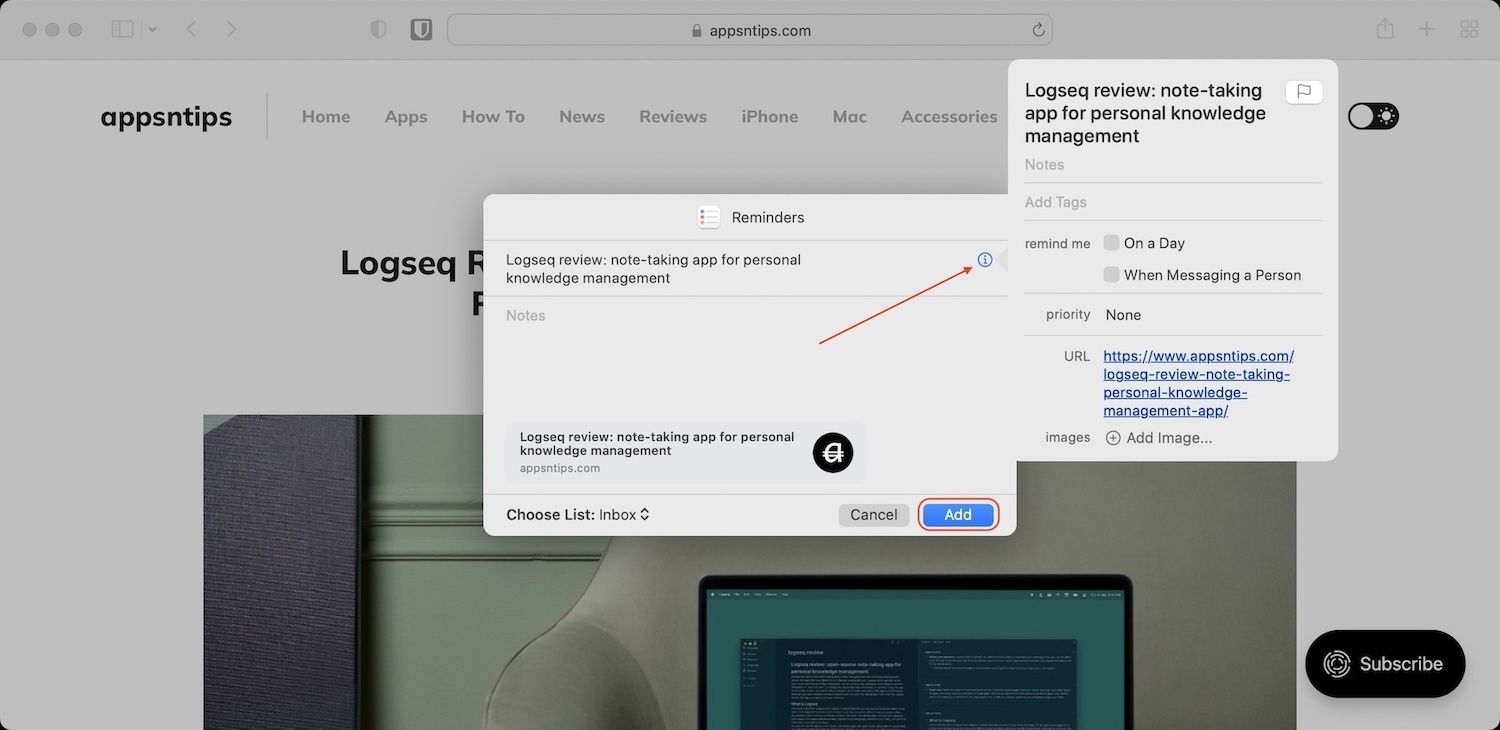
- You will see a pop-up window similar to the one on iPhone. You can click on the (i) button to customize the reminder. Once you are happy, click on the Add button to add the reminder.
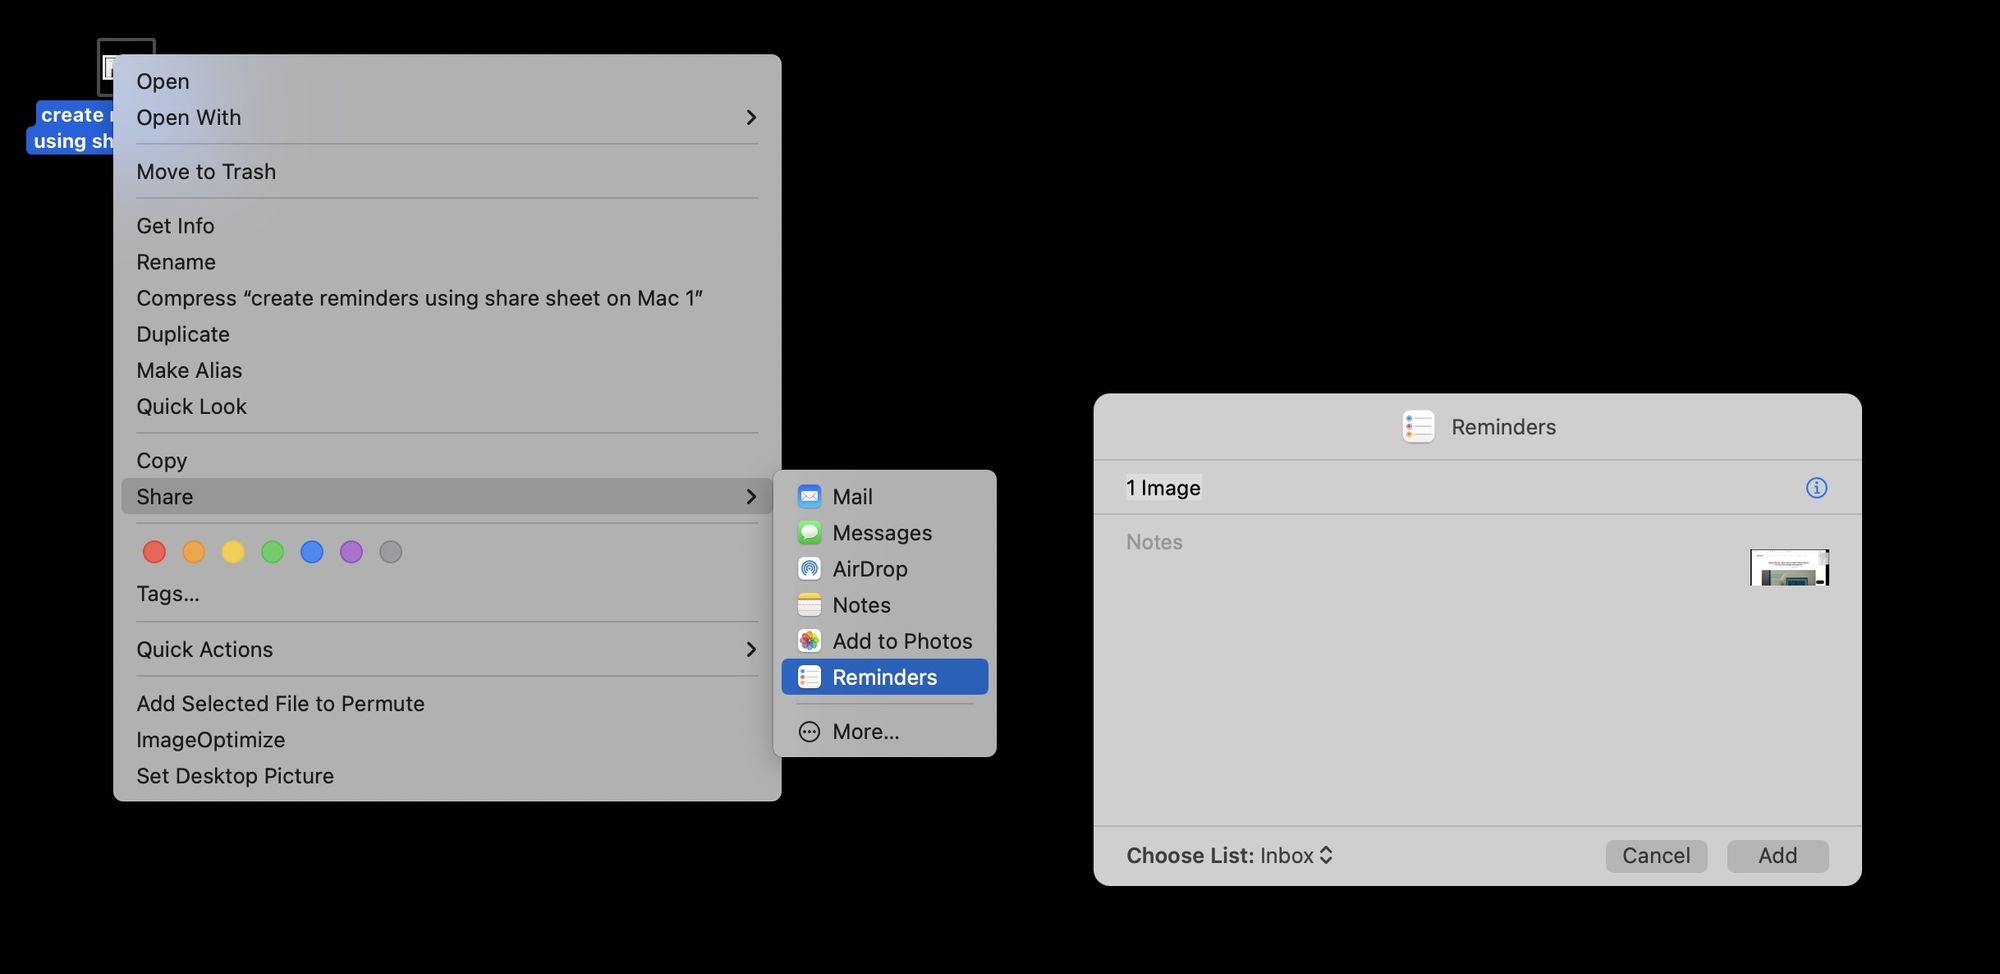
That’s one way to create a reminder using the share sheet. However, as I said, you can share almost anything on Mac to create a reminder. For example, let’s say you are writing inside Apple Notes app and you want to convert a piece of text to a task. Select the text and right-click on it to access the share menu and select Reminders.

You will see that your selected text is already auto-filled in the notes section of the reminder.
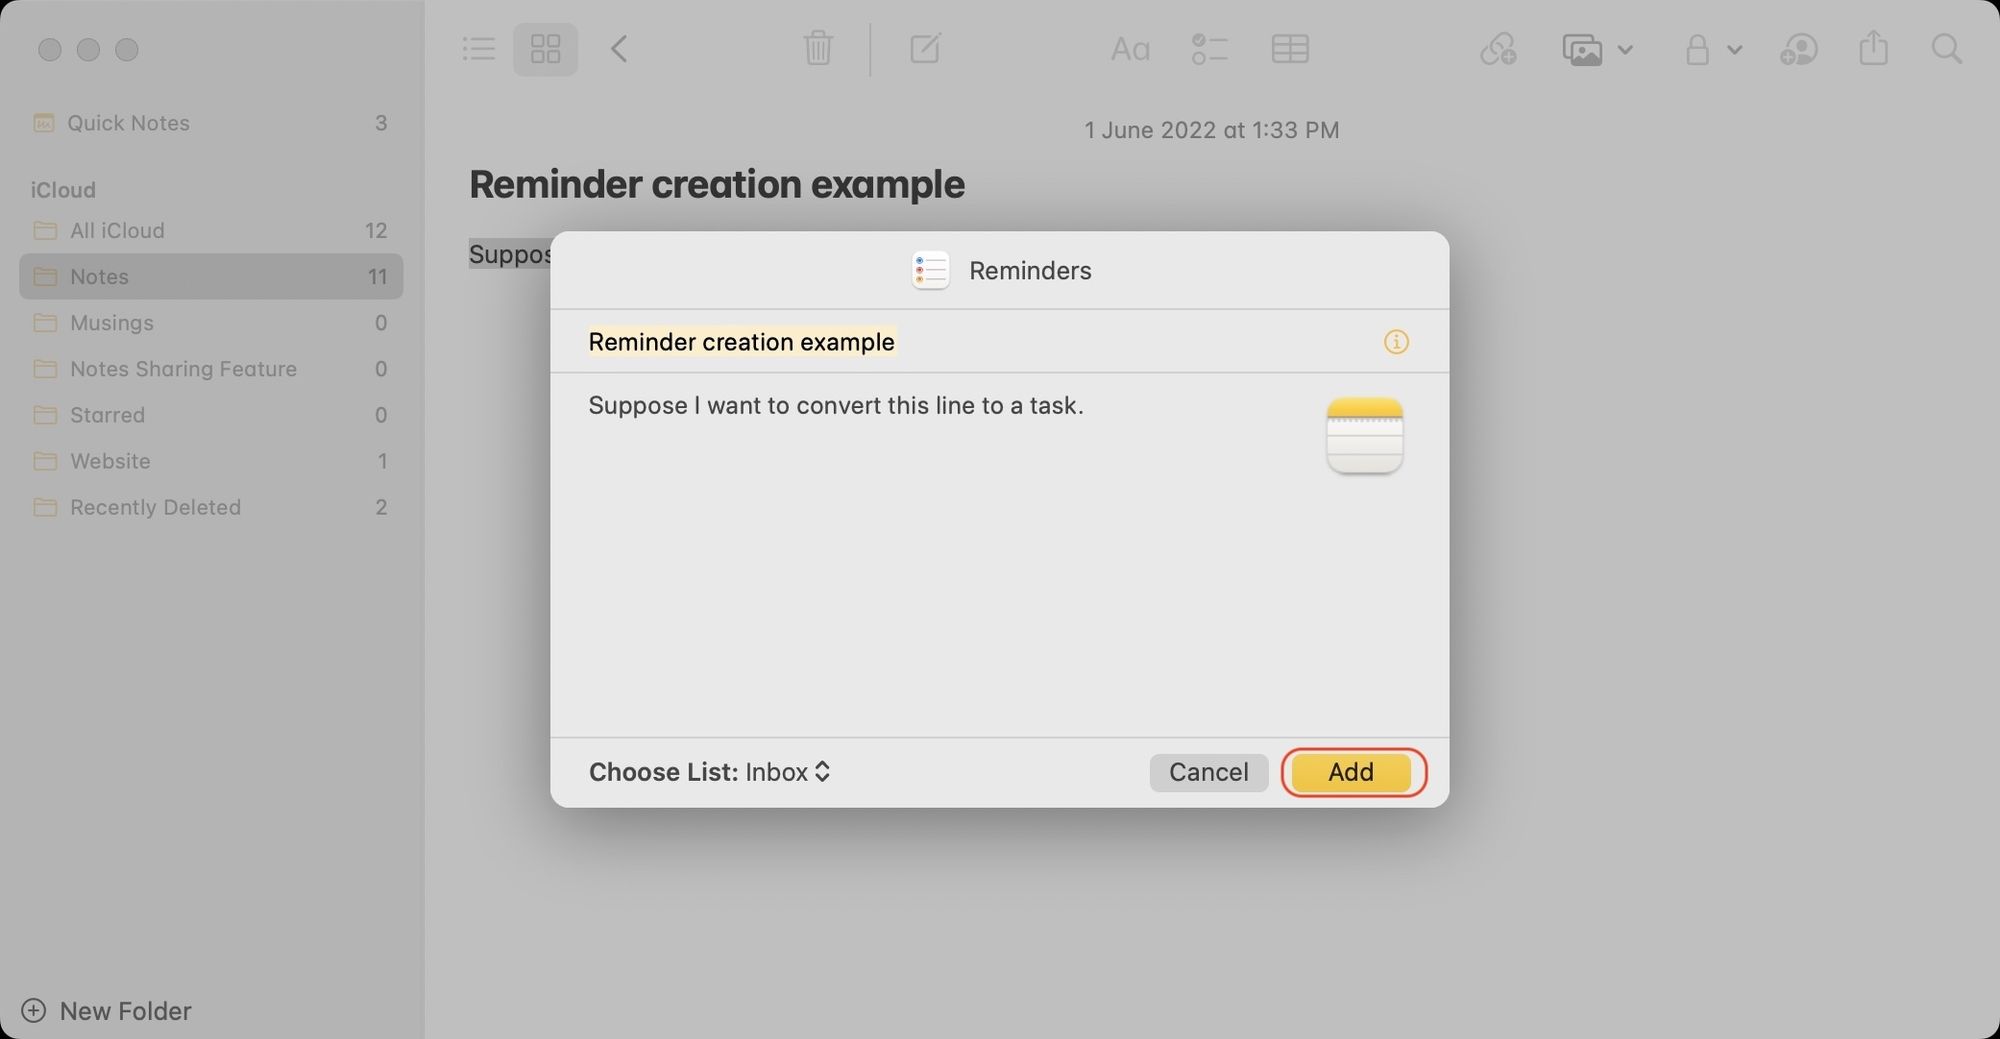
Similarly, you can share an image to create a reminder about it. Anything that you select to share is added in the notes section. You can change the title of the reminder, add the date and time, and then save it.
Organize reminders
Now that you know how to create reminders and have filled the app with tasks, you can start to learn to organize your reminders, so you don’t get a heart attack from seeing all the tasks at once.
Organize reminders using lists
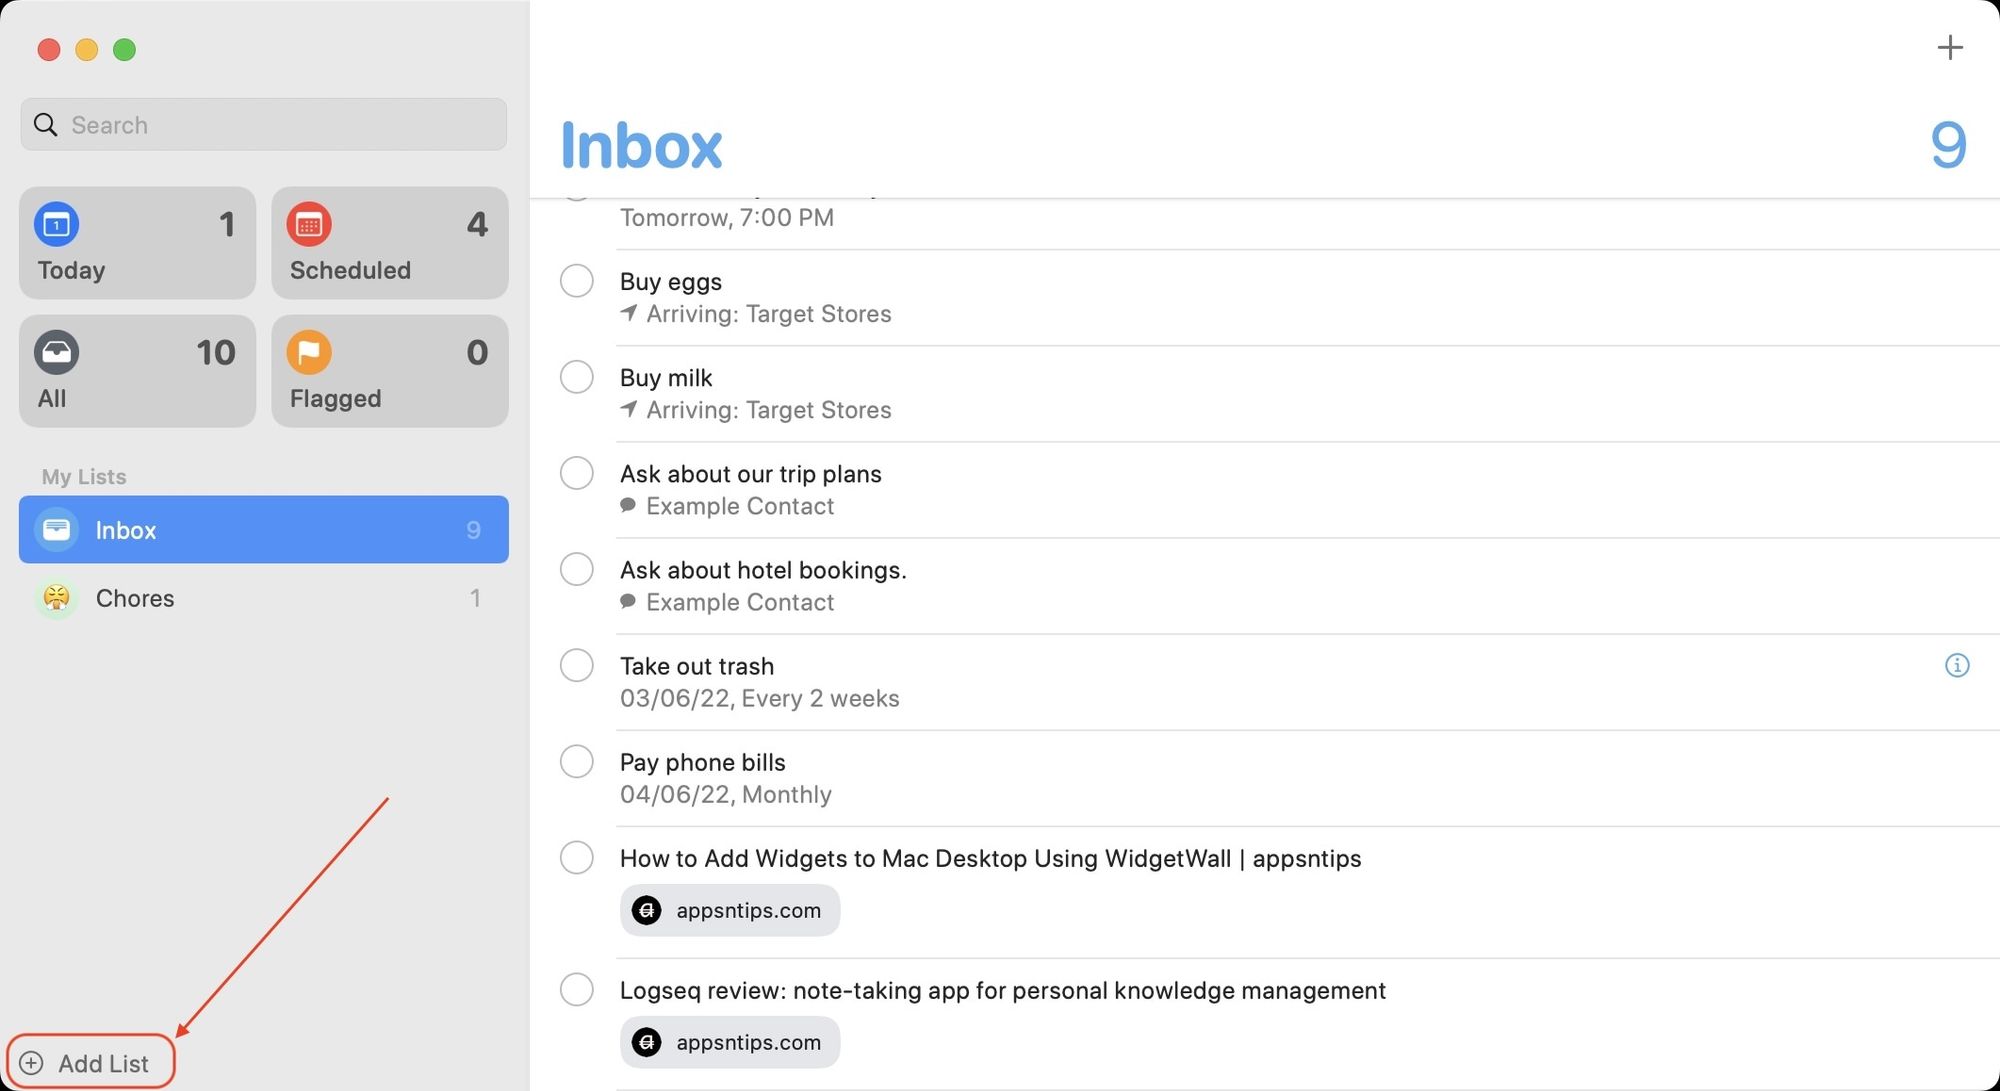
The first level of organization you can do is by using lists. You can create lists to organize reminders. A reminders list acts just like a folder. Like you can save files in folders to organize them, you can do the same with reminders.
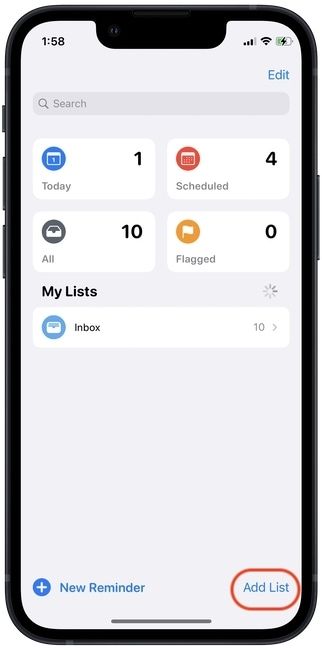
How to organize reminders using lists on iPhone
- Launch the Reminders app and tap on the Add List button in the bottom-right corner.
- Give the list a name and tap on one of the color pallets to give it a distinct color.
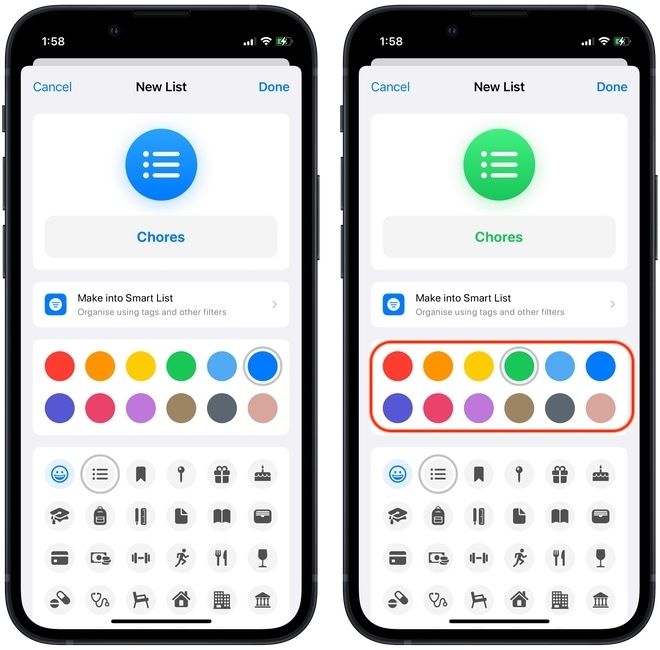
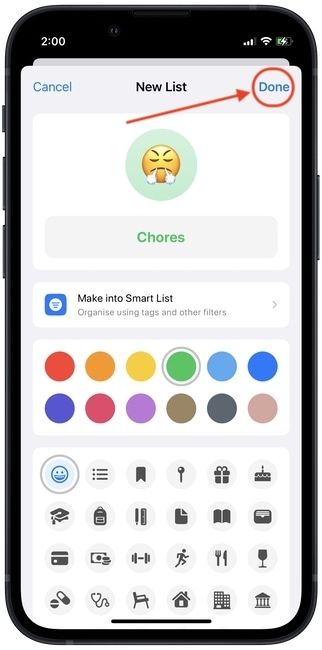
- Next, you can choose an icon for the list. You get a varied selection of icons. You can even use emojis using the emoji icon.
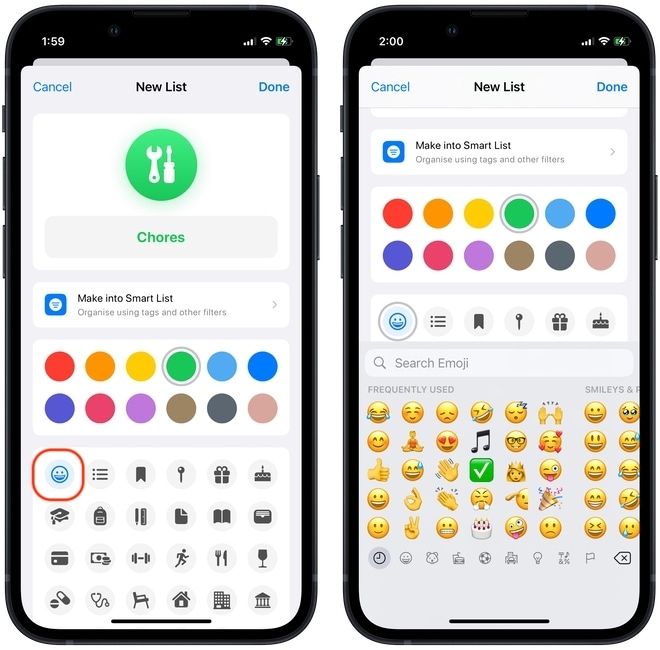
- After selecting the icon, tap on the Done button in the top-right corner to save the list.
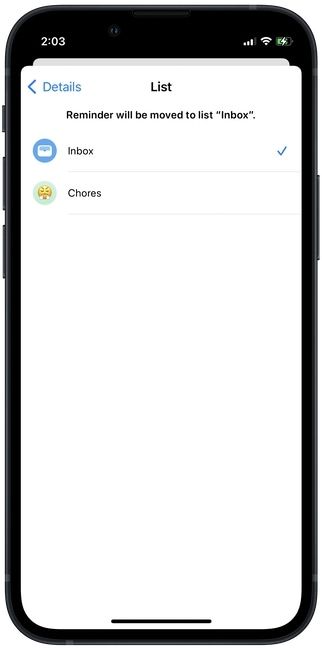
- To move a reminder to this list, tap on the (i) icon next to the reminder, scroll down to find the List option, and tap on it.
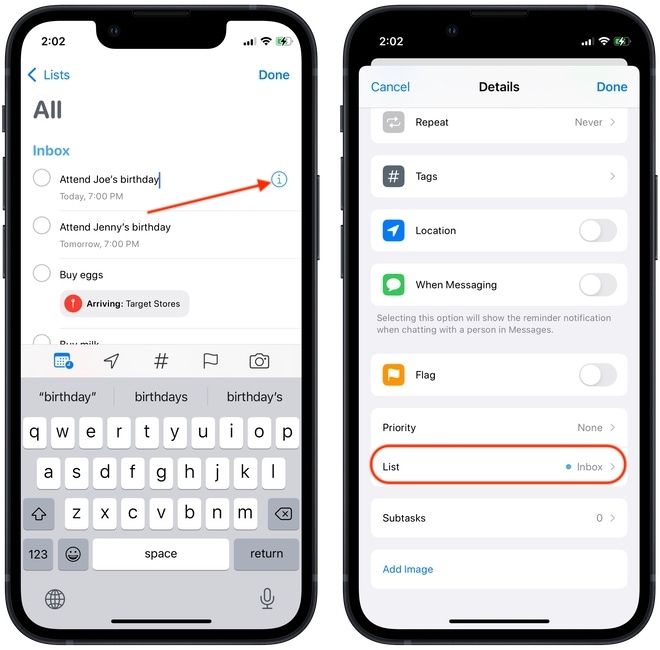
- Now, select the list you want.
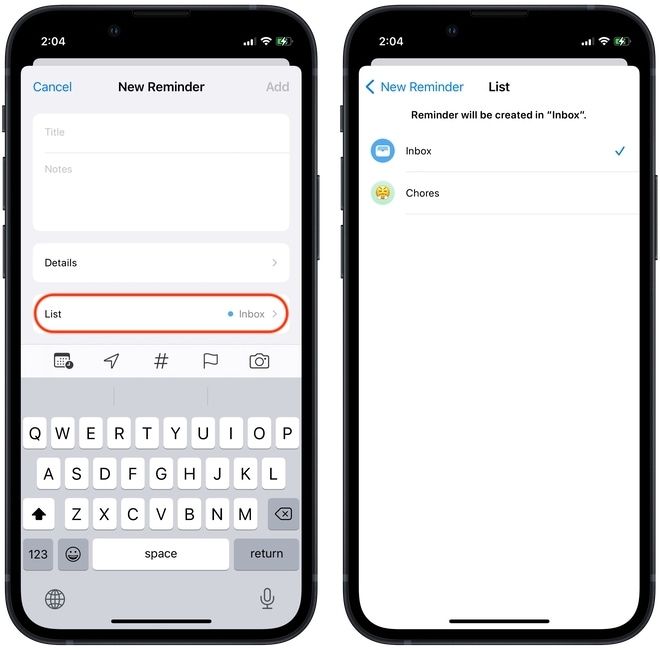
- You can also add a reminder directly to a list. When creating a new reminder, tap on the List option to select the list you want. Alternatively, you can tap to open a list and then add reminders.
How to organize reminders using lists on Mac
The process of creating lists and organizing reminders in lists is quite similar on Mac.
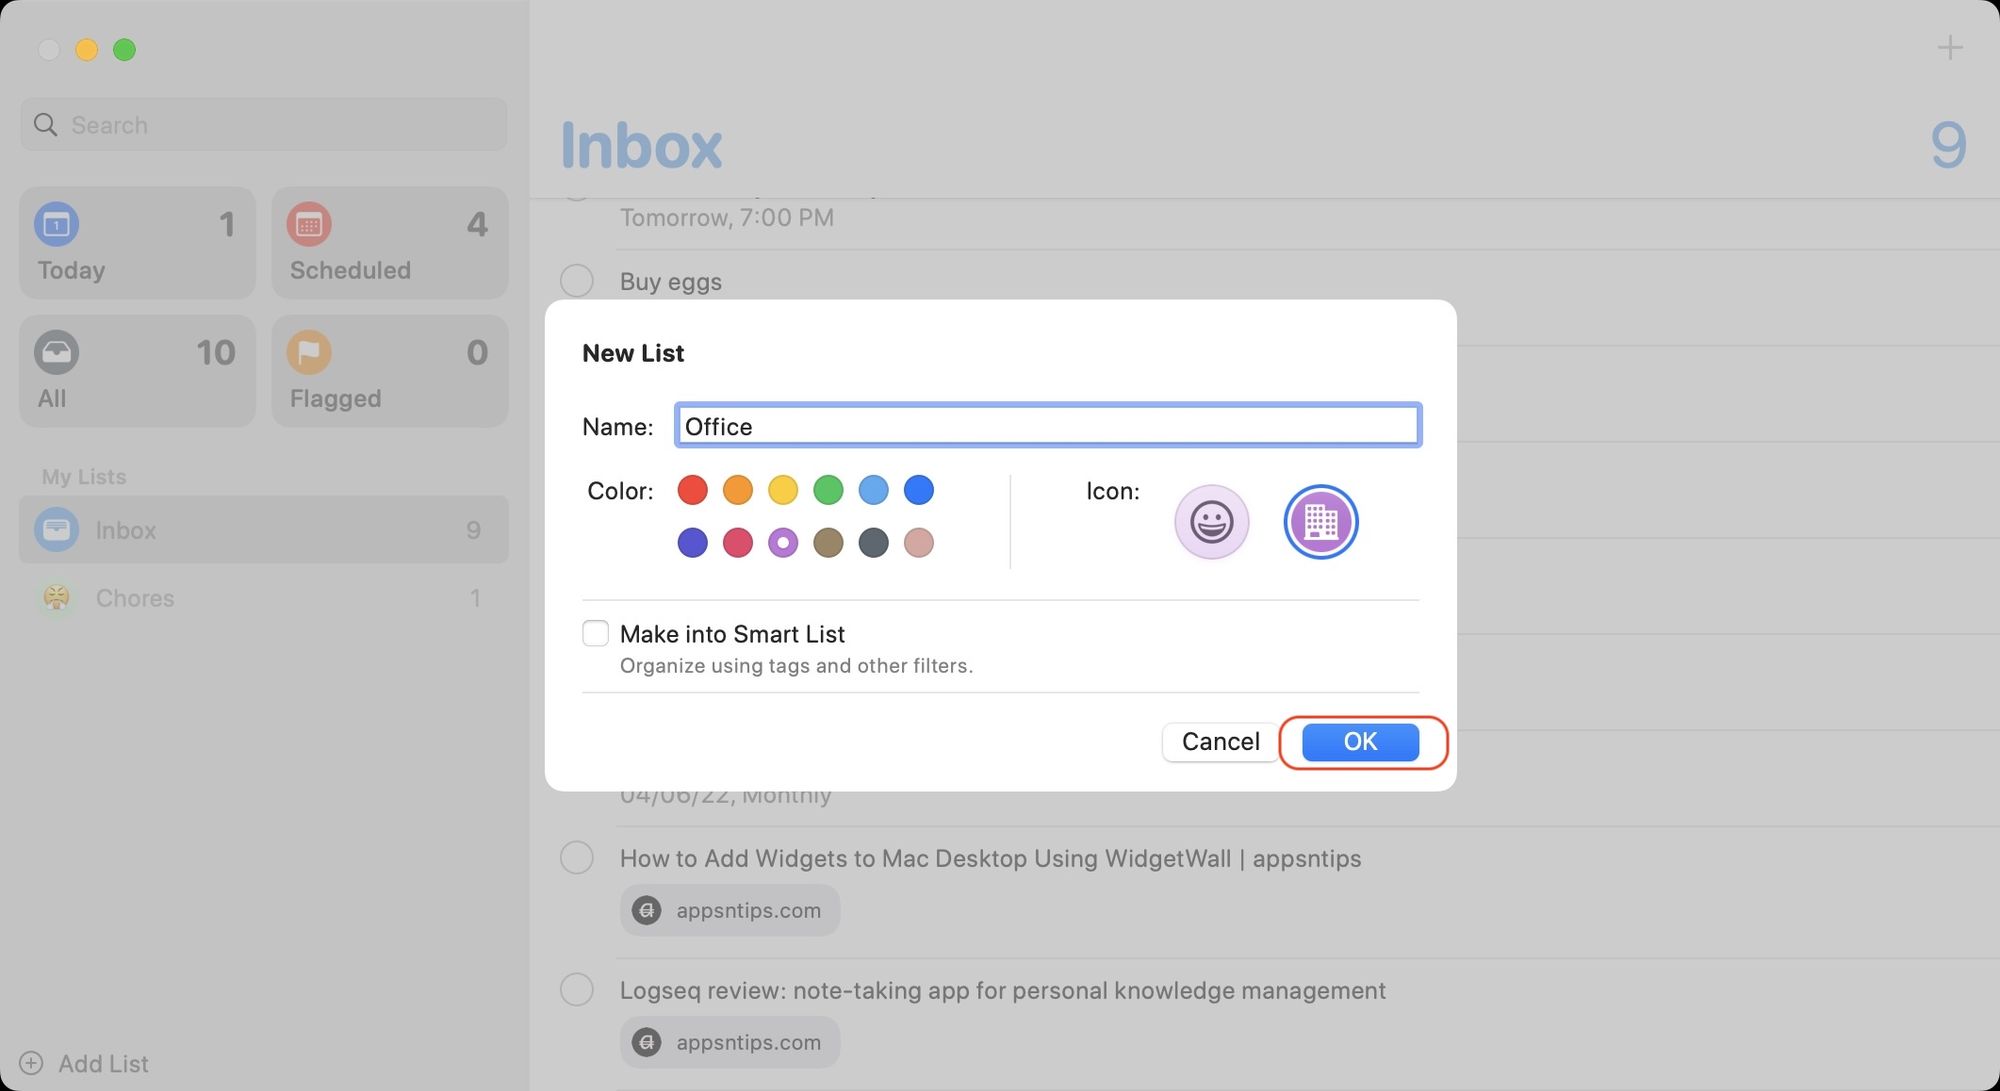
- Click on the Add List button in the bottom-left corner
- Enter the list name, select the color and use the icon and emoji button to add a distinct icon.
- To add a reminder to this list, simply drag and drop the reminder to the list.
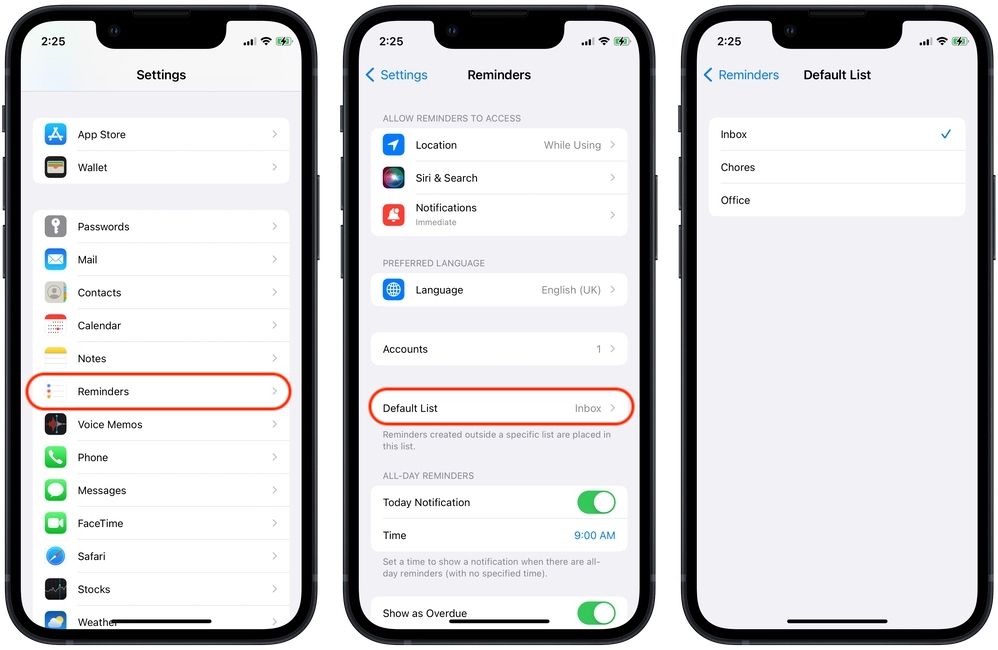
How to set a reminders list as the default list
When you create a new reminder, it’s already assigned to a default list. To make it easier to identify new reminders and process them later, you can make a default list. For example, I have created an Inbox list and set it as the default. Here’s how you can set a reminders list as default.
On iPhone, go to Settings → Reminders → Default List, and choose the one you want to select as default.
On Mac, launch the Reminders app and use the keyboard shortcut CMD+, or go to Reminders → Preferences.

On the preferences page, you can set your default list.
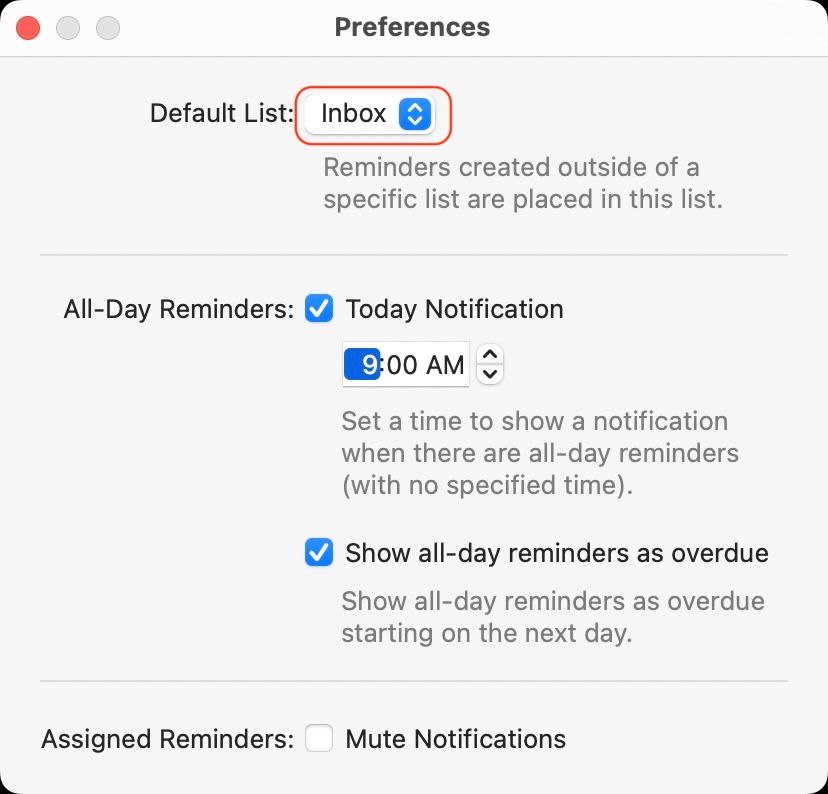
Note that any change you make will sync across devices, so you cannot set different default lists for different devices.
Organize reminders using tags
Tags are a great way of organizing reminders in a more free-form way. Since you can add multiple tags to a reminder, you can organize your reminders however you want.
How to use tags to organize reminders on iPhone
- When creating a reminder, tap on the # button above the keyboard to add tags.
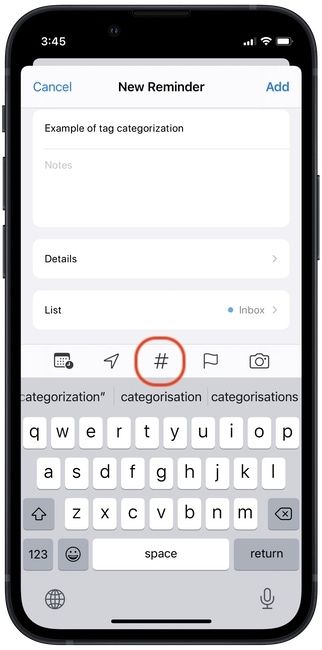
- Add as many tags as you want (separated by space), and tap on Add to save the reminder.
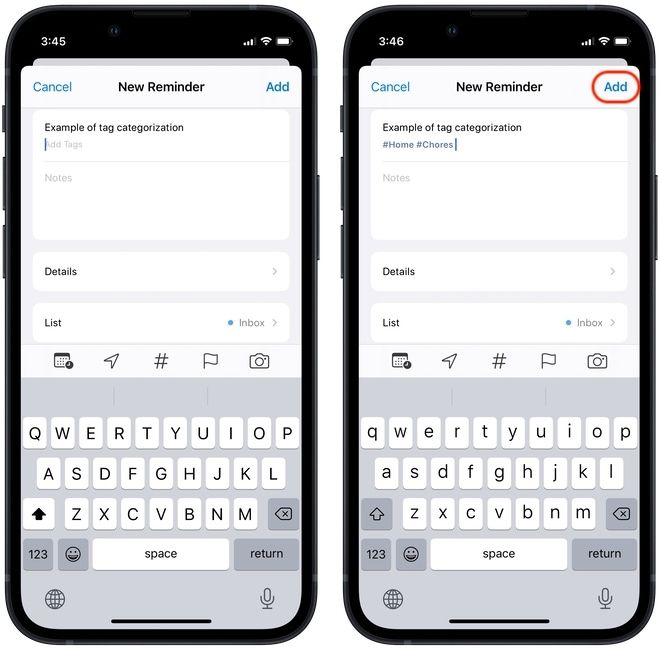
- On the homepage of the Reminders app, you will now see the list of tags you have added. Tap on a tag to show all the reminders with the same tag.
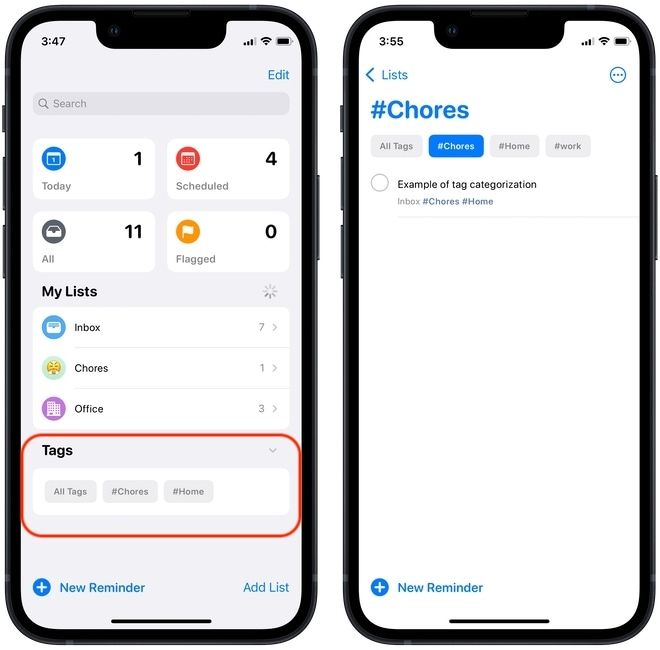
How to use tags to organize reminders on Mac
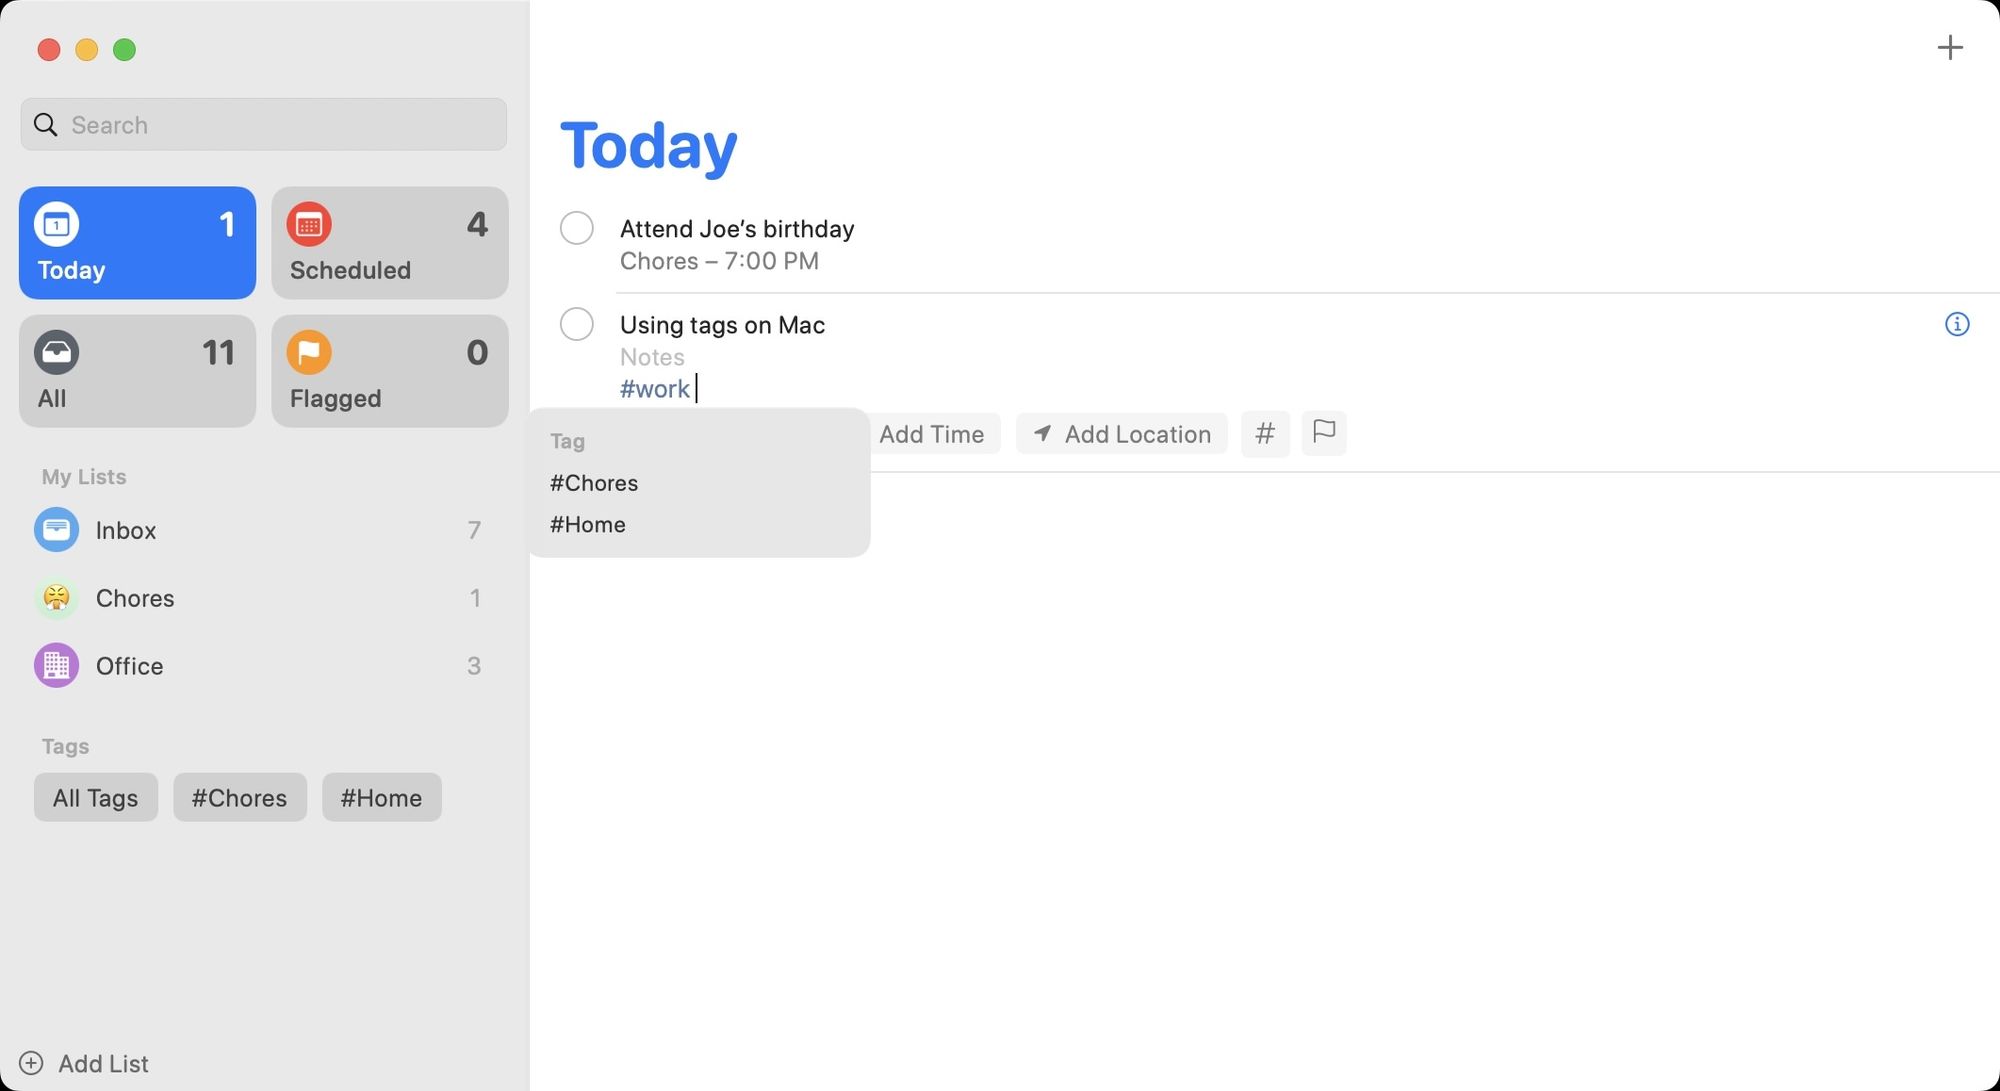
- When creating a new reminder, click on the Add Tags section or on the # symbol.
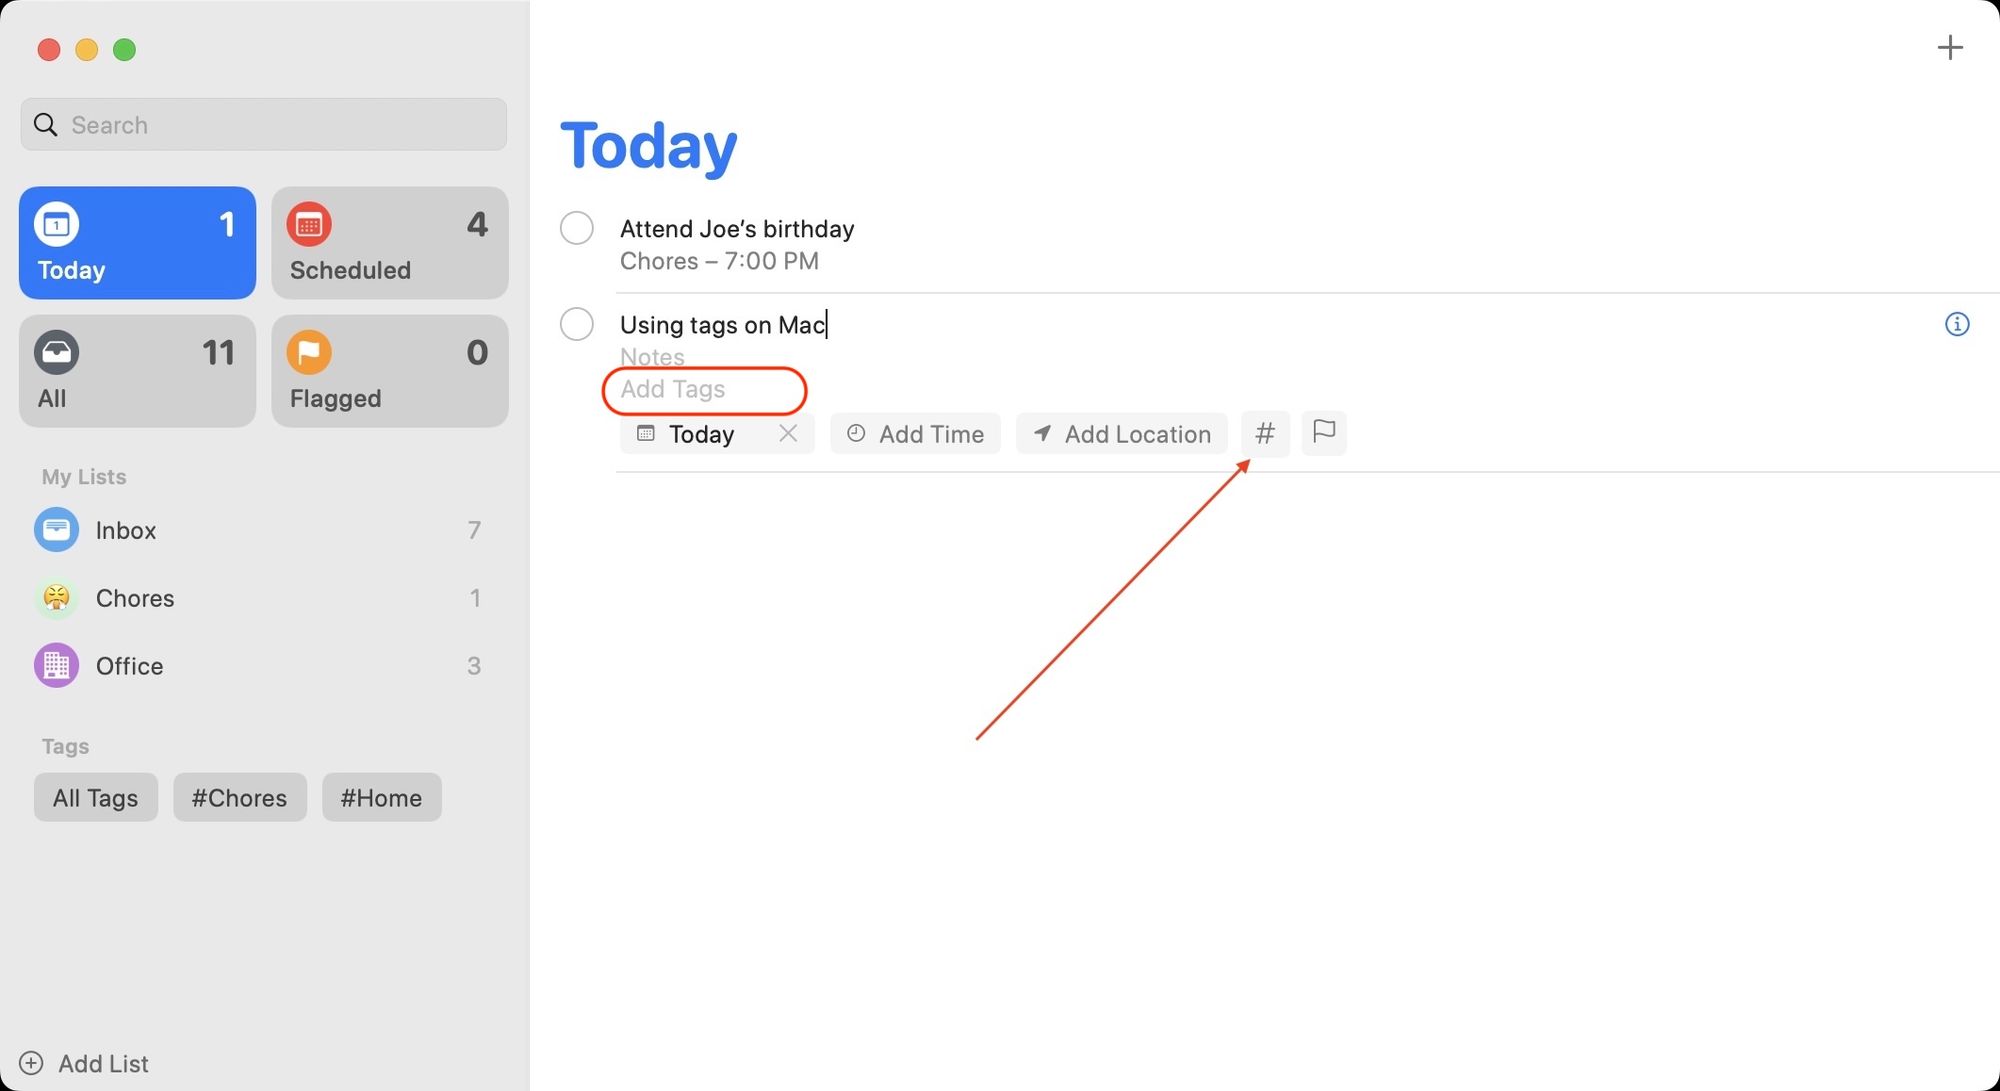
- You can then select from already available tags or create new ones.
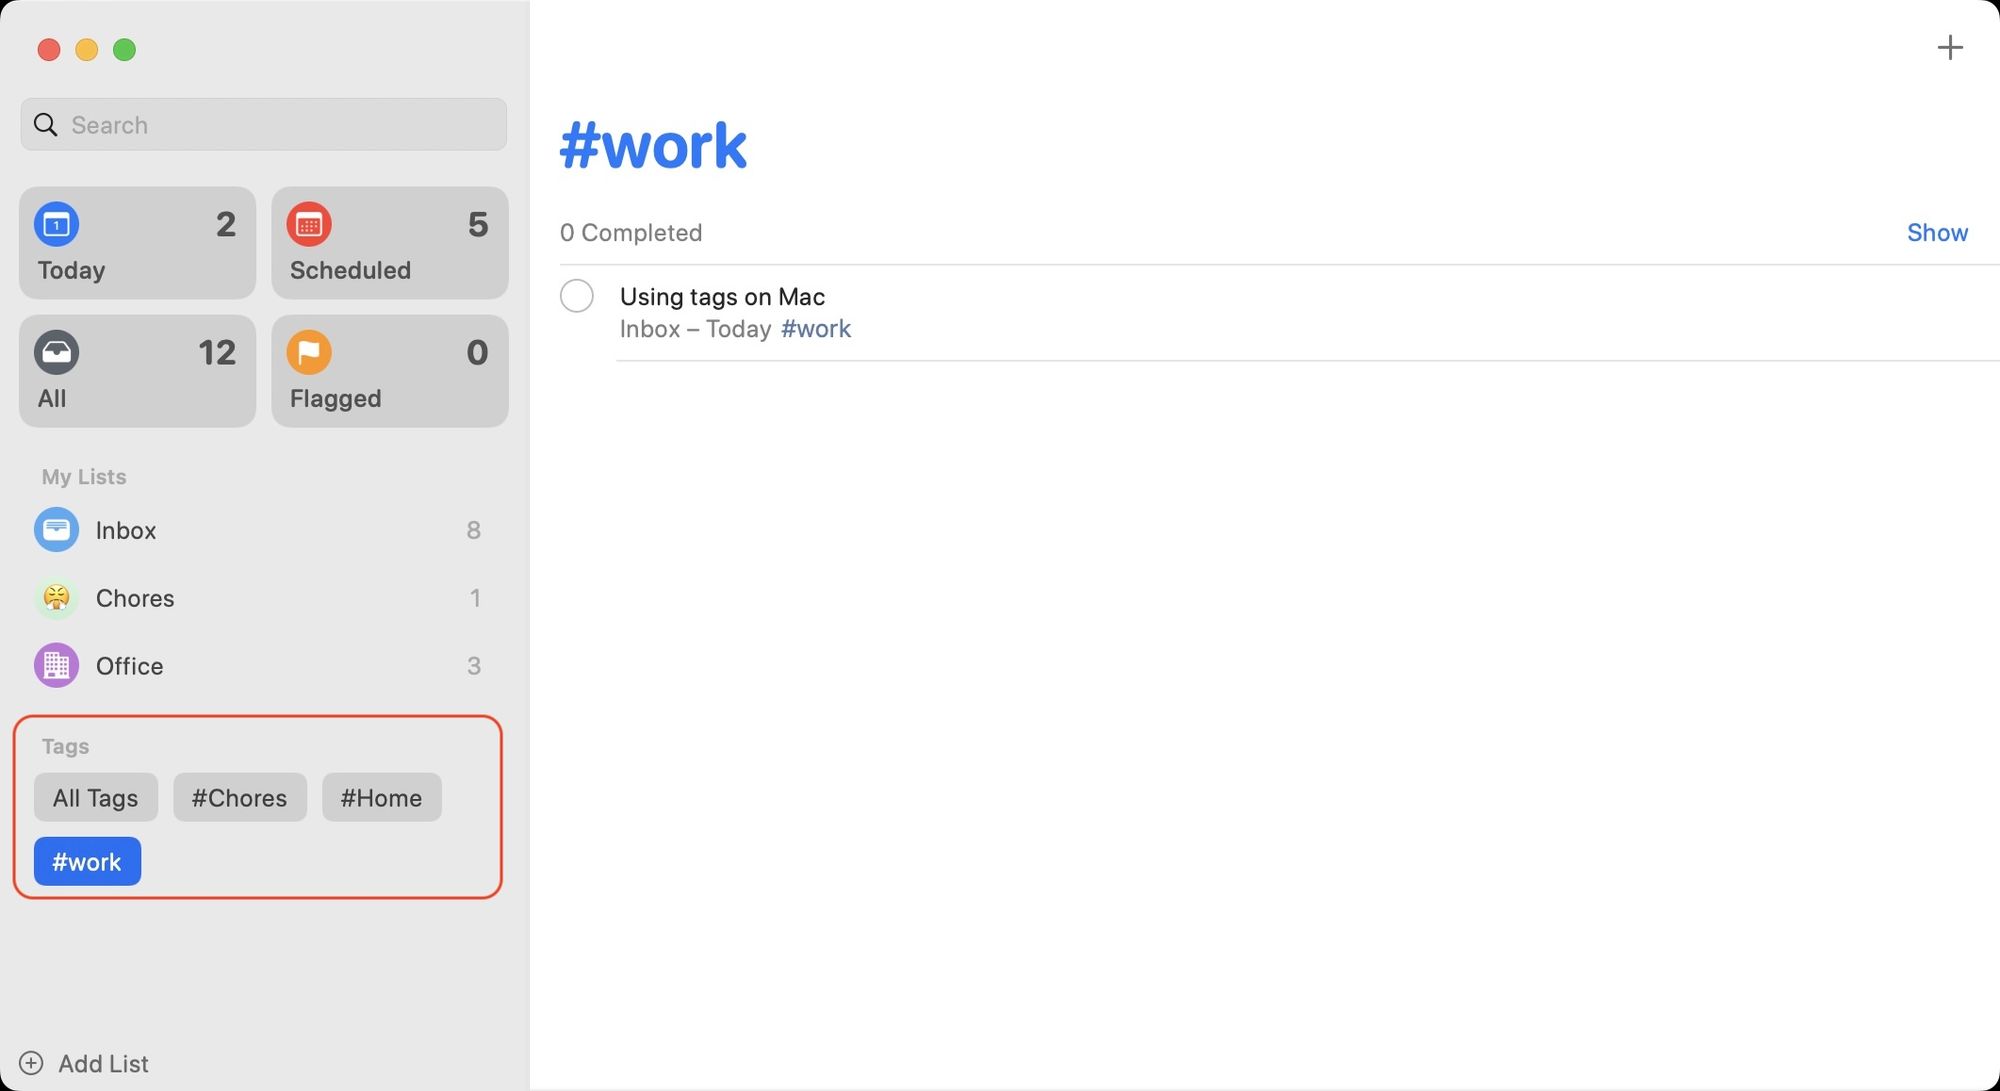
- You can use the left sidebar to click on a tag to see all the reminders with the same tag.
Organize reminders using Smart Lists
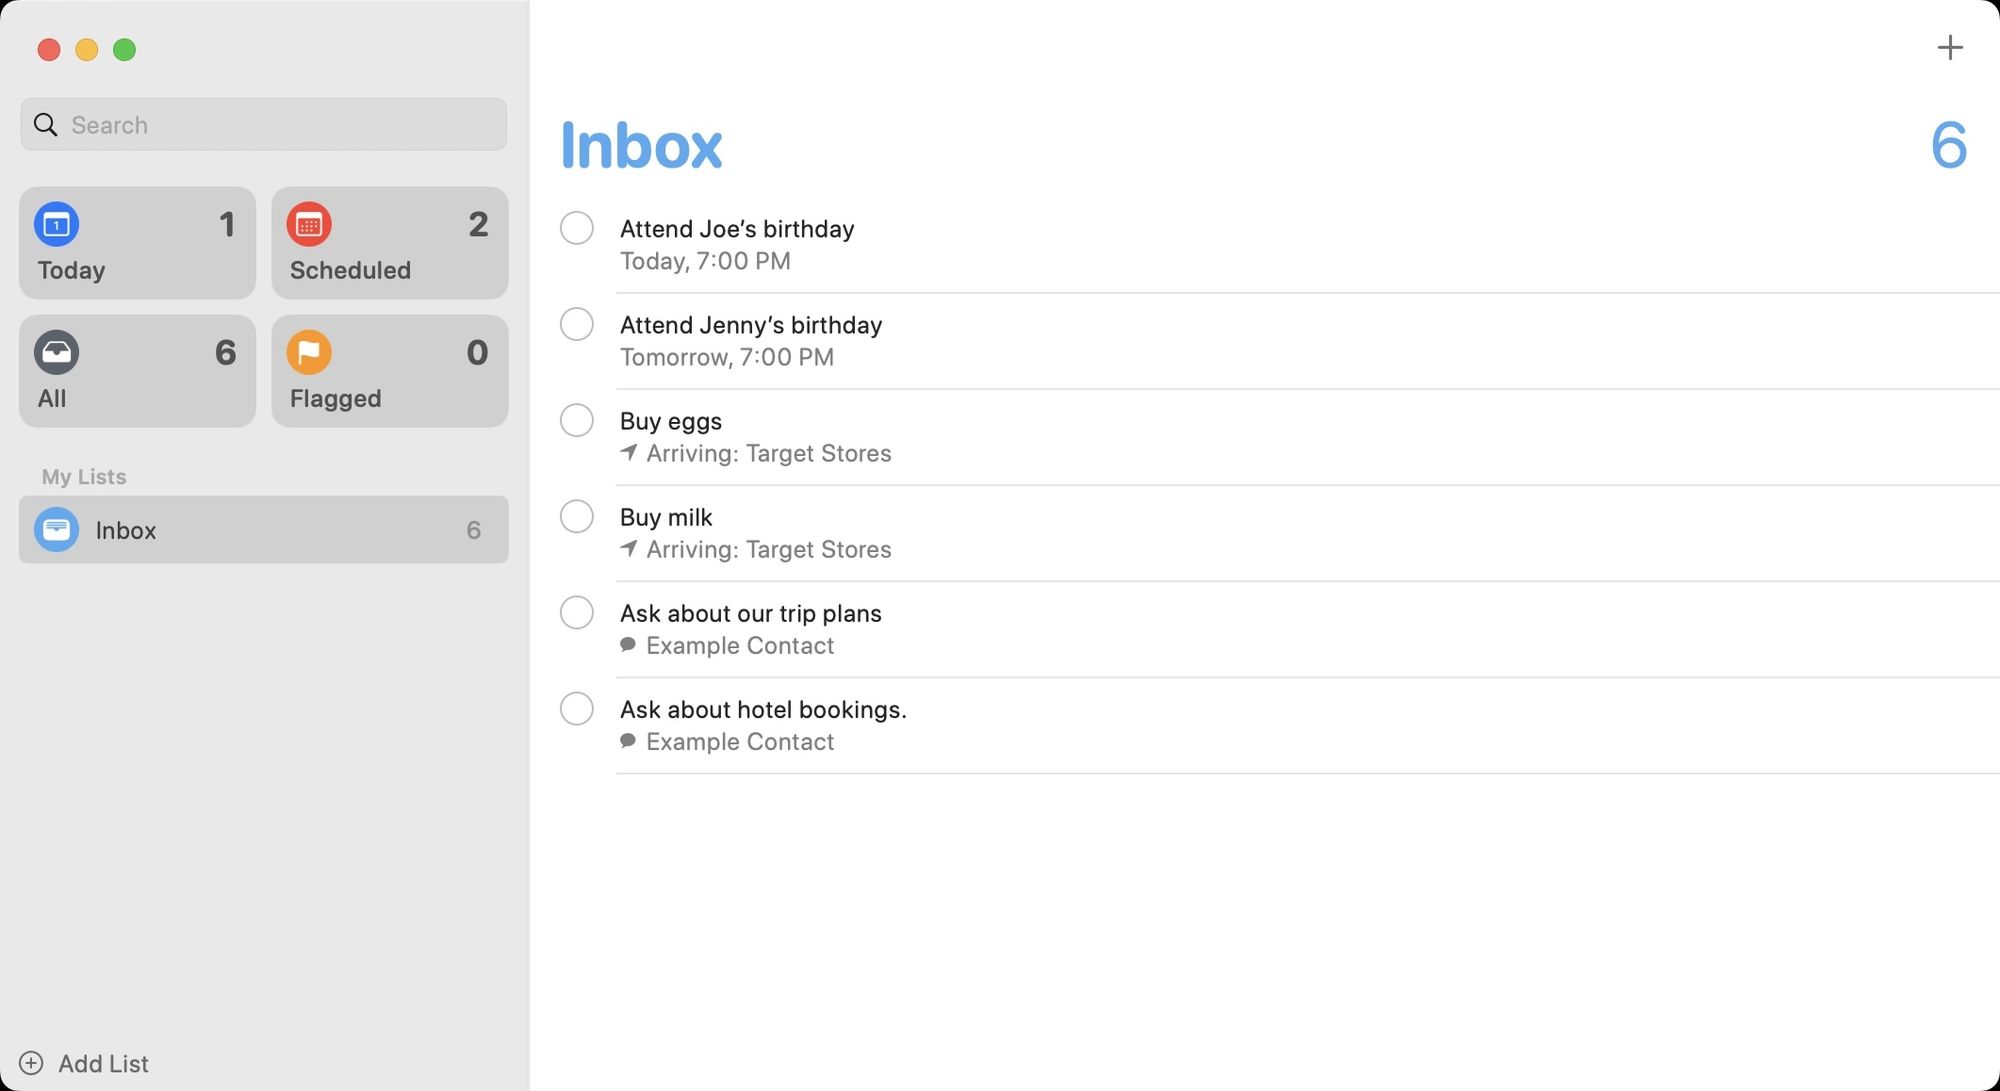
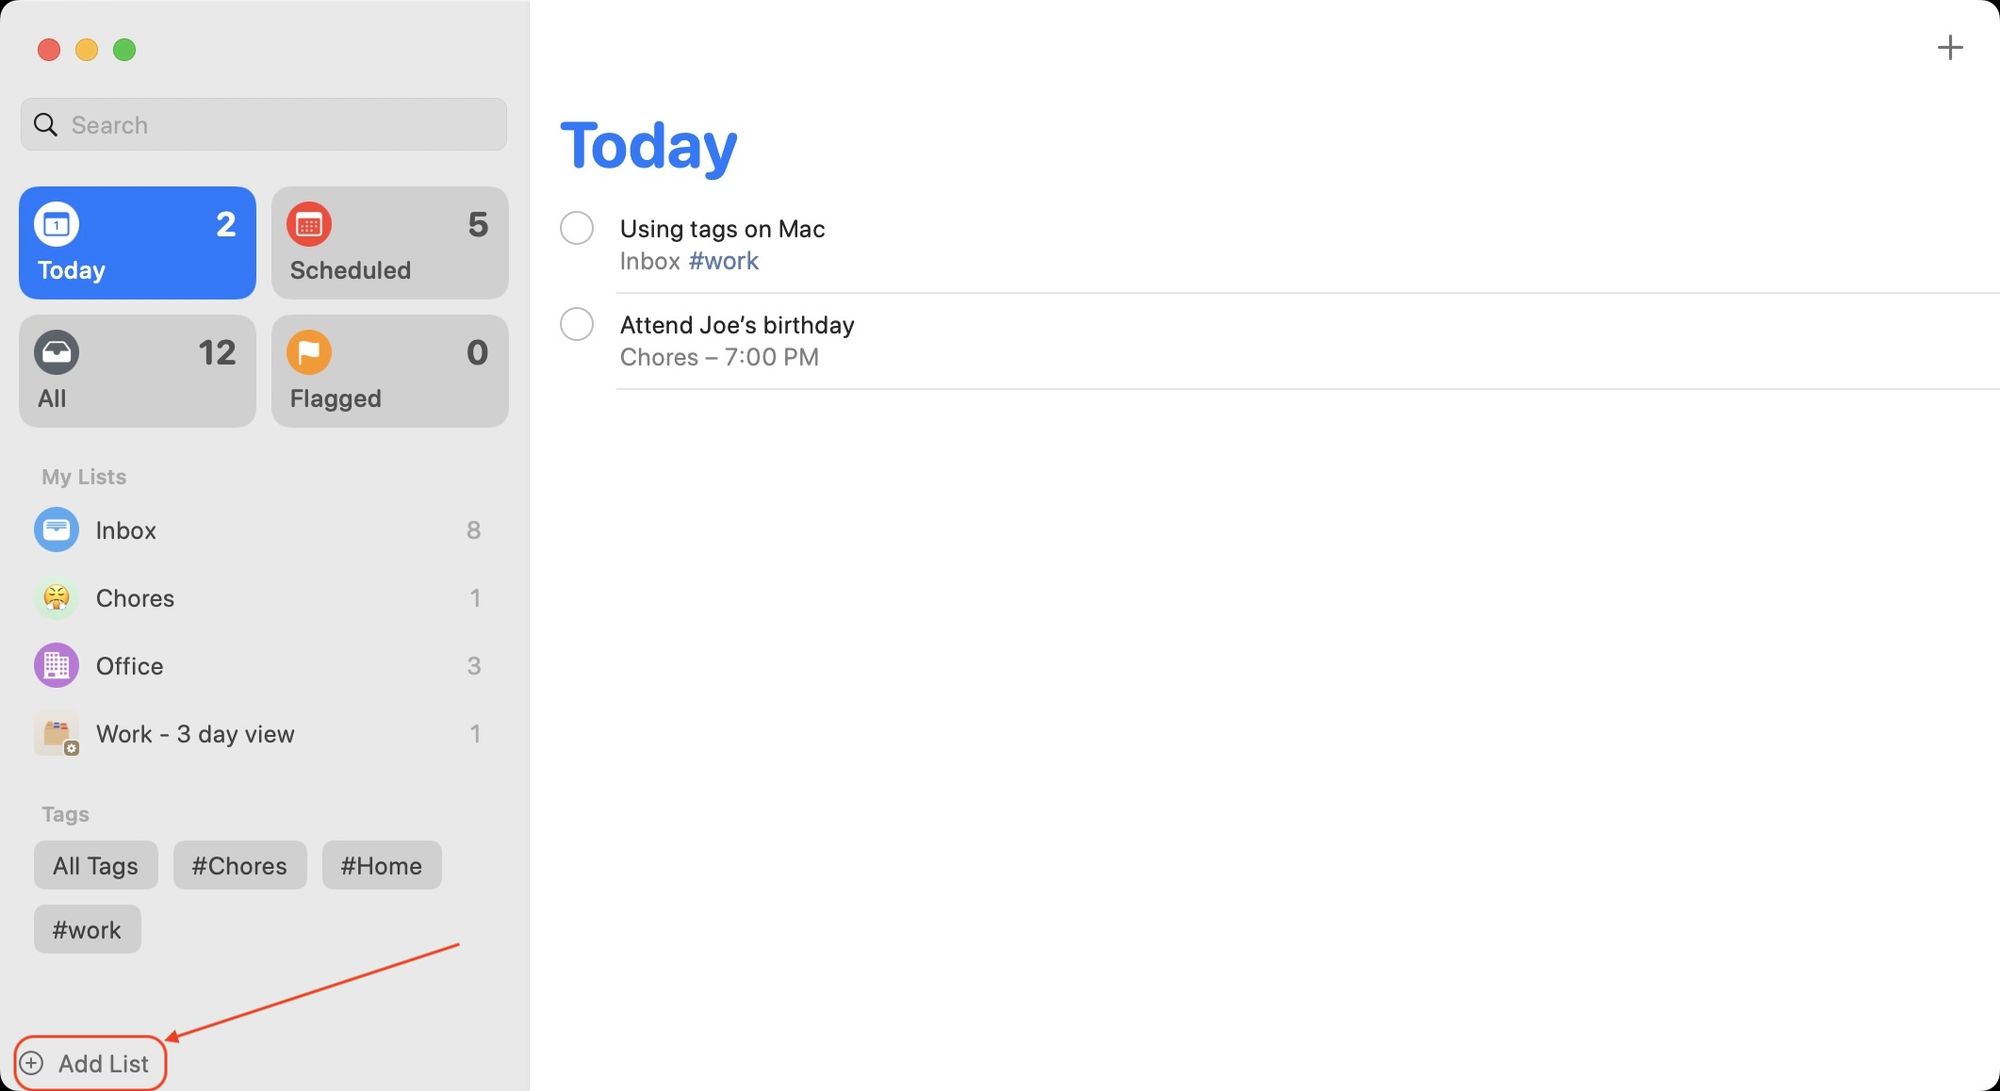
Smart Lists let you create different views for reminders. The app already comes with four smart lists, including Today, Scheduled, All, and Flagged. These views are helpful in refining your perspective of the tasks you want to see. For example, you can create a view that shows only office tasks pending in the next three days. Let’s see how you can make smart lists on your iPhone and Mac.
How to organize reminders using smart lists on iPhone
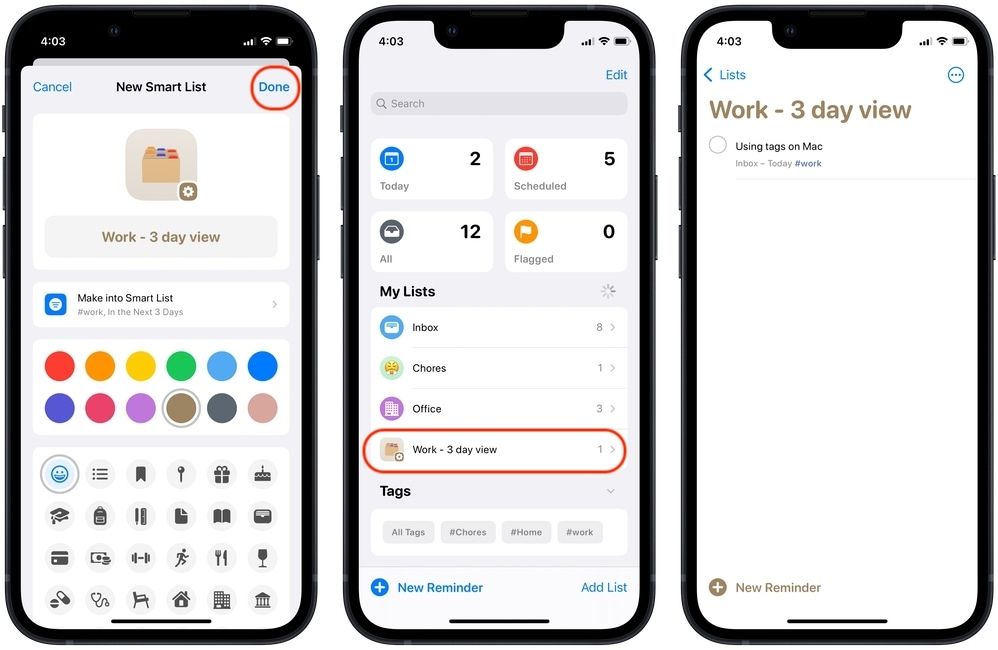
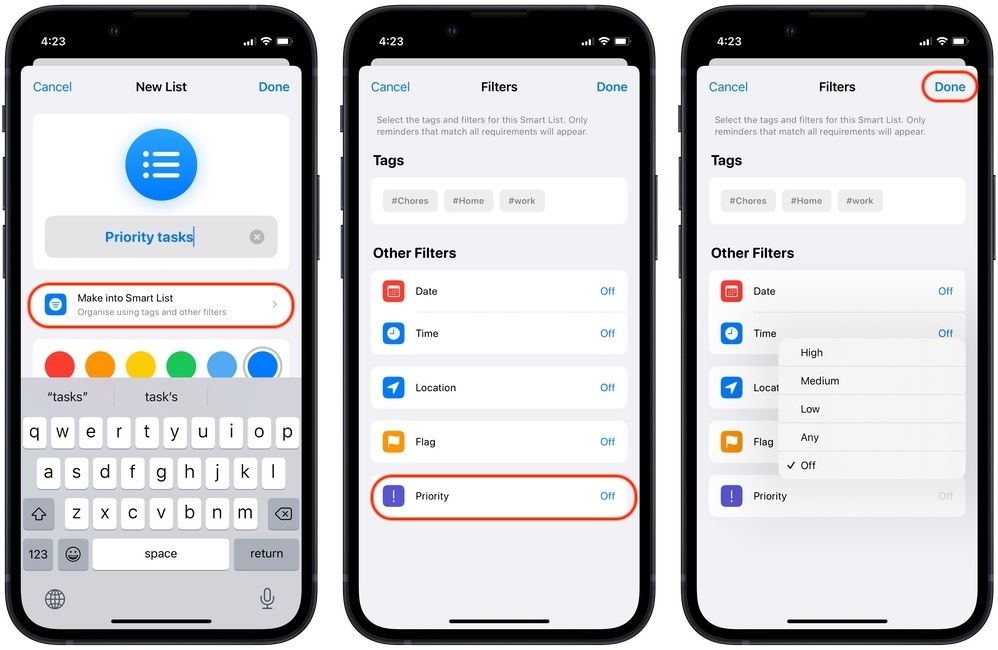
- Launch the Reminders app and tap on the Add List button. Name the list, select the color and add the icon. Now, tap on the Make into Smart List option. On this page, you can use tags, date, time, location, flag, and priority as filters.
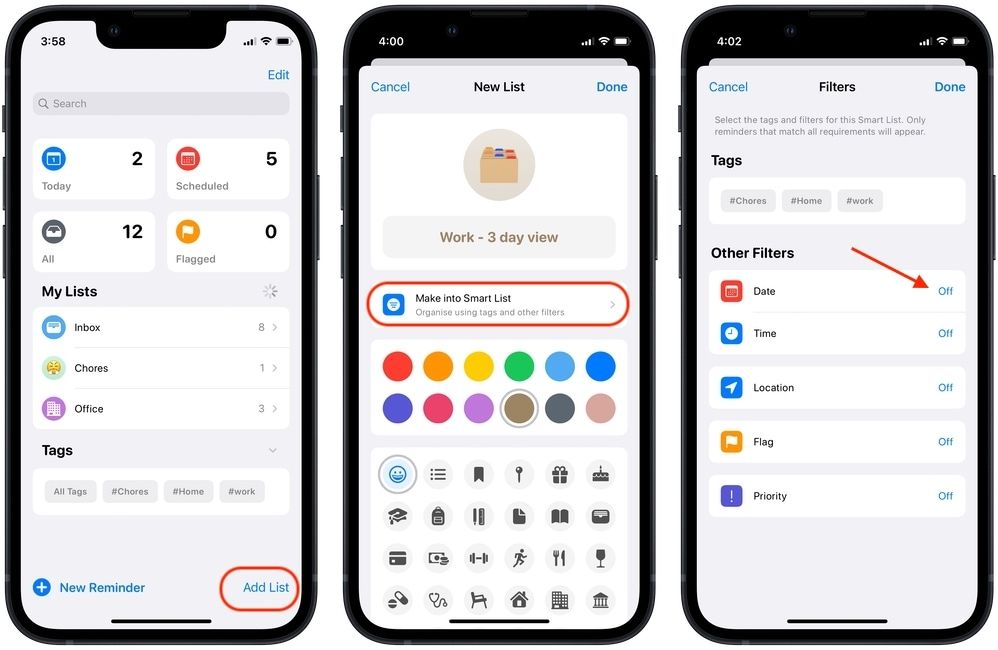
- Let’s use the tag work and set the date filter to the next three days. Now, this smart list will show all the tasks that are tagged with work and are due in the next three days.
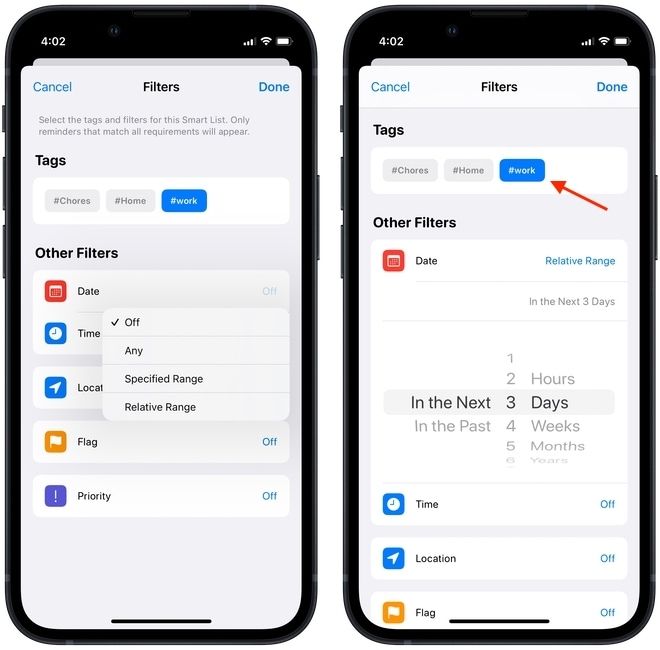
- Tap on Done. Similarly, you can use other filters to create different custom views by using smart lists.
How to organize reminders using smart lists on Mac
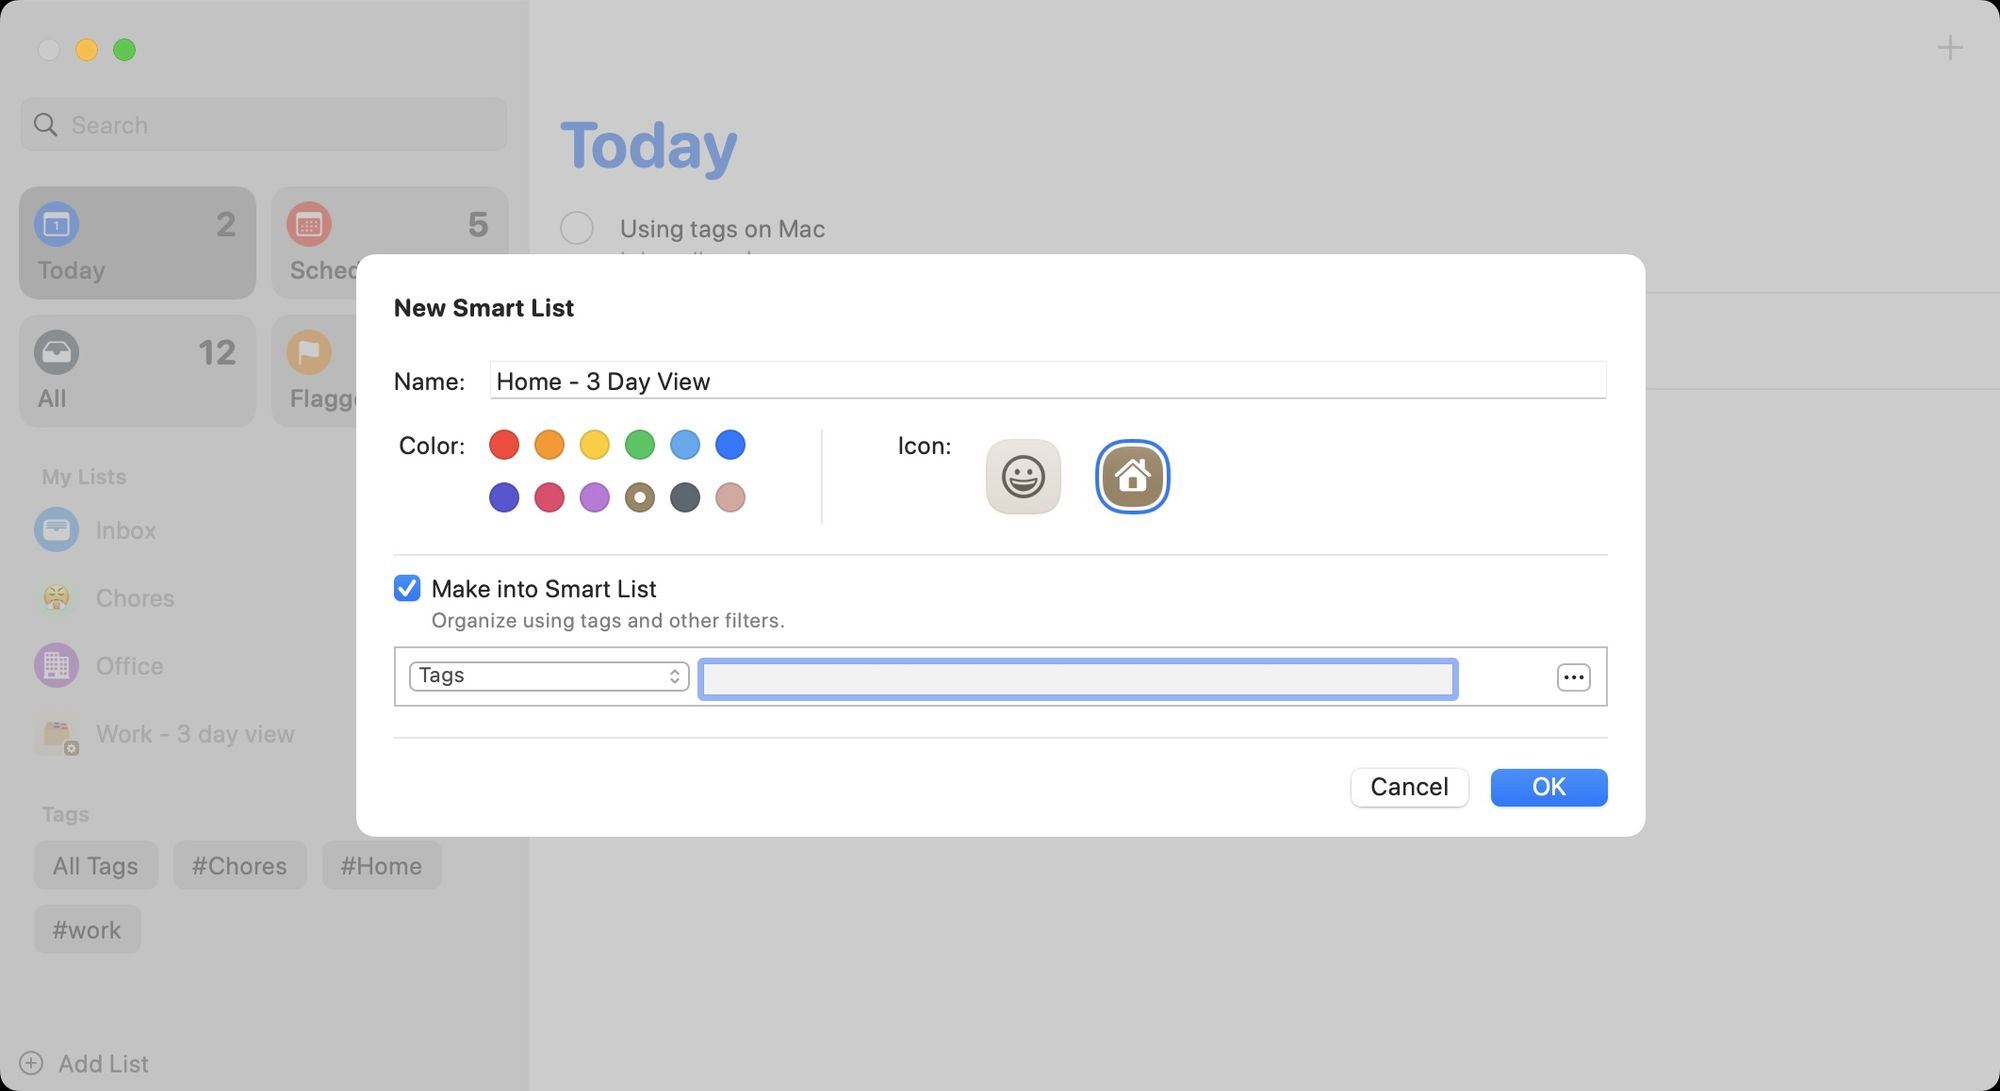
- Launch the Reminders app on Mac and click on the Add List button.
- Set the name, icon, and color, and then click on the checkbox next to the Make into Smart List option.
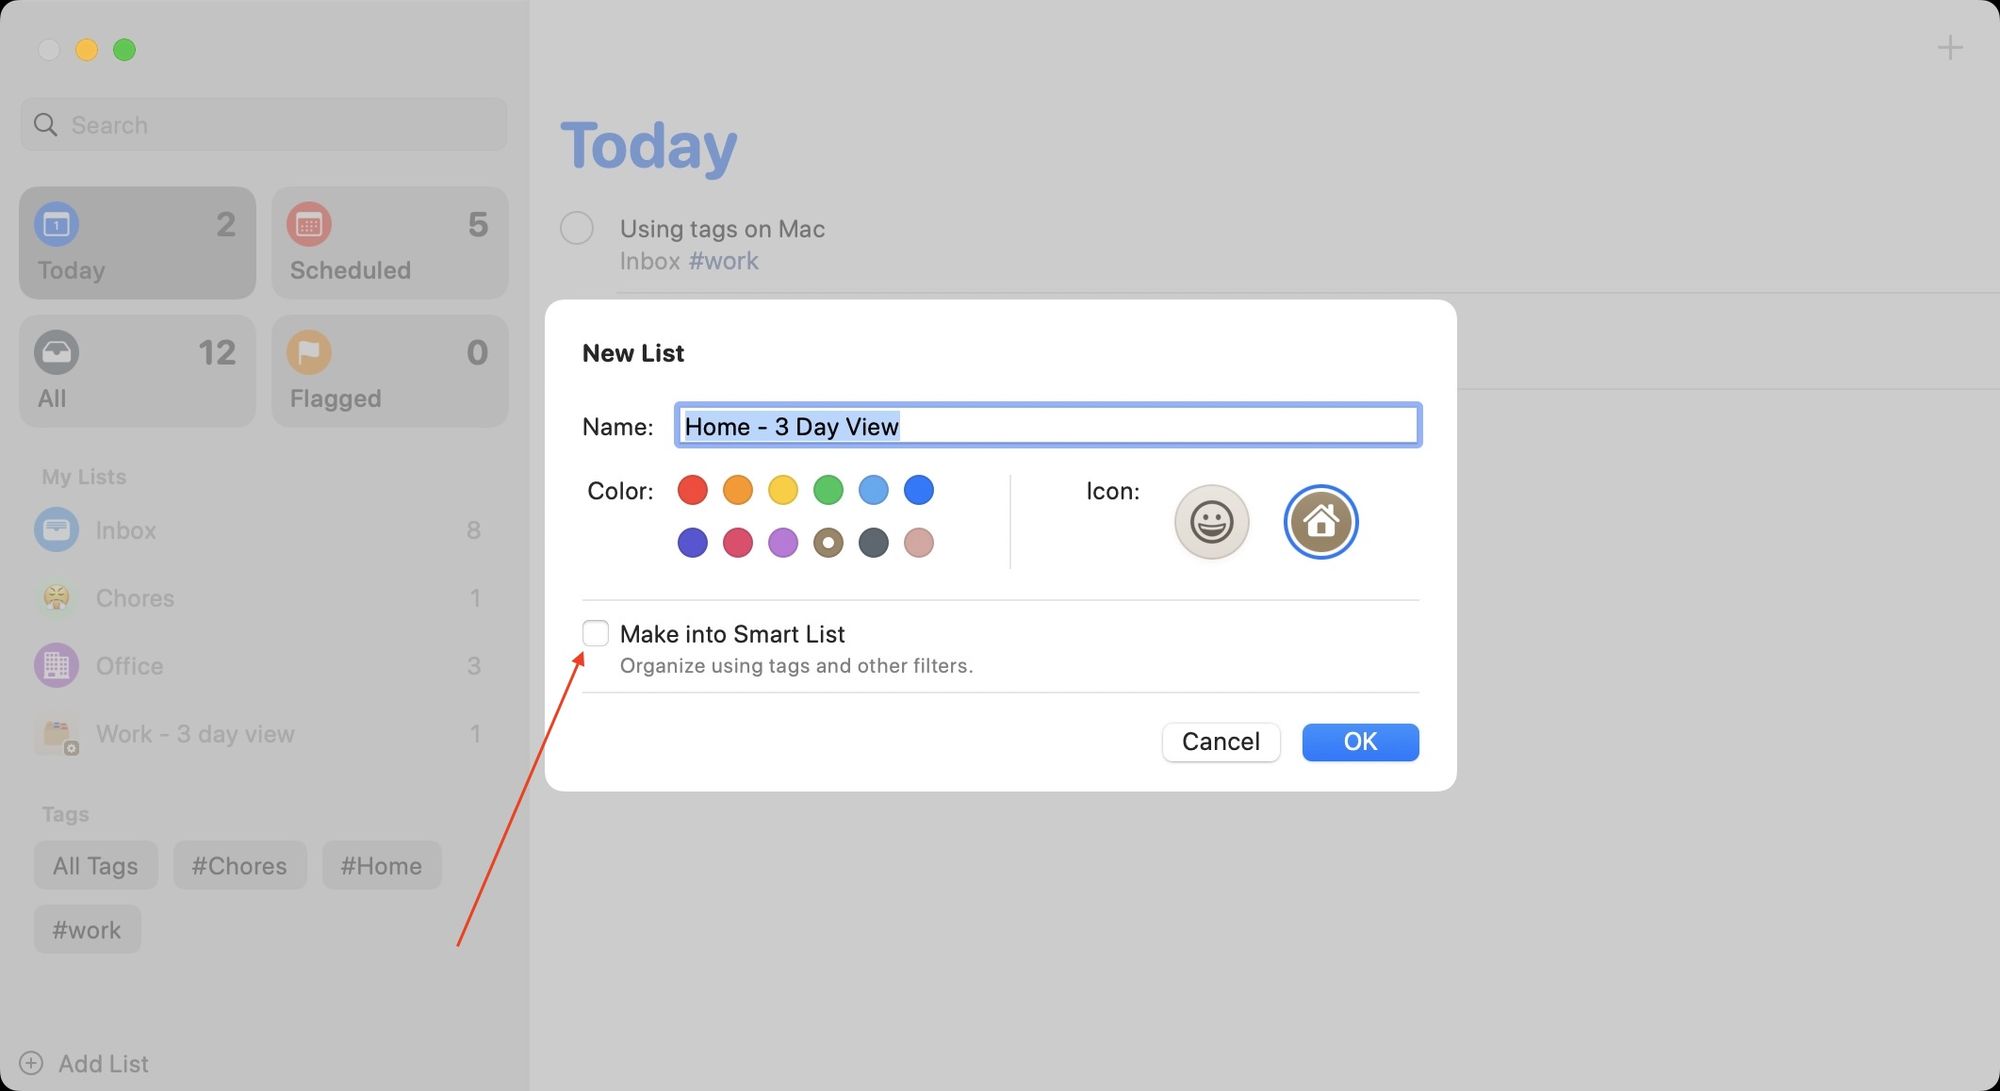
- Here, you will see that you will get a drop-down menu list. You can use the plus (+) button to add as many filters as you need. I will be adding the date and tag filters as I did for the iPhone.
- Once you add the filters, click on the Done button to save changes.
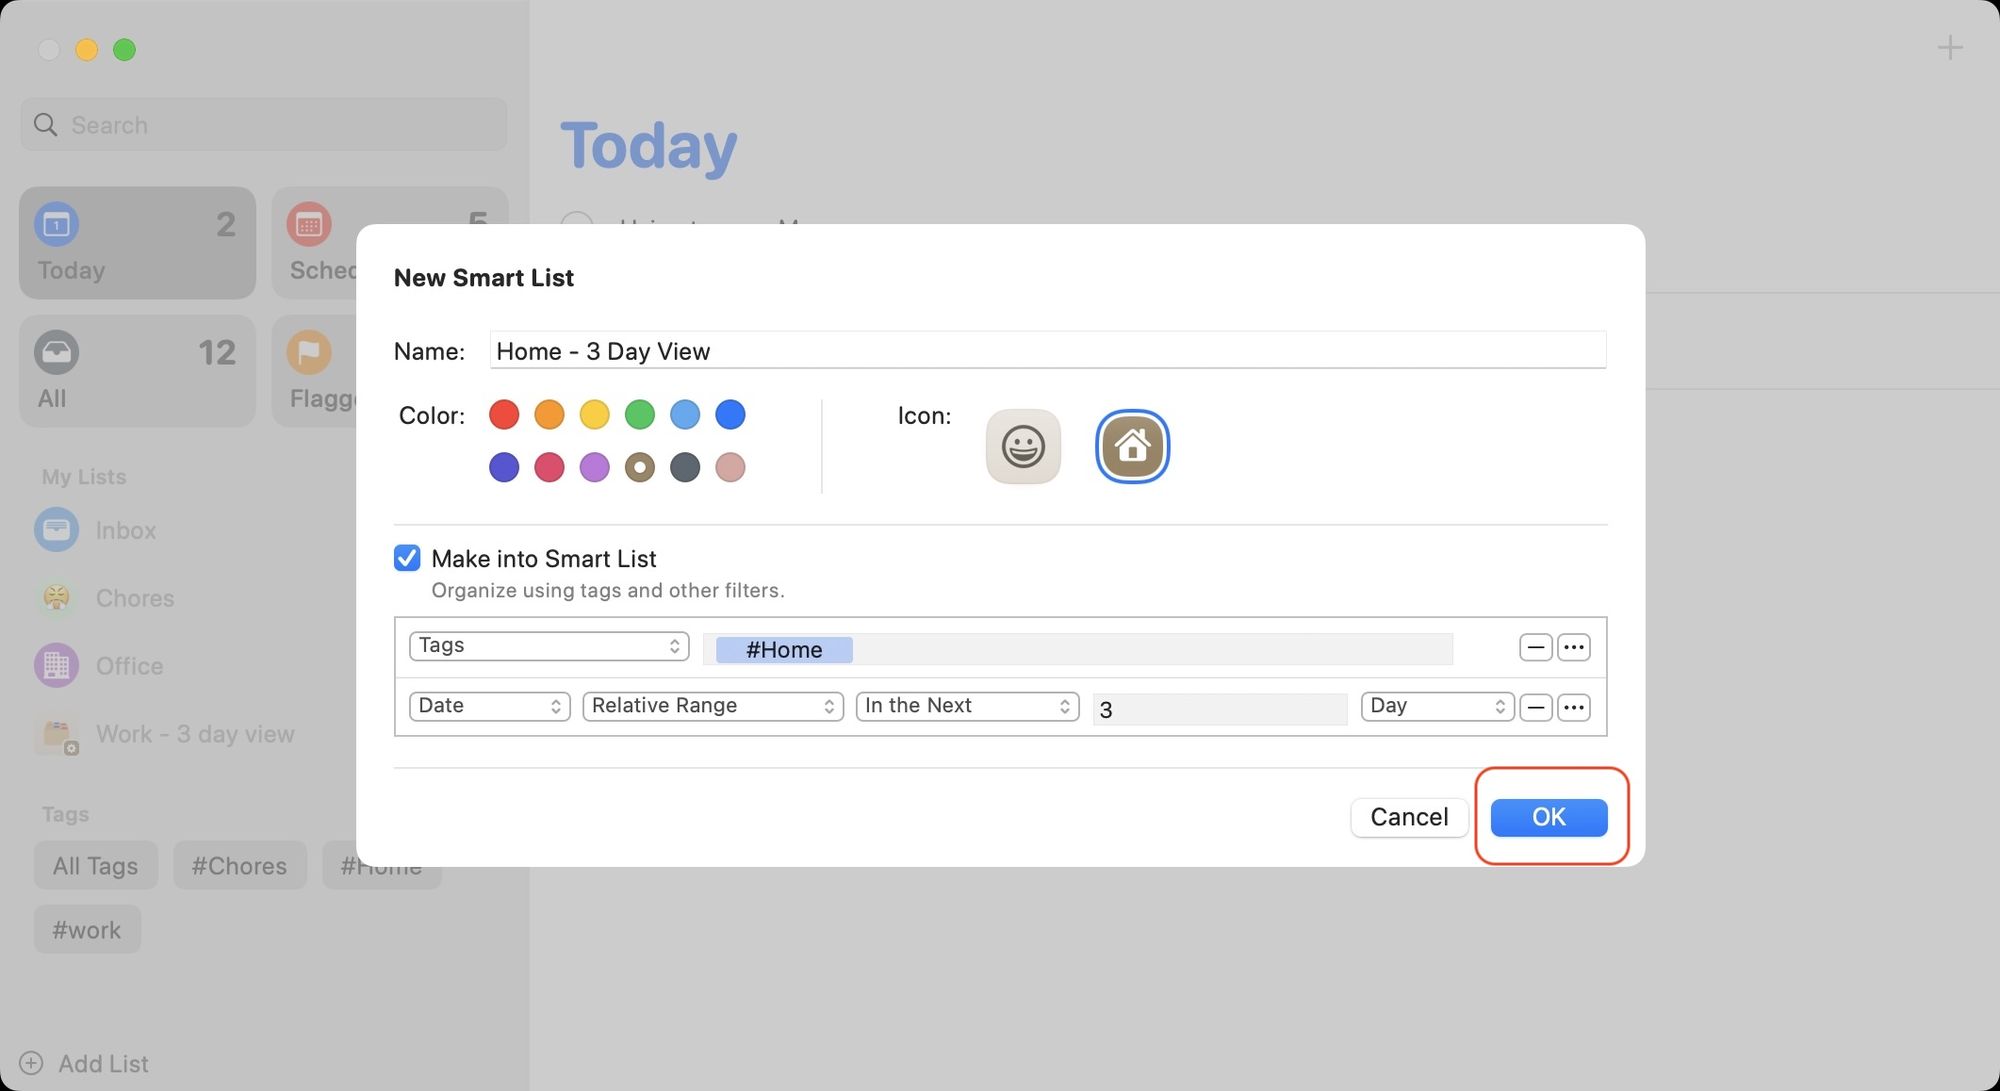
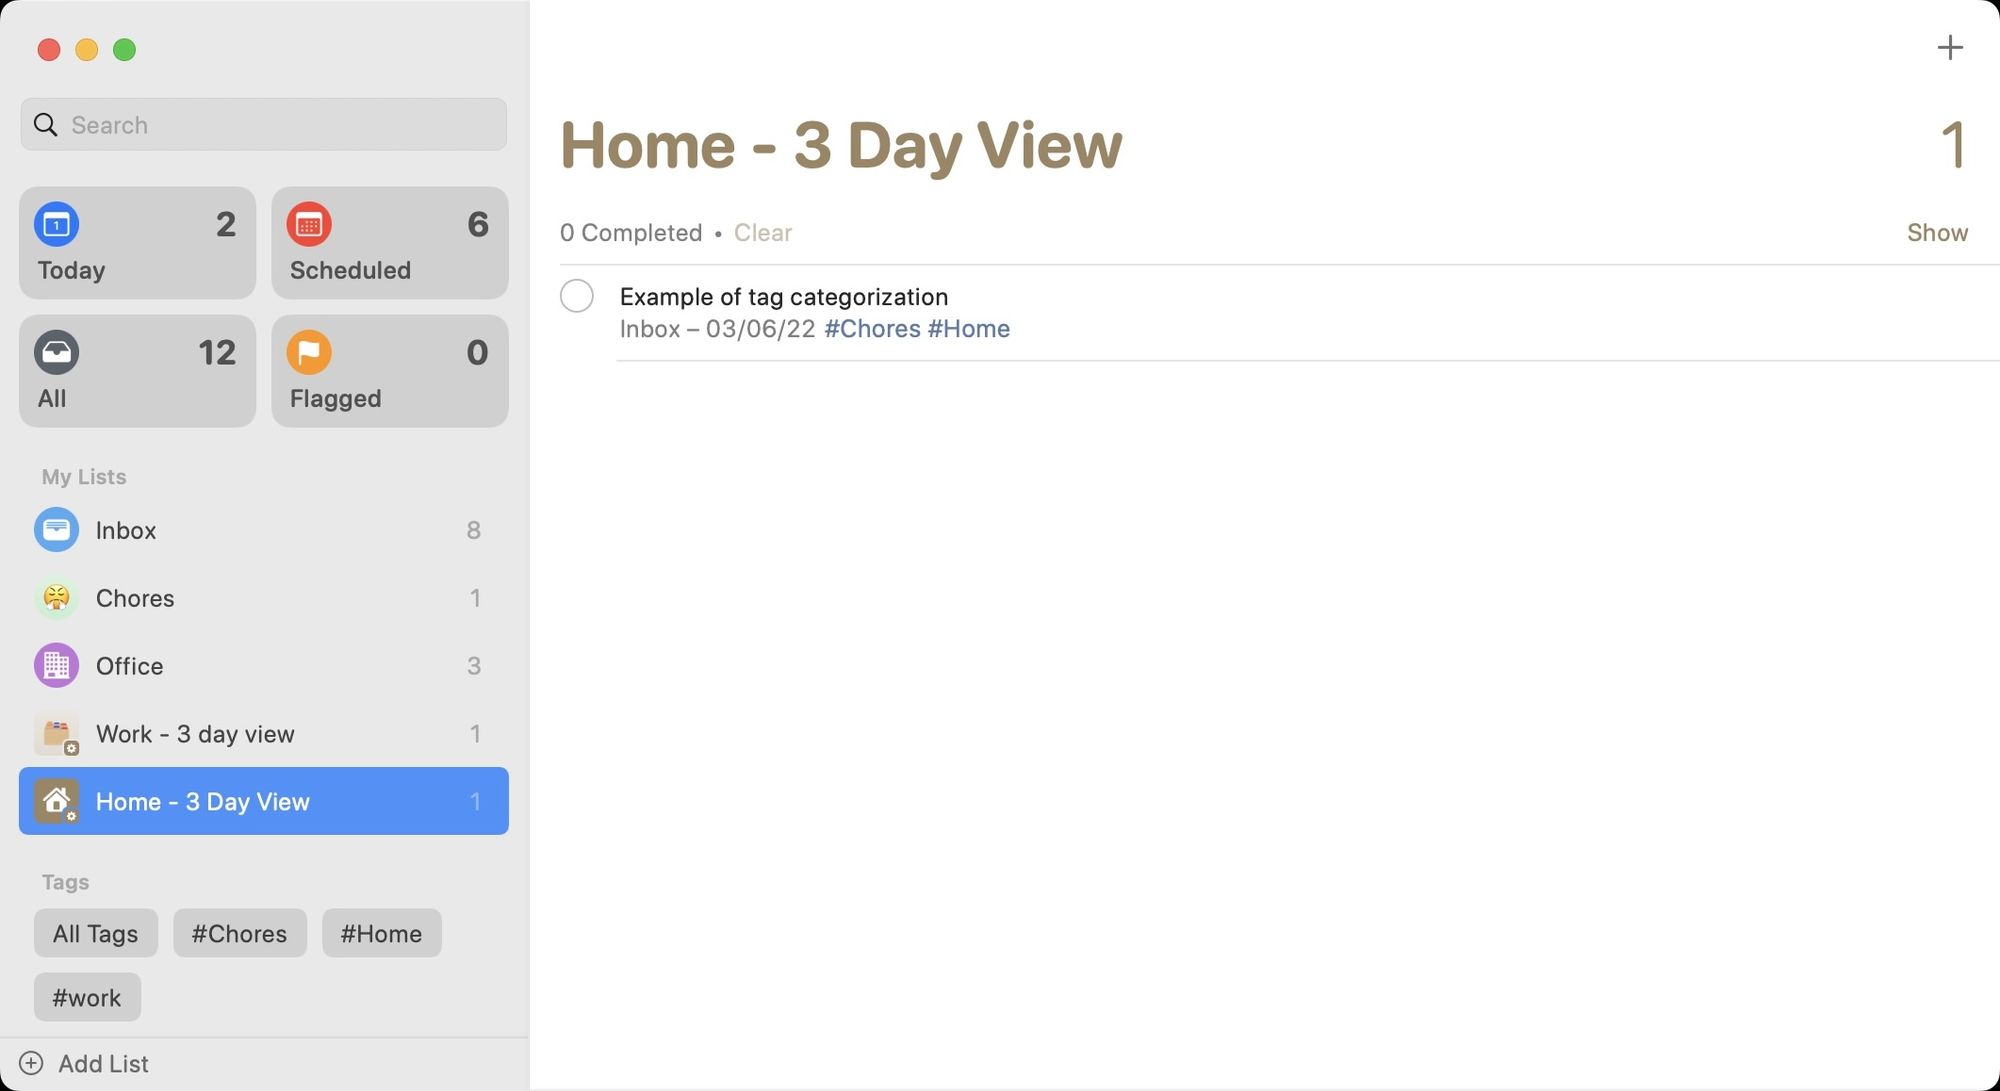
- As you can see, the smart list is now showing me a task that is due in the next three days and has the tag Home.
Organize reminders using priority
Reminders app also lets you set priorities for tasks. It can come in handy when you have too many tasks, and you want to do them based on their importance. You can set three levels of priority to a task: Low, Medium, and High.
How to add priority to reminders on iPhone
To add priority to a reminder on iPhone, go to Details → Priority and set the priority level.
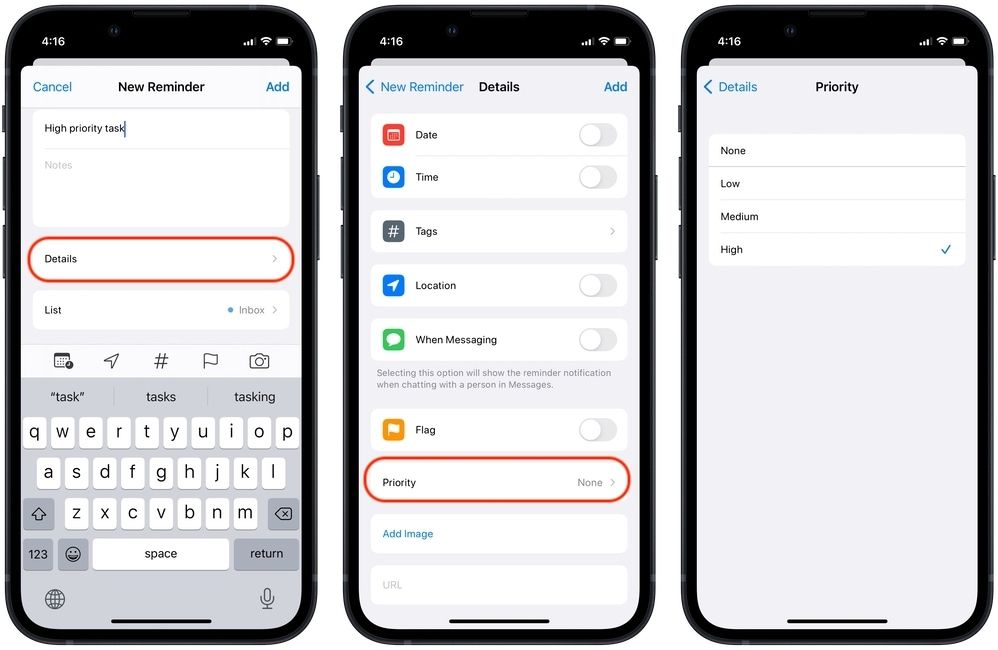
The priority of the tasks will be represented by exclamation marks next to the task item. A low priority task will have one !, a medium priority task will have two !!, and a high priority task will have three !!!.

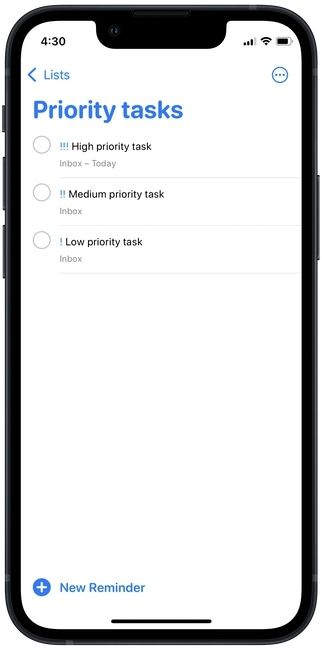
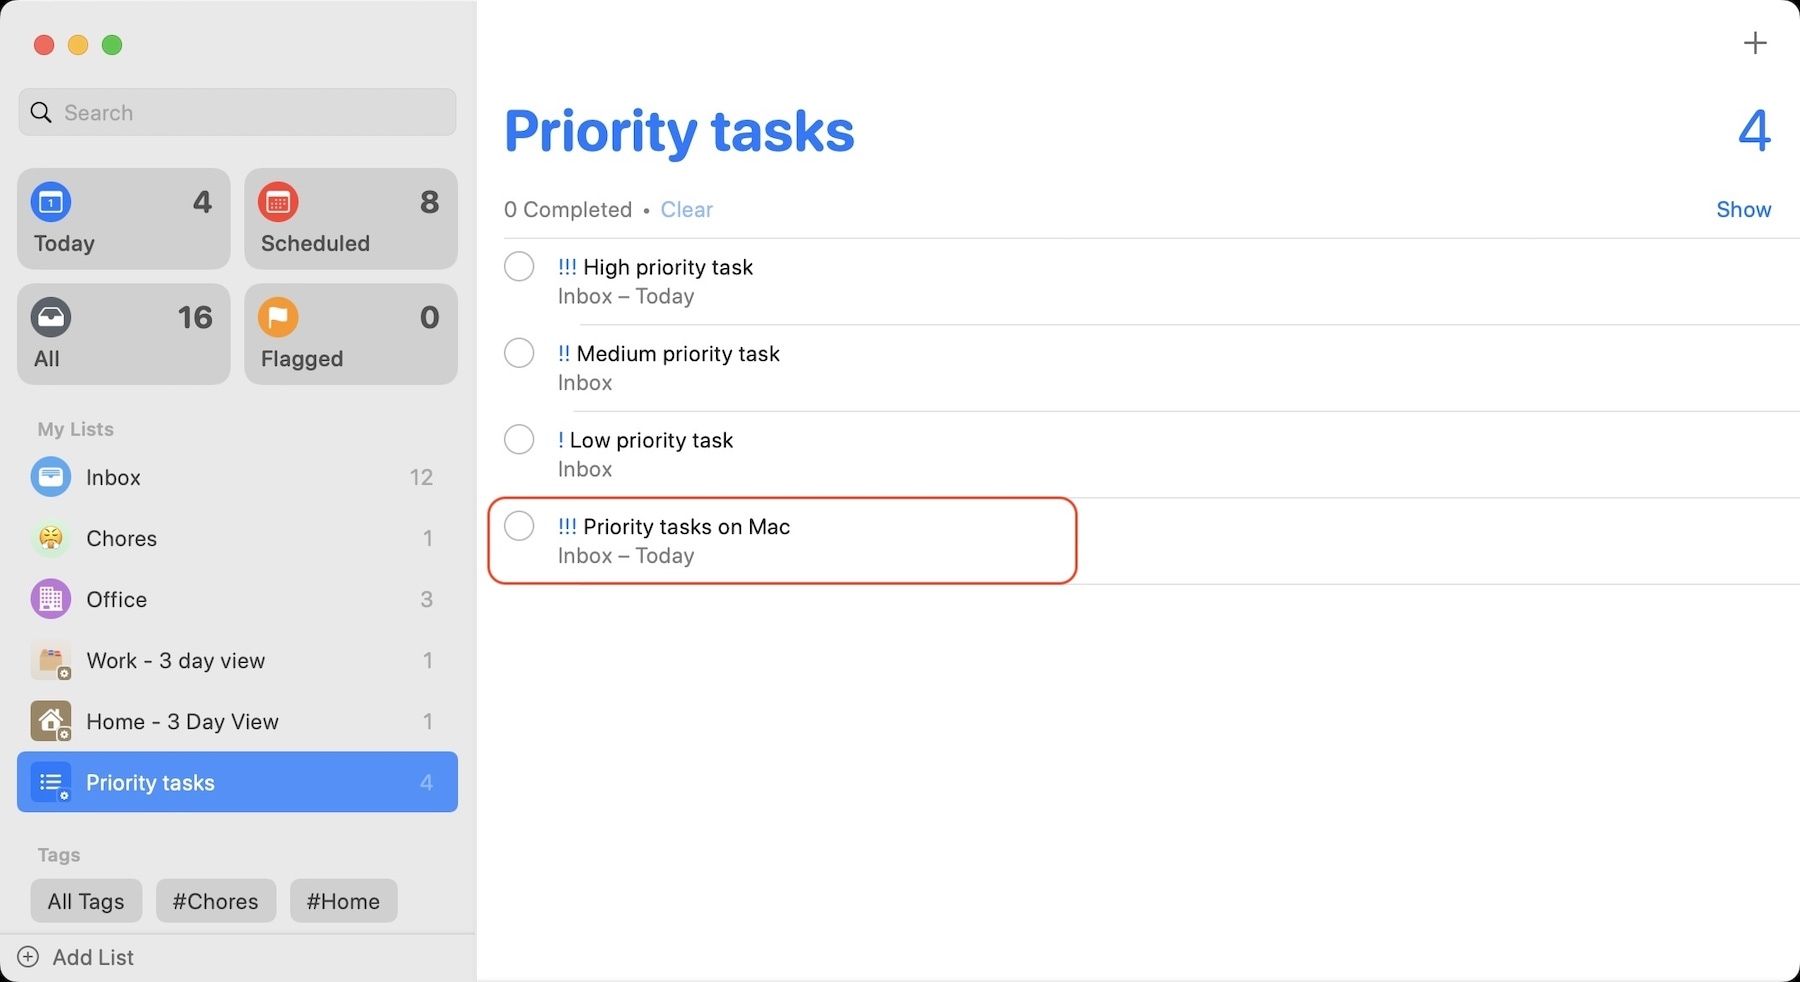
To make this even more useful, you can create a smart list with a priorities filter to see all your priority tasks in one place. You can even choose which priority level tasks to show in the list. Let’s say I want to see all the priority tasks in one place. I will follow the same steps I showed before to create a smart list. Instead of date and tags, I will use the priority filter. Note that you can the priority filter alongside the date, tag, and other filters to further refine the list.
As you can see, all the reminders with assigned priority are now showing up in the smart list that I created.
How to add priority to reminders on Mac
- Hit the keyboard shortcut CMD+N to start creating a new reminder, and then click on the (i) button.
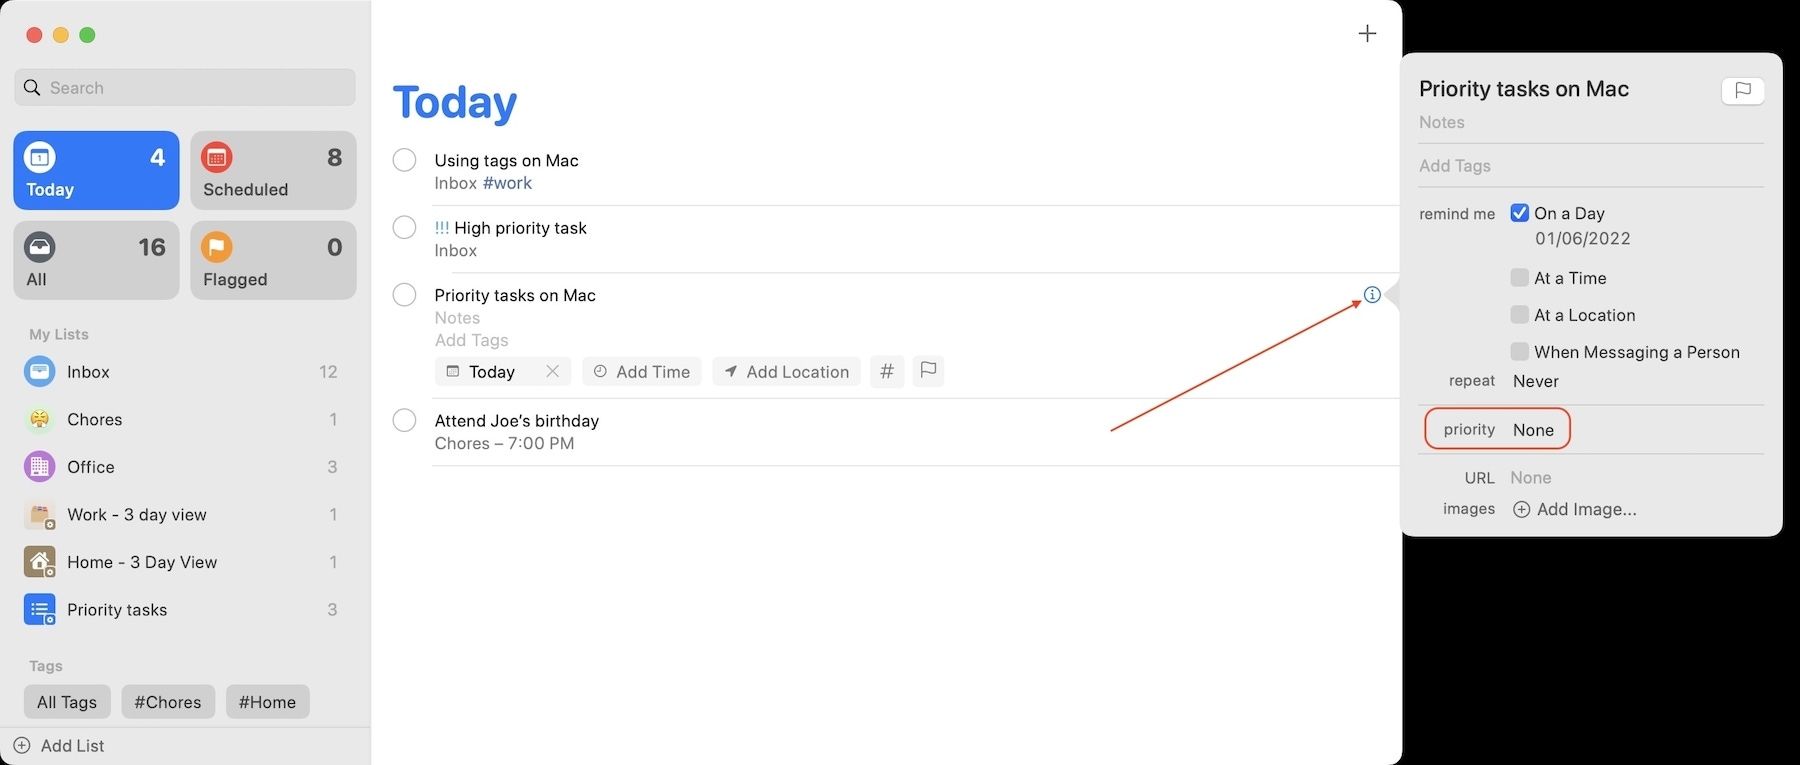
- Click on the drop-down menu next to priority, and select the relevant priority level.
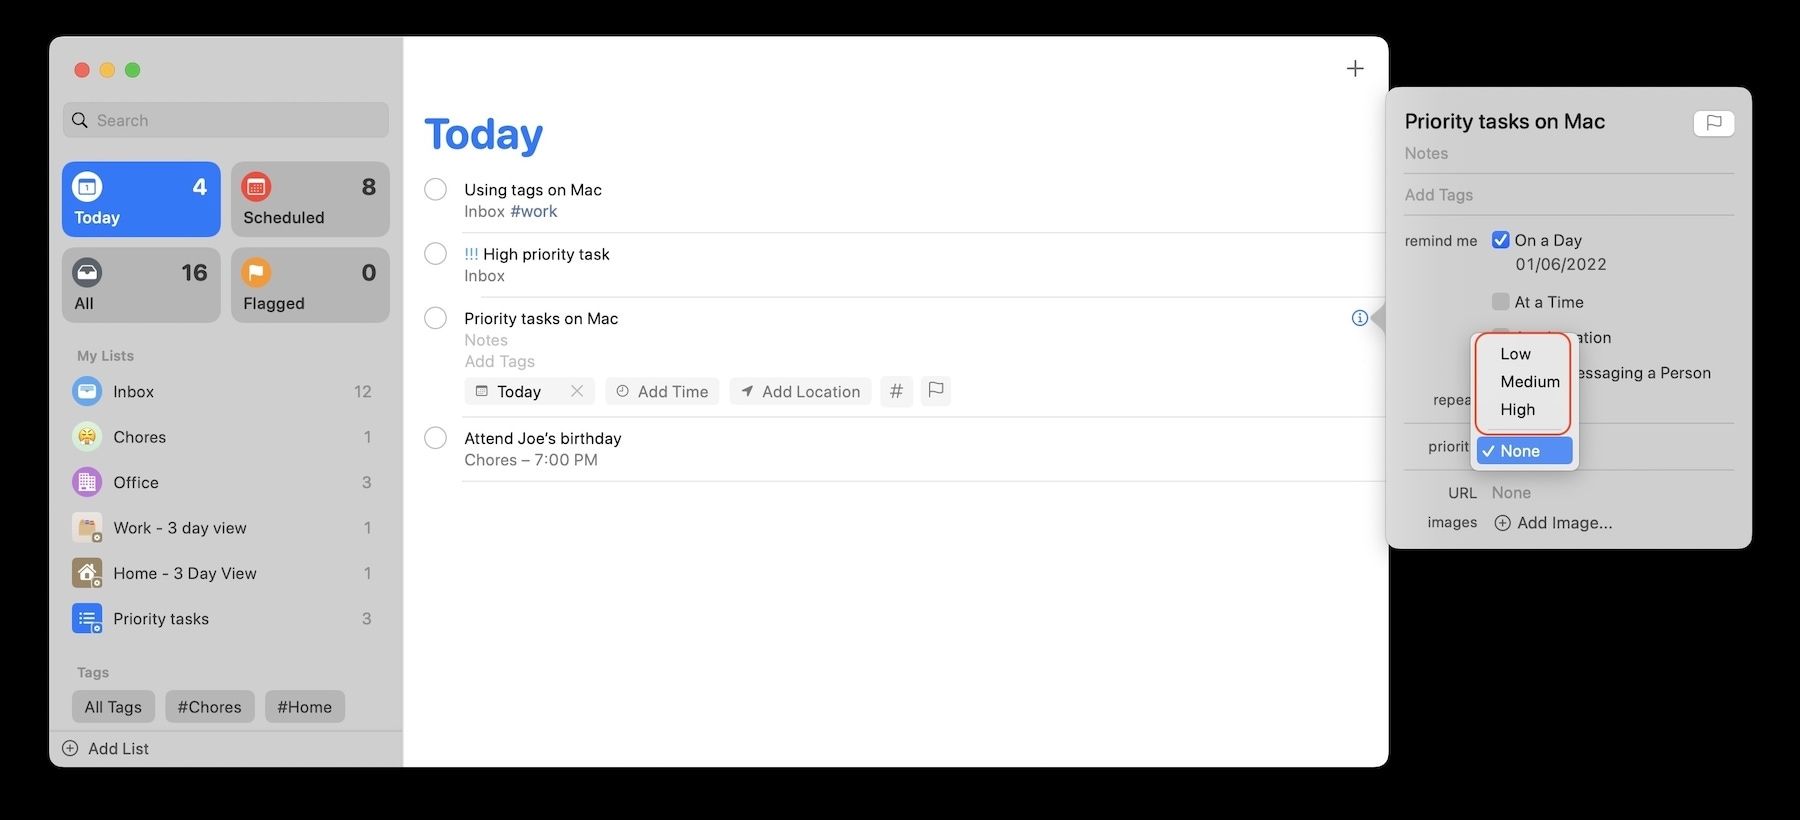
- As you can see, the task priority is added, and the reminder is appearing in the same smart list that we created on the iPhone.
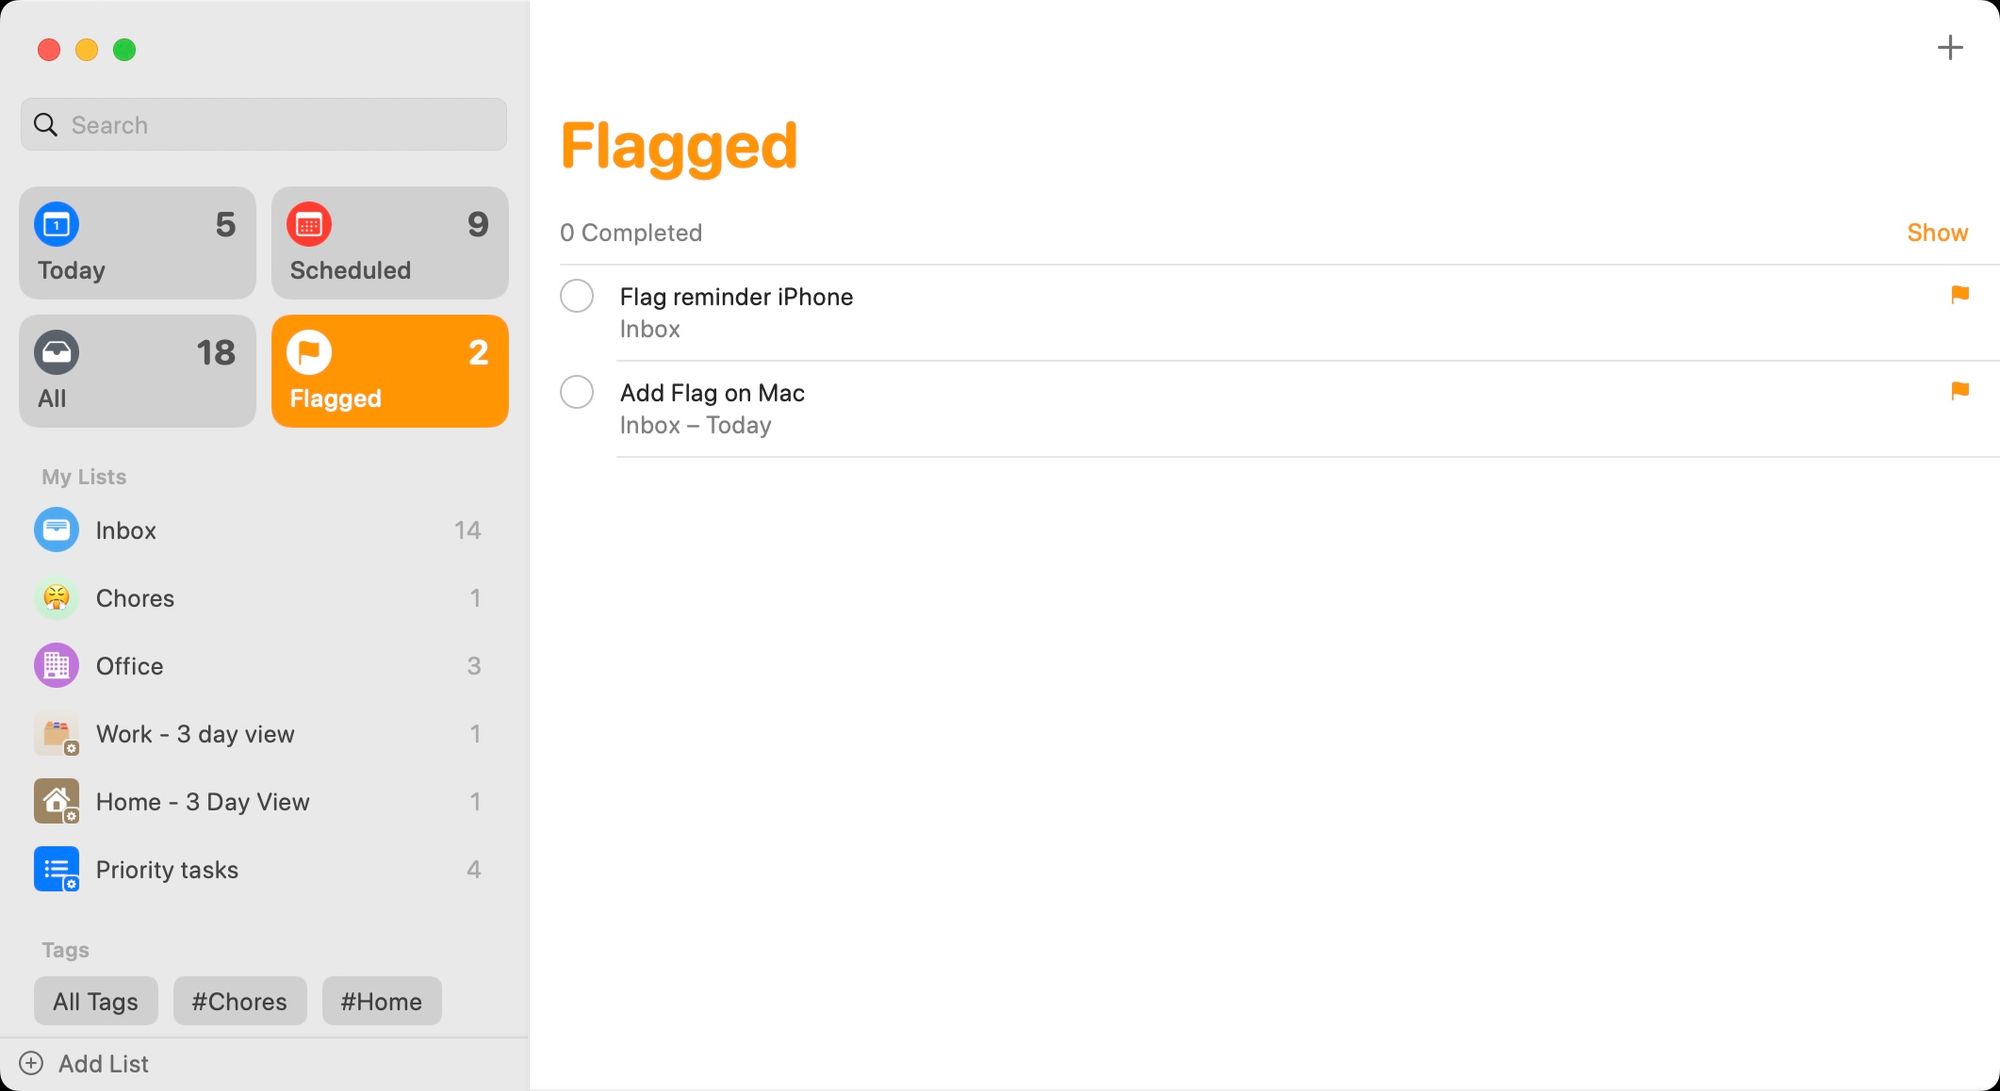
Organize reminders using flags
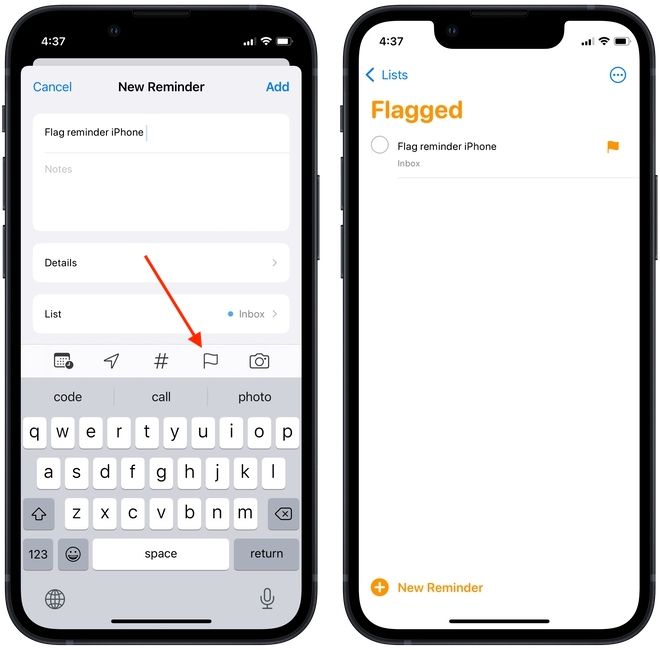
Apart from priority, you can also add flags to reminders. The Reminders app already has a Flagged smart list that shows you all the flagged reminders in one place.
To flag a reminder on your iPhone, tap on the Flag button. It will now show up in the Flagged smart list view as shown below.
Similarly, you can click on the Flag icon while creating a reminder on Mac.
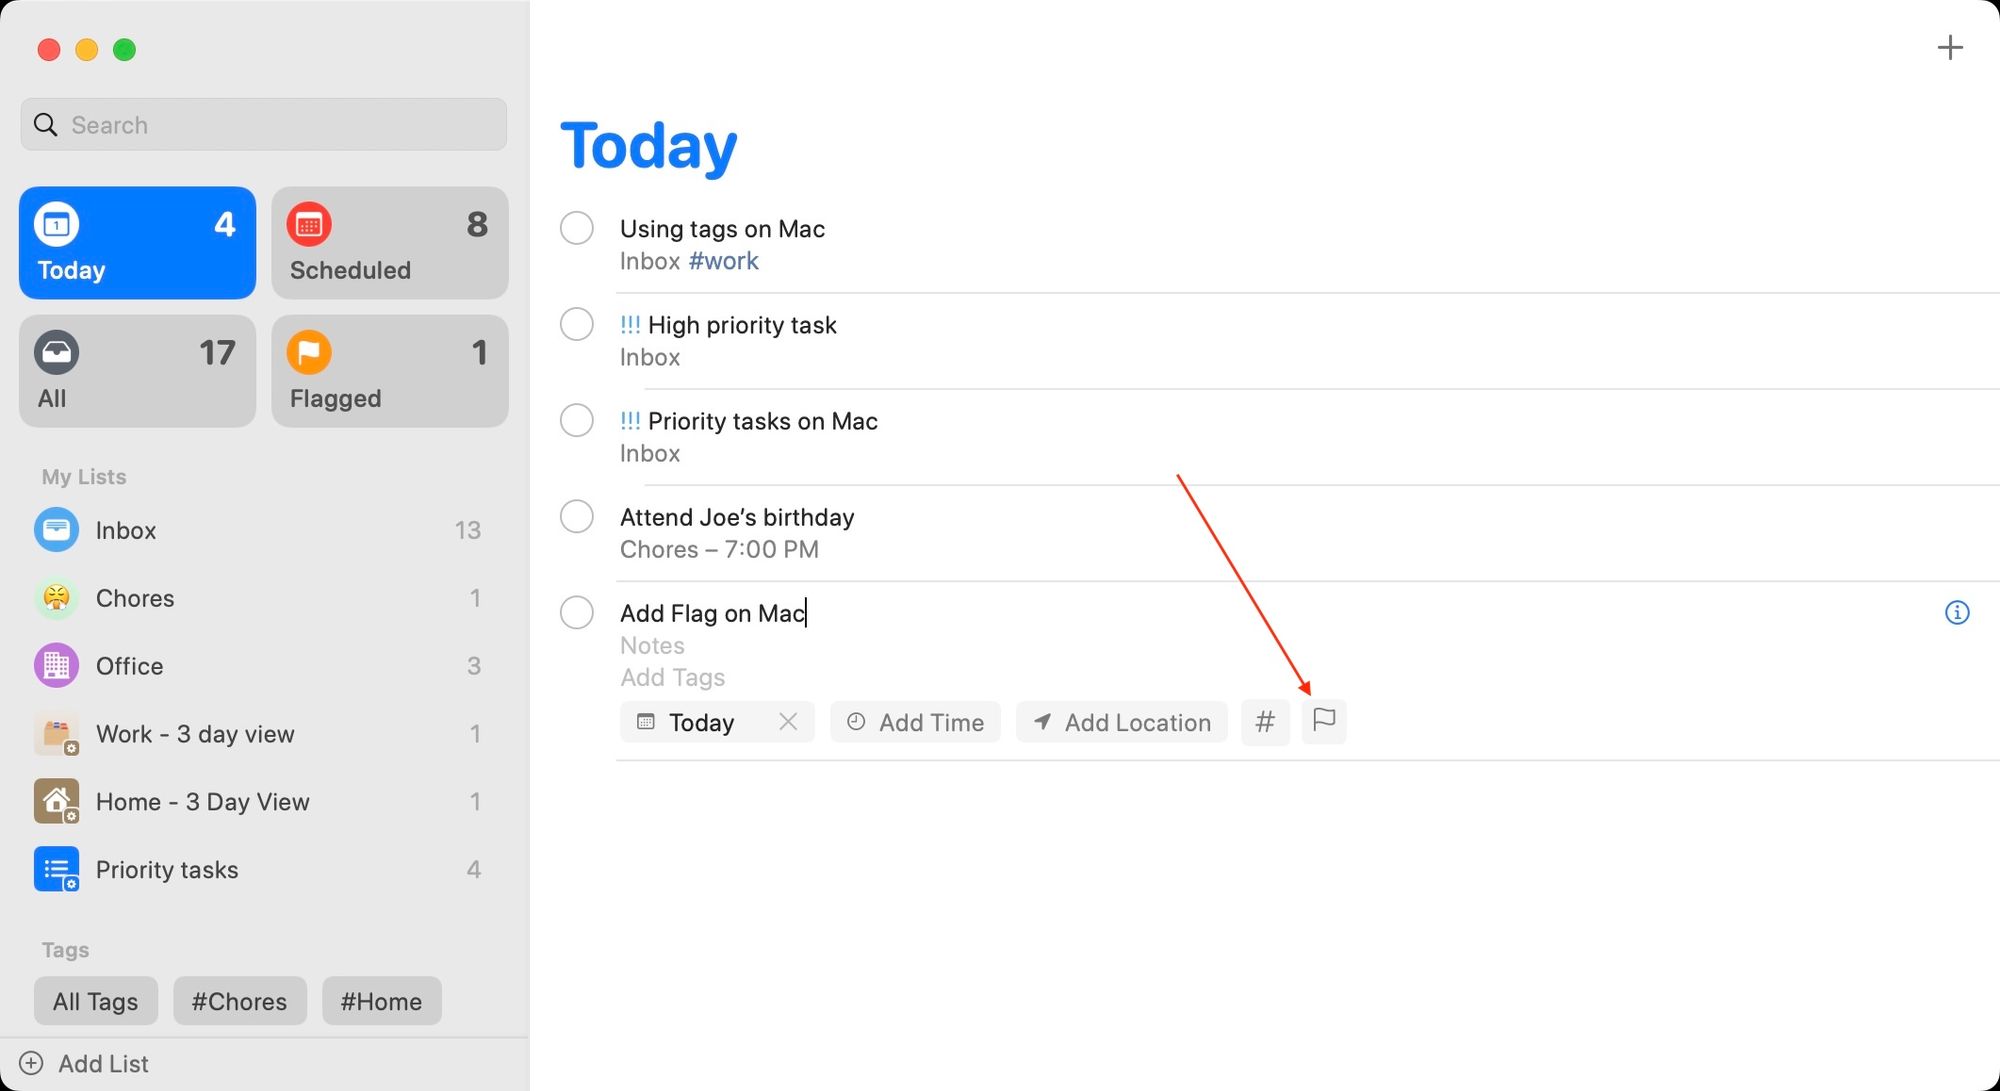
You can see that this reminder now appears in the Flagged view.
Share reminders to collaborate with other users
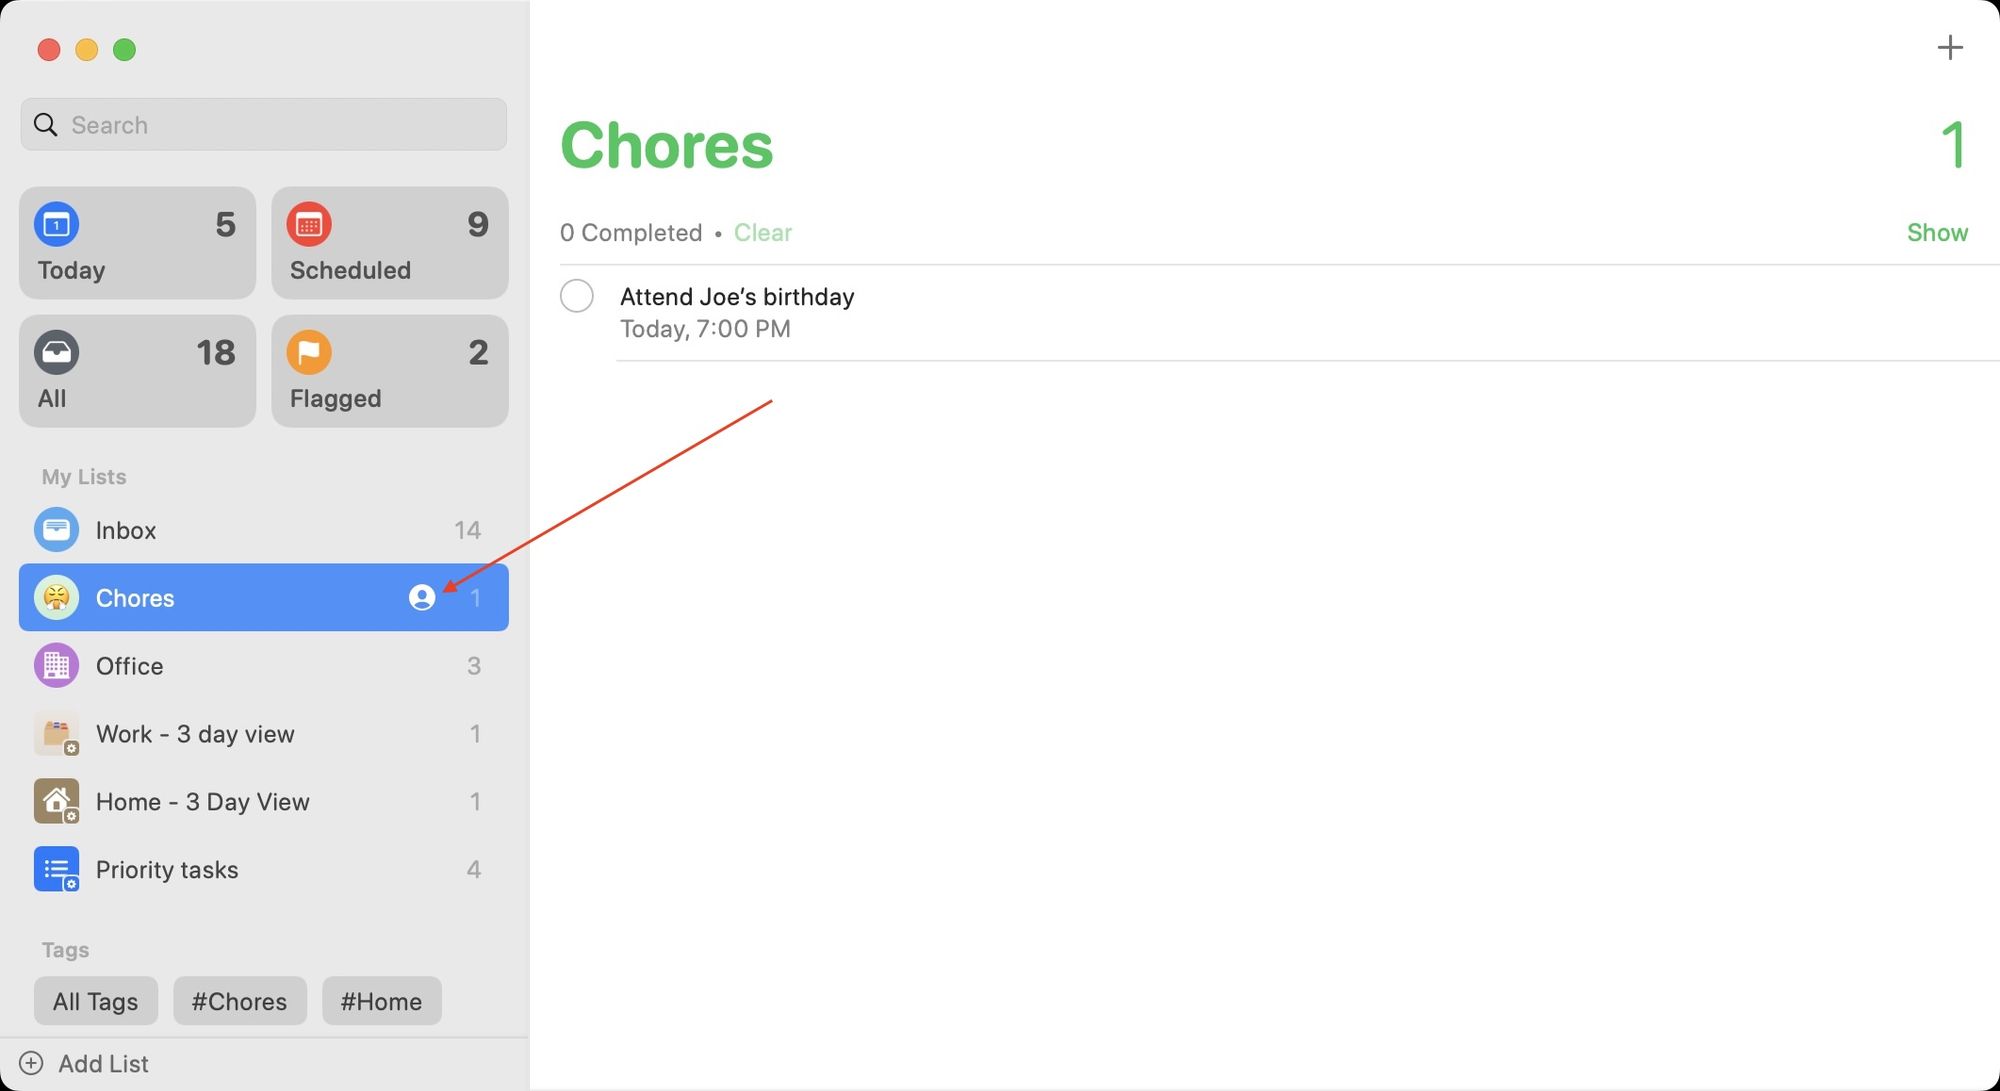
Did you know that you can share reminders to collaborate with other users? I love this feature as it comes in really handy. While it’s not good enough to handle big project collaboration, it’s perfect for managing a small list with your spouse or a small team.
For example, you can create a shared grocery list and share it with members of your household. People can add items to the list anytime they want, and when you or anyone else visit the store, they will have the list of items they want to buy in one place. Note that you cannot share a smart list with anyone else. The feature only works with regular lists.
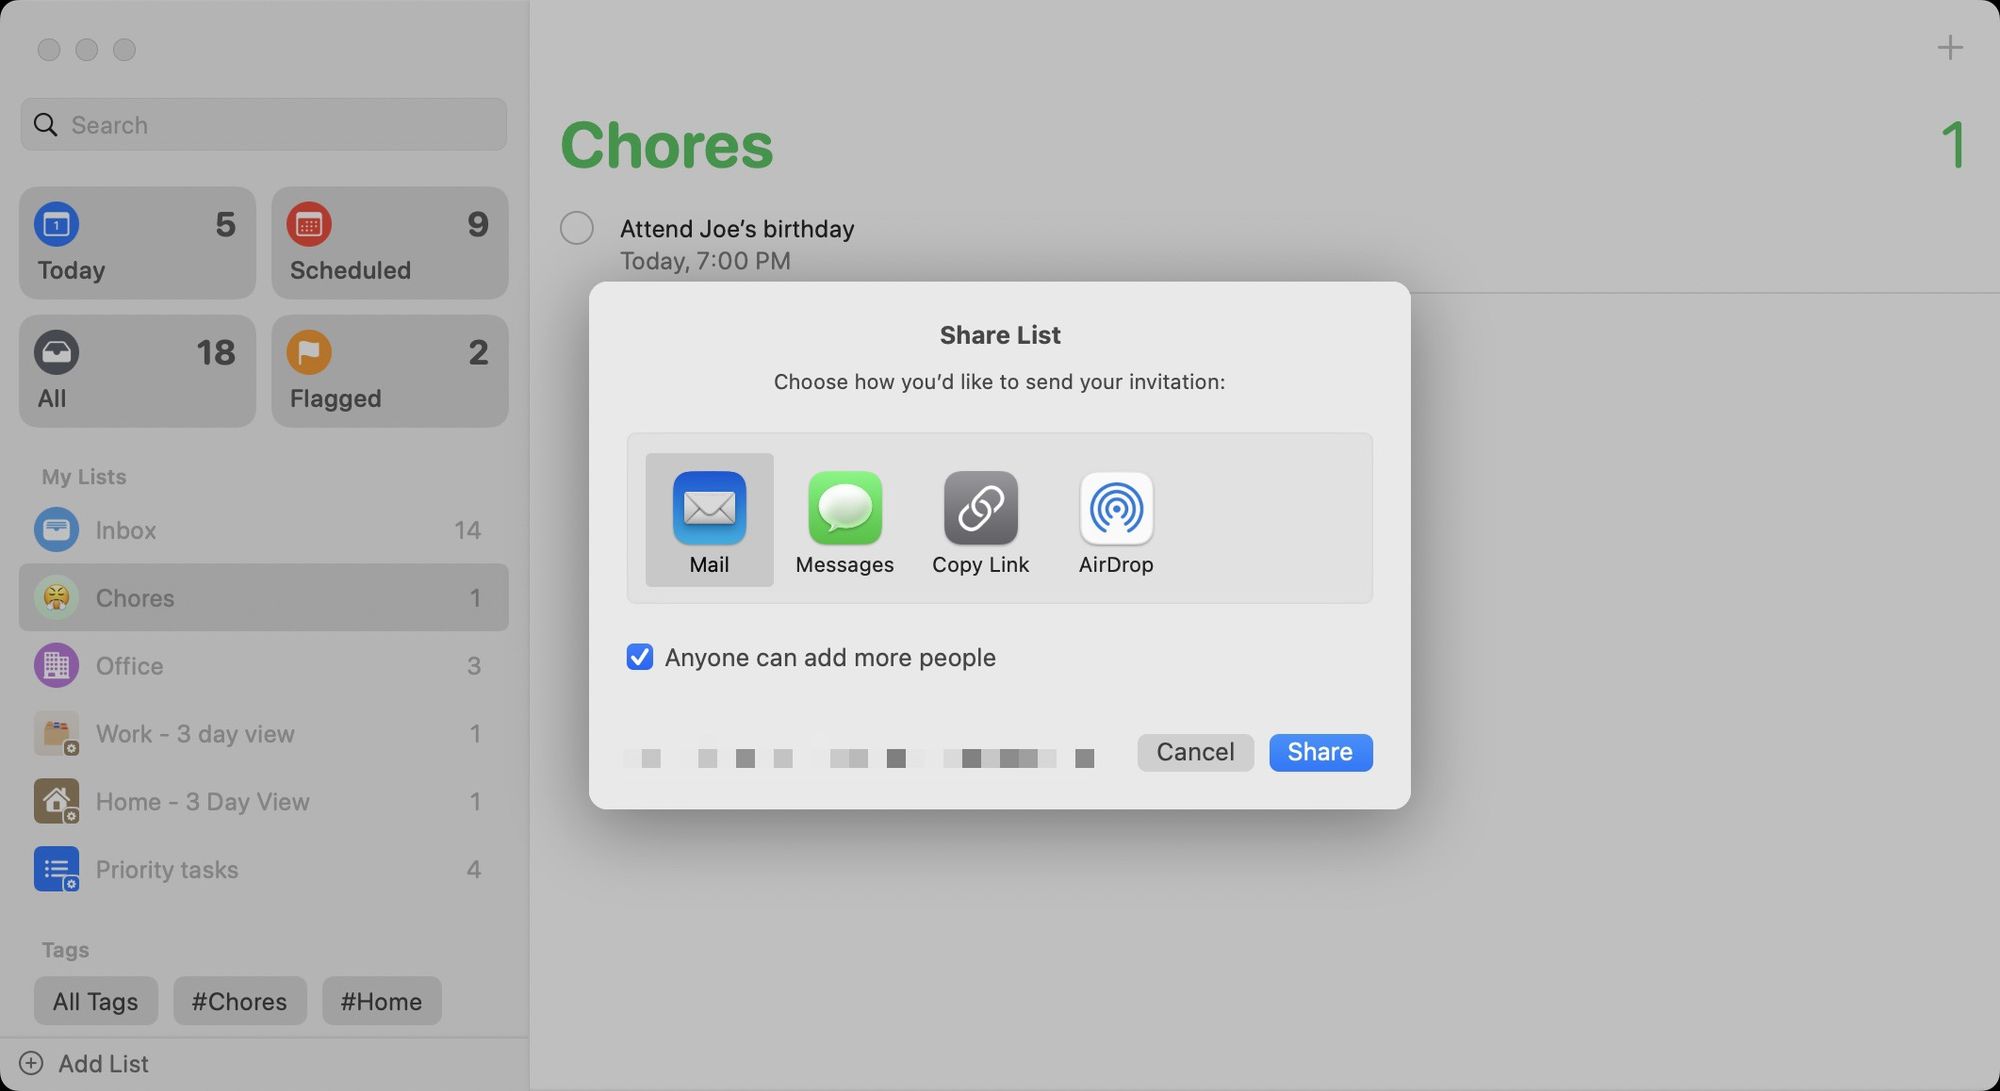
How to share a reminders list on iPhone
- Tap and hold on a reminders list and then tap on the Share button.
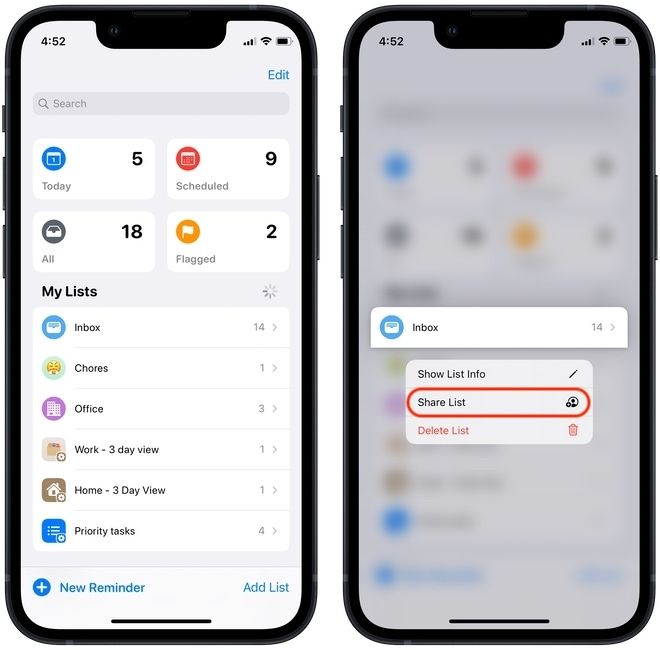
- Now, you can choose how you want to share your list. You can share the list via any of your messaging or email apps. Let’s choose the Messages app. As you can see, I can share the list with any of my contacts.
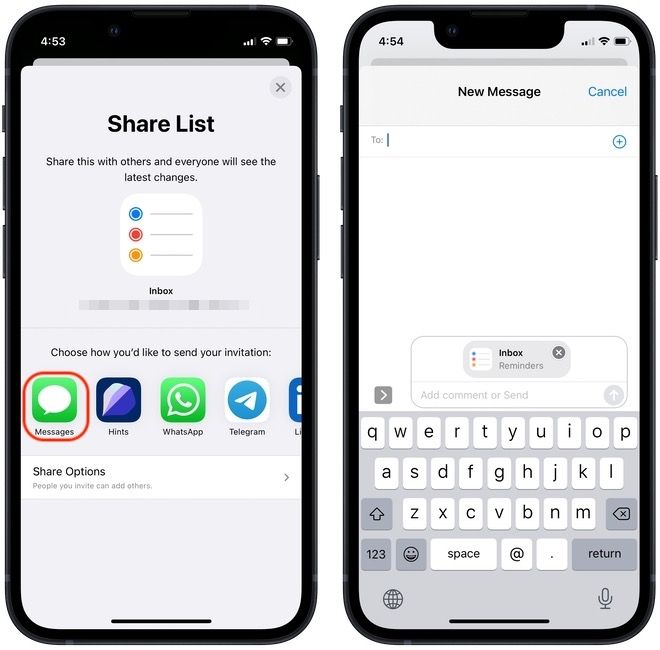
Of course, the other user should have an Apple iPhone, iPad, or Mac to access the shared list using the Reminders app.
How to share a reminder list on Mac
- Launch the Reminders app and hover over the list you want to share with the mouse cursor.
- Here, you can see that you get the option to share a list using mail and messages. You can also copy the link to share using other messaging or email applications.
Reminders tips and tricks
By now, you have learned all the basic functions of the Reminders app, and hopefully, you can see that it can act as a full-fledged task management system. But if you are still on the fence, this tips and tricks section will convince you by taking your reminder usage to the next level.
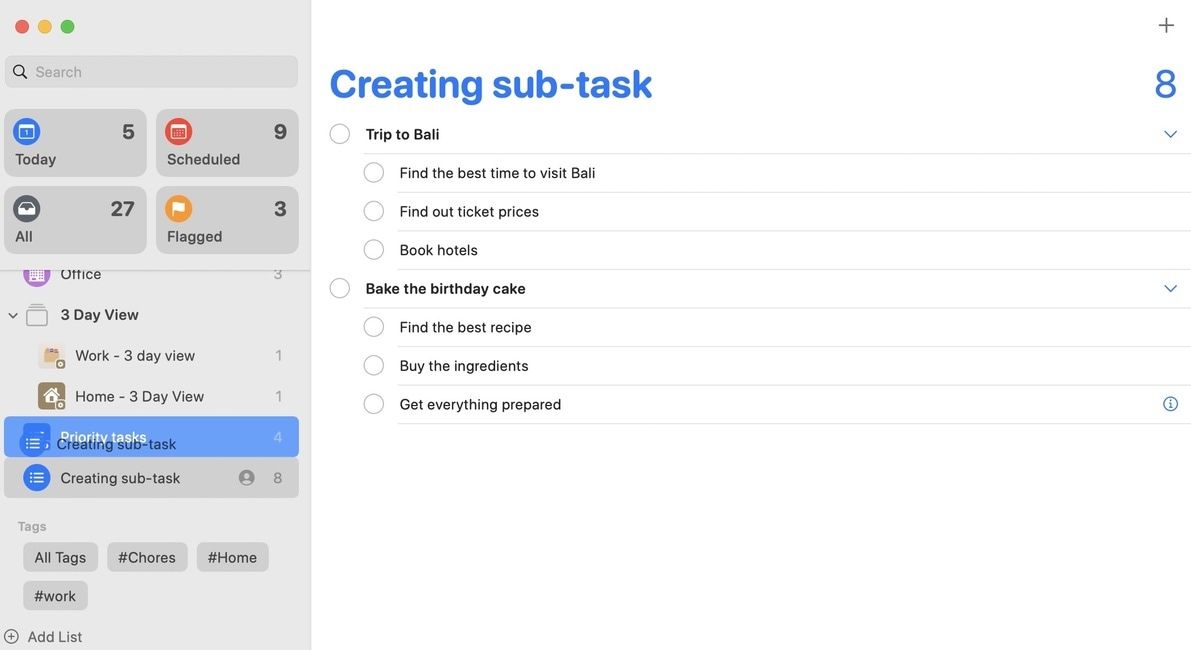
Create sub-tasks to break up bigger tasks
Sometimes a single task that we add is comprised of multiple smaller tasks. It’s recommended to break the big task into smaller tasks to make them more manageable and executable. Thankfully, reminders lets you add sub-tasks that you can use to break up bigger tasks into smaller tasks.
How to create sub-tasks in reminders on iPhone and Mac
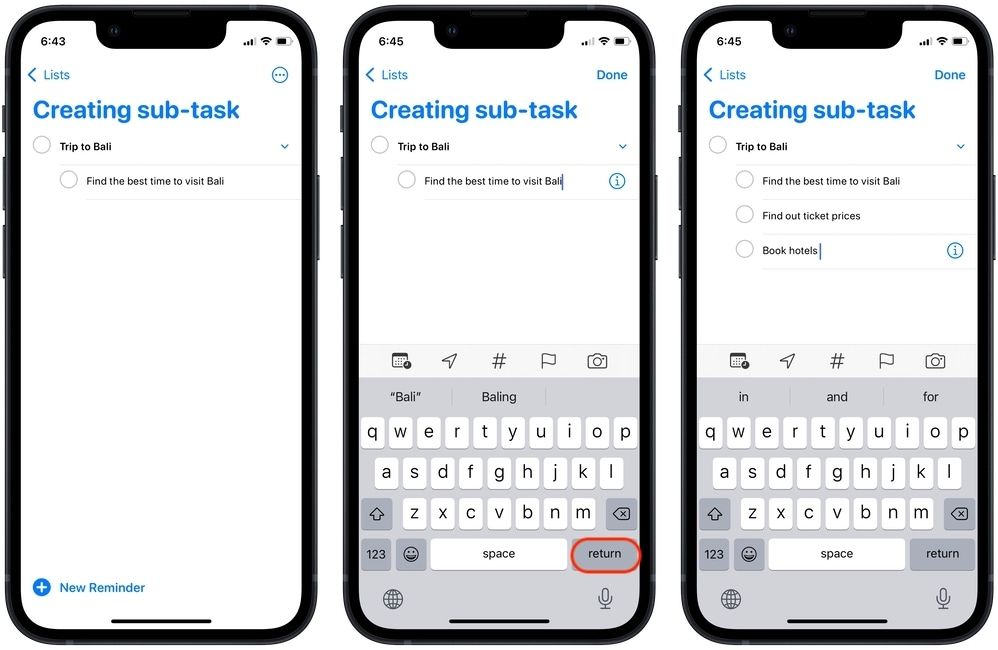
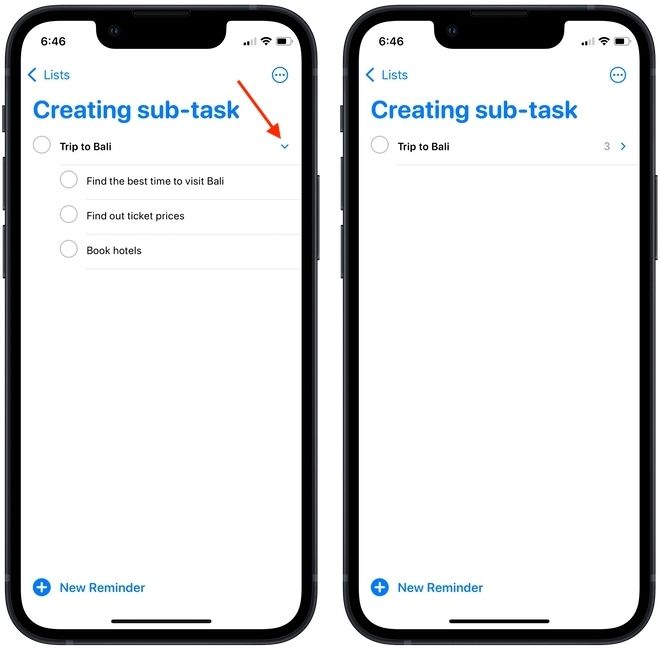
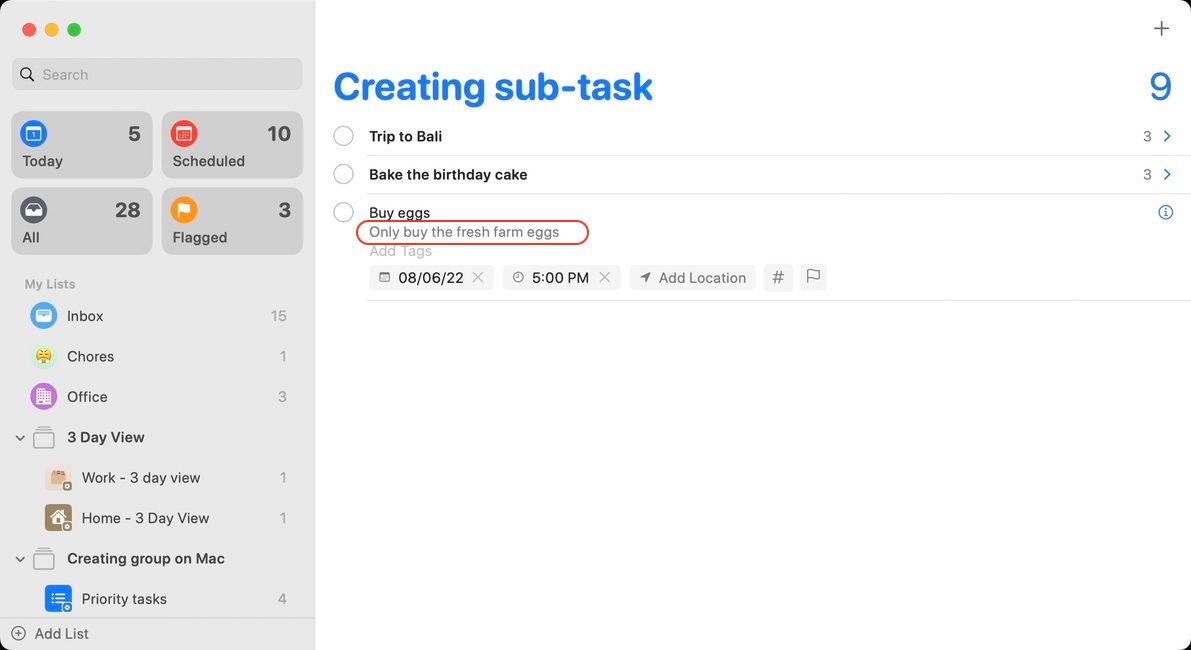
- Create the first reminder that you want to act as the main task. Let’s say we are planning a trip to Bali, so that will be our primary task.
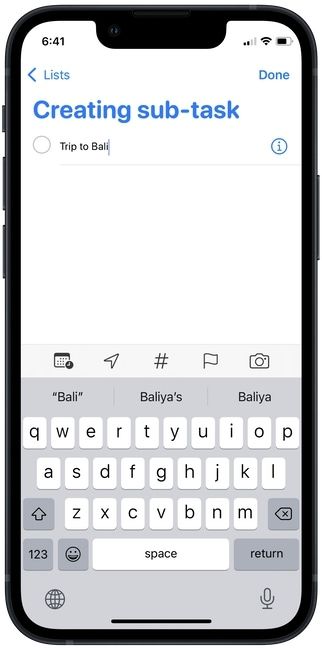
- Now, create a second reminder that will be its sub-task. For example, I will add a task to find the best time to visit Bali. To make this a sub-task, tap and hold on the second reminder and drag it on top of the first one.
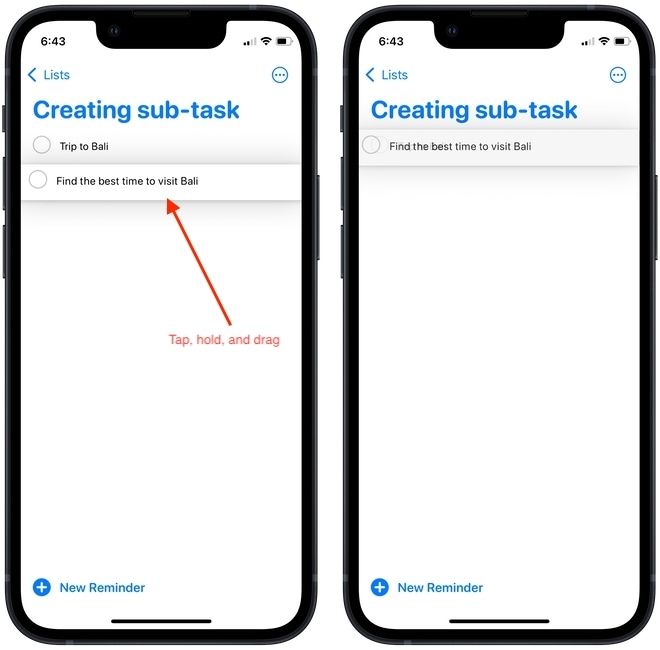
- As you can see, our Trip to Bali has a sub-task. To create more sub-task, tap inside a sub-task and hit the return key on the keyboard.
- The main task is shown in bold and there’s a drop-down arrow next to it that you can use to fold the task list.
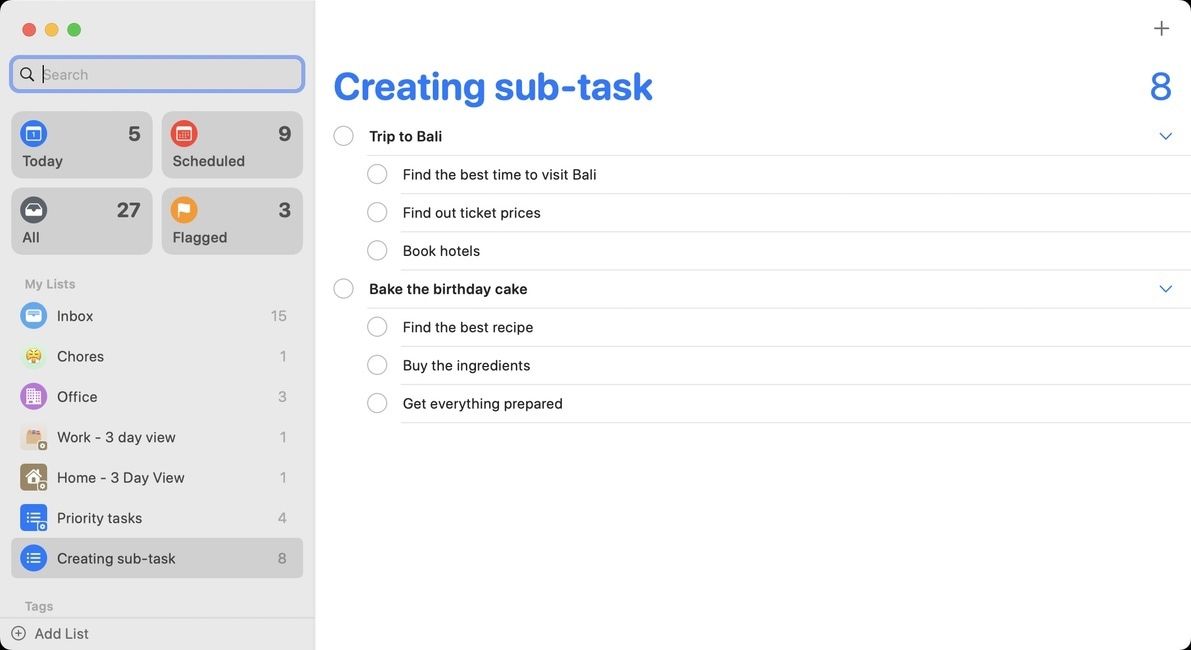
- Similarly, on Mac, you can click and drag a reminder on top of the other to create a sub-task.
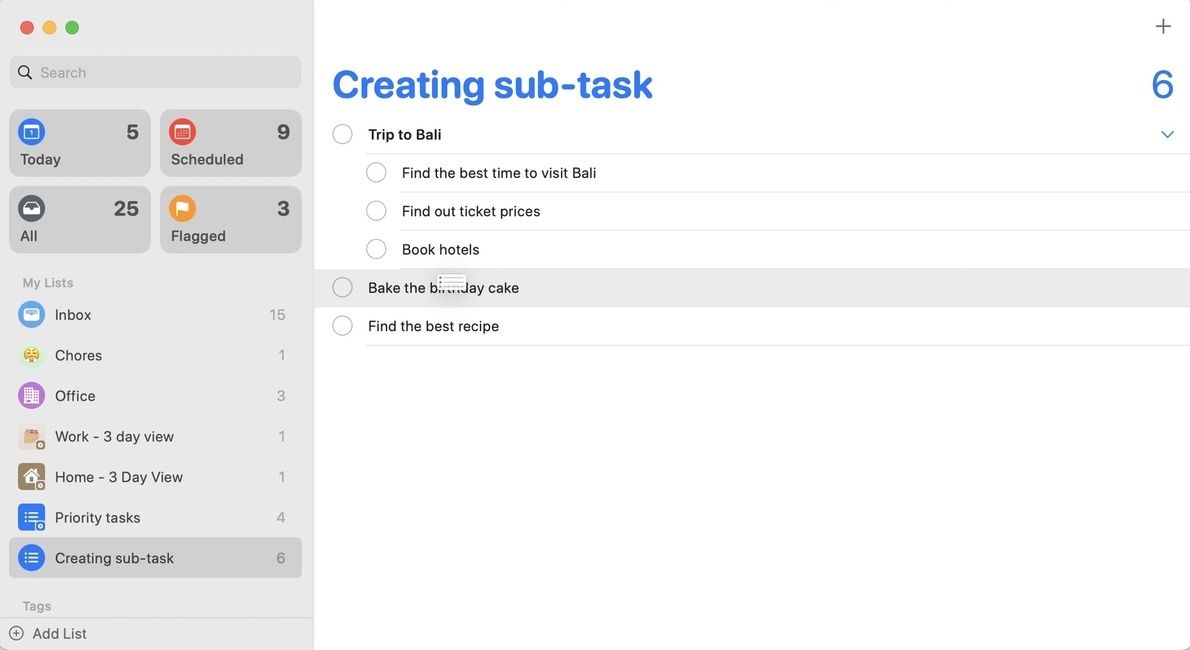
- You can then hit the enter/return key on your keyboard to create more sub-task.
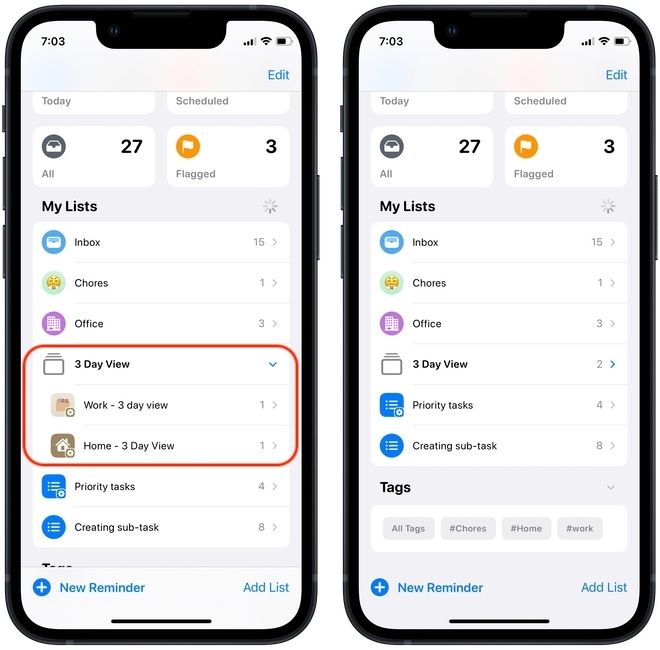
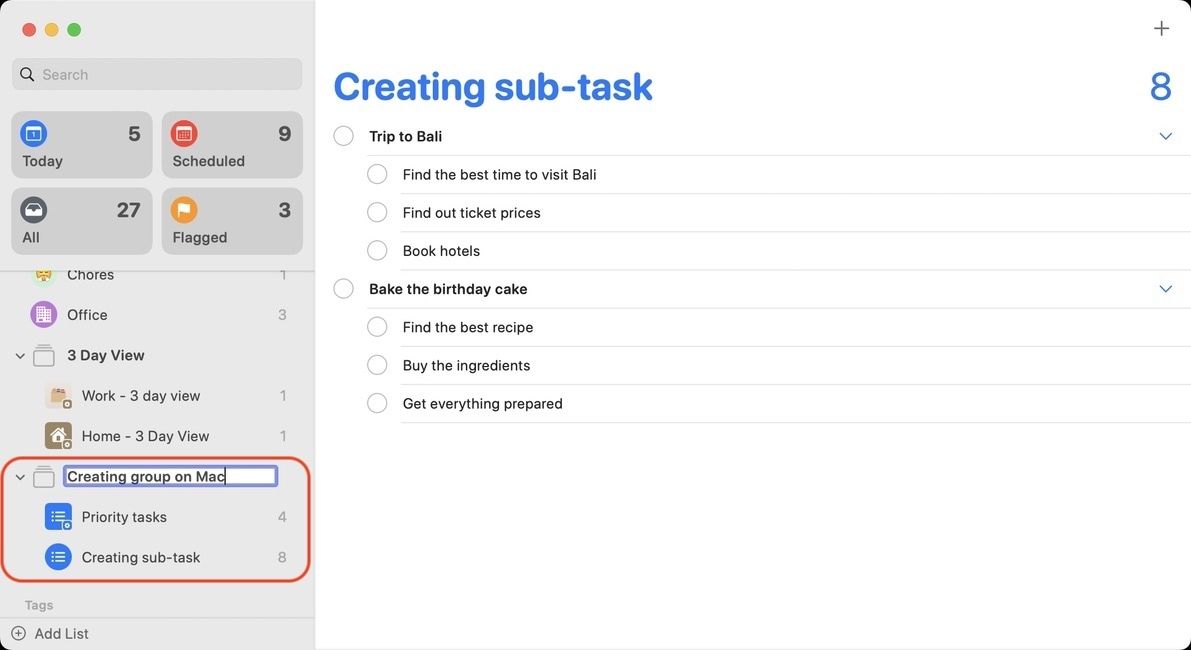
Group lists to break up big projects
If you are handling a big project, you can create list groups to organize multiple lists inside a group. The steps of creating a group are similar to that of creating sub-tasks. The only difference is that instead of nesting the second list under the first list, it gives you an option to create a group that will house the two lists.
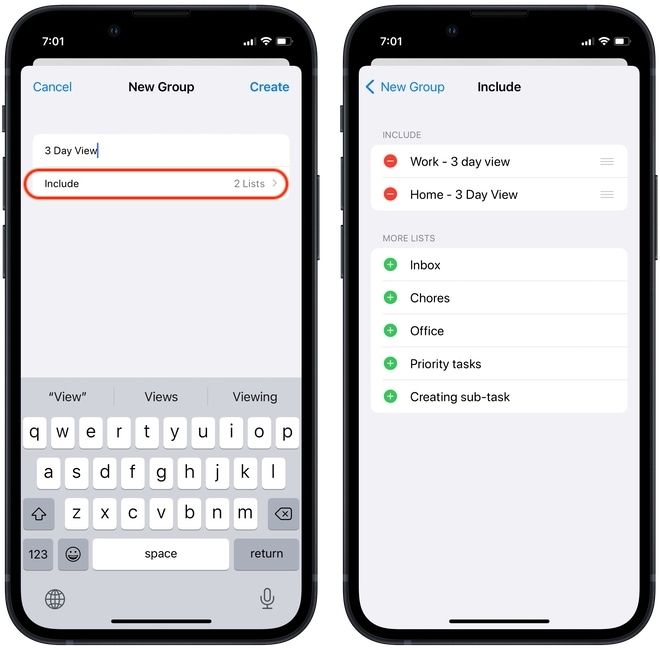
Here’s an example to make it more understandable. Suppose I want to group the Work and Home 3 Day view smart lists under a parent 3 Day View List. I will tap and hold on a list name (doesn’t matter which), and drop it on top of the second list.

Now, you will see the top to create a new group. You can name the group and tap on Create button in the top-right to create the group. To add more lists to the group, tap on the Include option and select the list you want to add. Since I don’t want to add more lists to the group, I will just save the original group.
As you can see, now I have a 3 Day View group that holds both my work and home lists. I can tap on the group name to expand or collapse the list view.
The steps are the same on the Mac. All you need to do is click and drag a list on the top of the other, and you will get the option to create a group.
Use natural language processing
The Reminders app also support basic natural language processing for recognizing dates and time. So, you can type something like, buy eggs at 5 PM tomorrow, and the app will recognize the time and date.
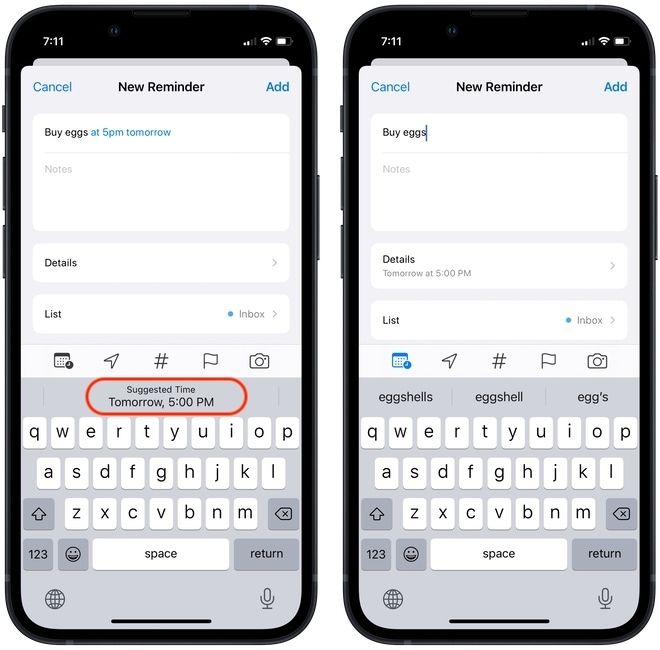
The natural language processing is nowhere as good as the one on Fantastical calendar app, but it works for simple reminders and saves a ton of time. Also, you can use this on both iPhone and Mac.

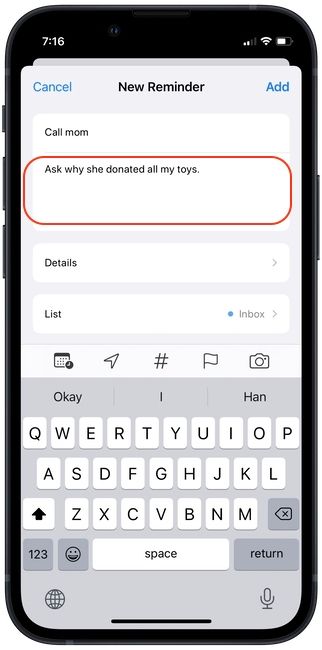
Add notes to reminders
I love that you can add notes inside reminders to add extra information for a task. For example, you can add context for a call you want to make or a message you want to write, etc. When creating a reminder on iPhone or Mac, tap in the notes filed and type the extra information you want.
Attach photos and documents to reminders
Apart from adding text notes, you can also attach photos and documents to a reminder. Again, this is helpful for adding context to the tasks you are adding. To add an image or document, tap on the camera icon when creating a new reminder.
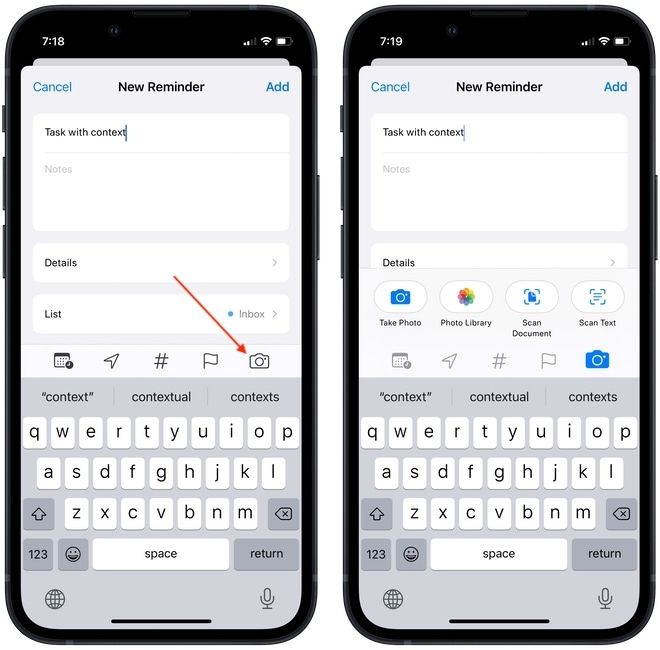
You can choose to take a photo, select a photo from your Photos library, scan a document, and even use iOS’s scan to text function to scan written text.
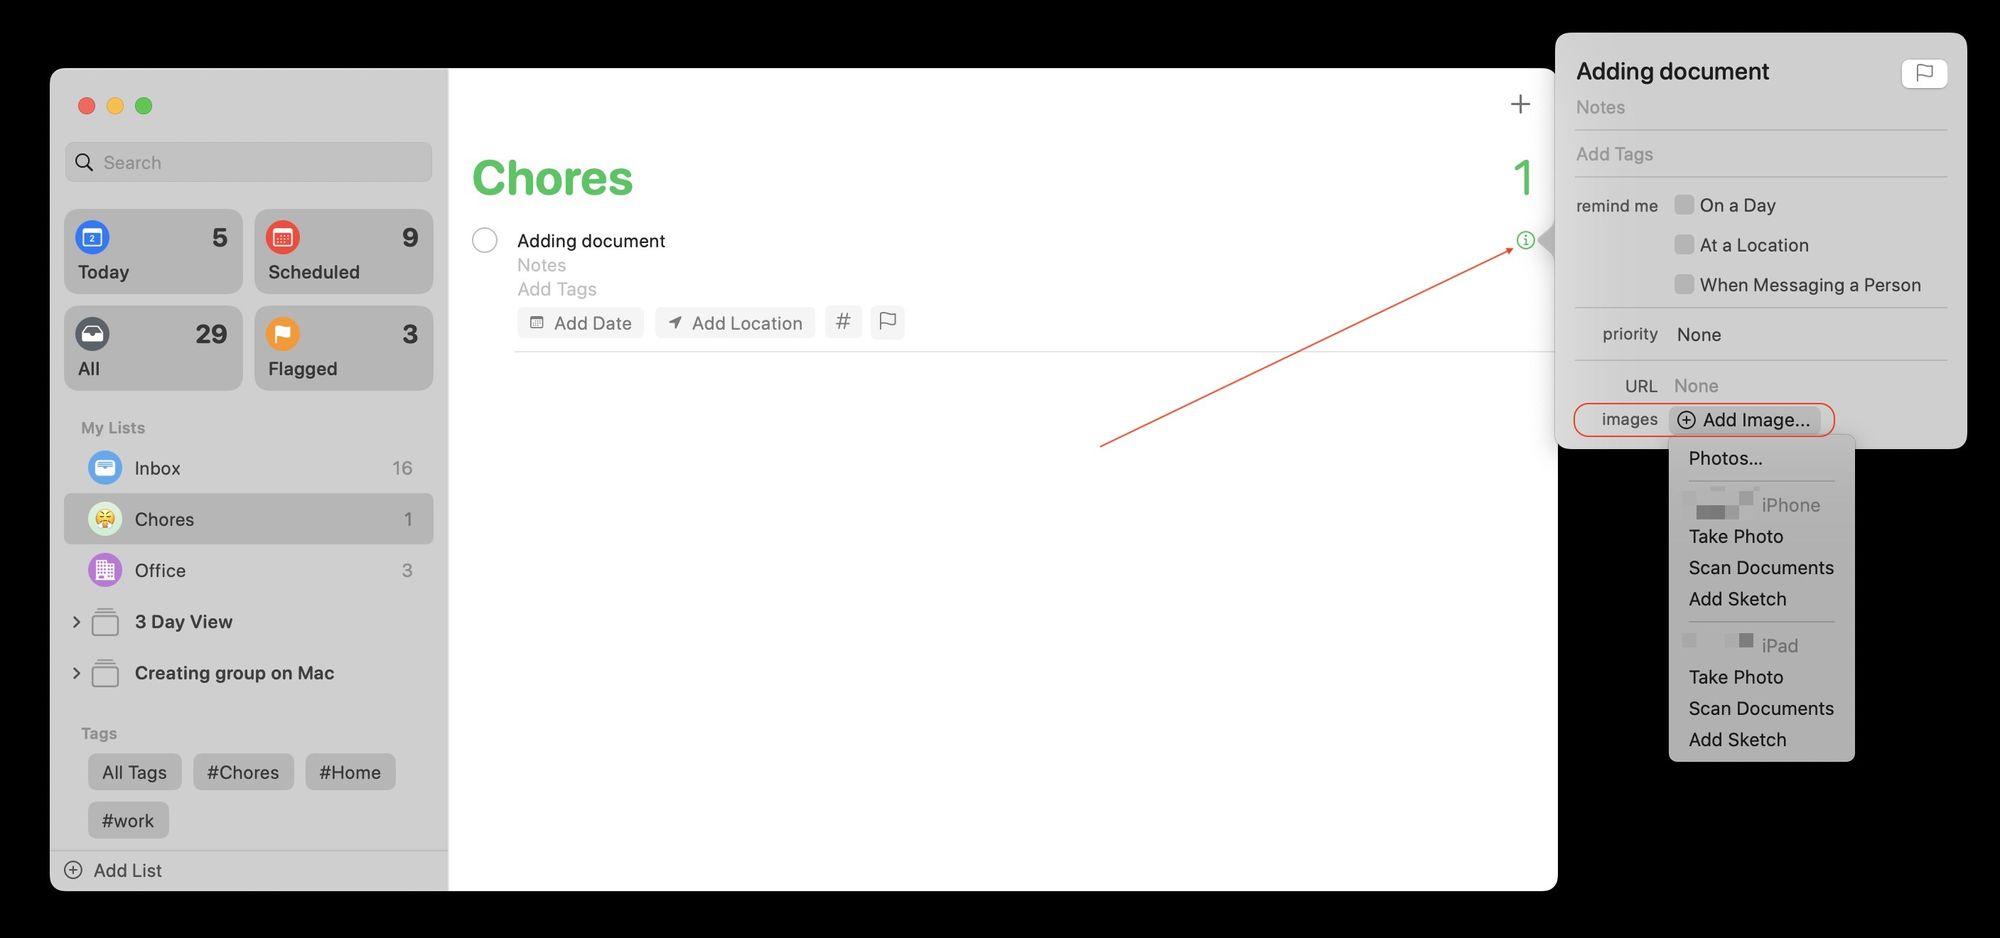
On your Mac, you will need to click on the (i) button and then Add image button. However, note that you won’t be able to add a document without an iPhone or iPad. The Mac will only let you add images from your Photos library or scan documents using iPhone or iPad.
Use app integrations
This is one of my favorite features of Reminders. I am still surprised as to how many people are unaware of this feature. Reminders integrate with most of the Apple apps along with several third-party apps.
When using an app, you can ask Siri to “Remind me about this,” and it will add a reminder with a backlink to the specific app. For example, with the notes app open, I can say ‘Hey Siri, remind me about this”, and Siri will create a reminder with a link to that specific app. You can do the same in Safari, Apple Pages, and more.

My favorite writing app, Ulysses also supports this feature. So when I want to check back on a specific sheet in Ulysses in the future, I ask Siri, and it adds a reminder with the link back to that sheet in Ulysses.
I love this feature, and once you start using it, you will see how much easier your life will become.
Use shortcut to quickly add reminders on Mac
The Shortcut app is powerful, and my workflow essentially revolves around this. From launching apps to combining images to performing complex automation, the app never seems to amaze me. If you have not used the app before, I highly recommend going through our best Siri shortcuts guide to see what amazing things you can achieve with this app.
Anyway, coming to the point, one thing I missed about using Things 3 was its quick add window that I could activate with a keyboard shortcut on Mac and quickly add tasks. Since this is not possible in the Reminders app, I created a quick shortcut that lets me do exactly that.
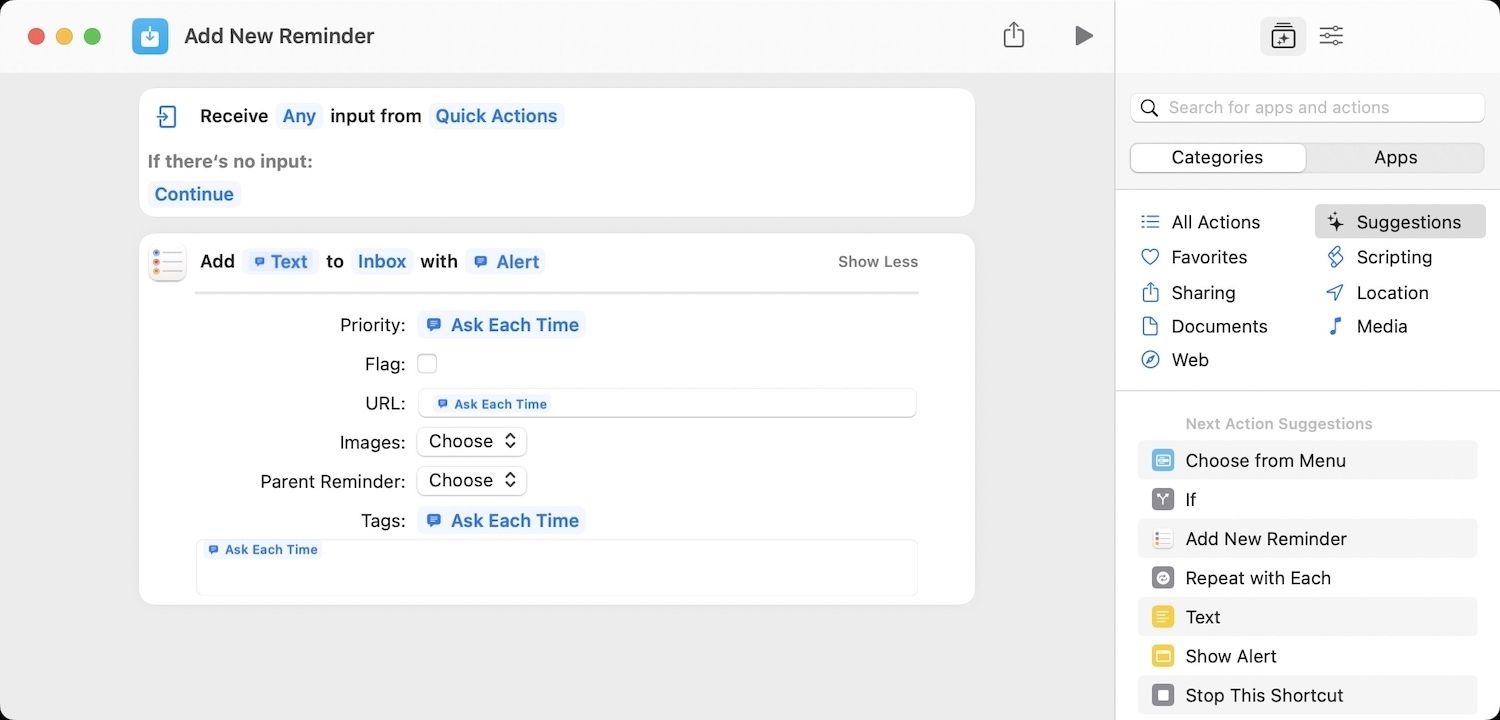
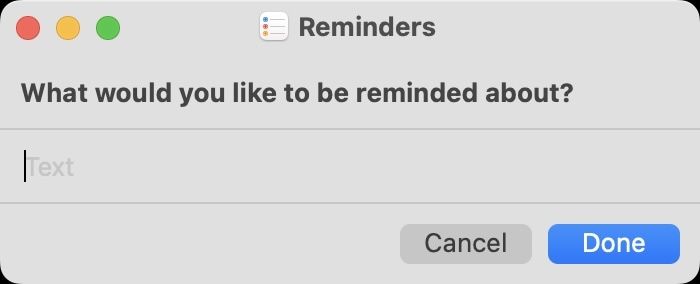
I will publish another article on how to create this quick entry shortcut and link it here when it goes live. For now, you can click on this link to download this shortcut and assign your own keyboard hotkey. When you use the hotkey, it will open a quick add window for reminders as shown below. Since I started using this shortcut, I no longer miss the quick add feature of Things 3.
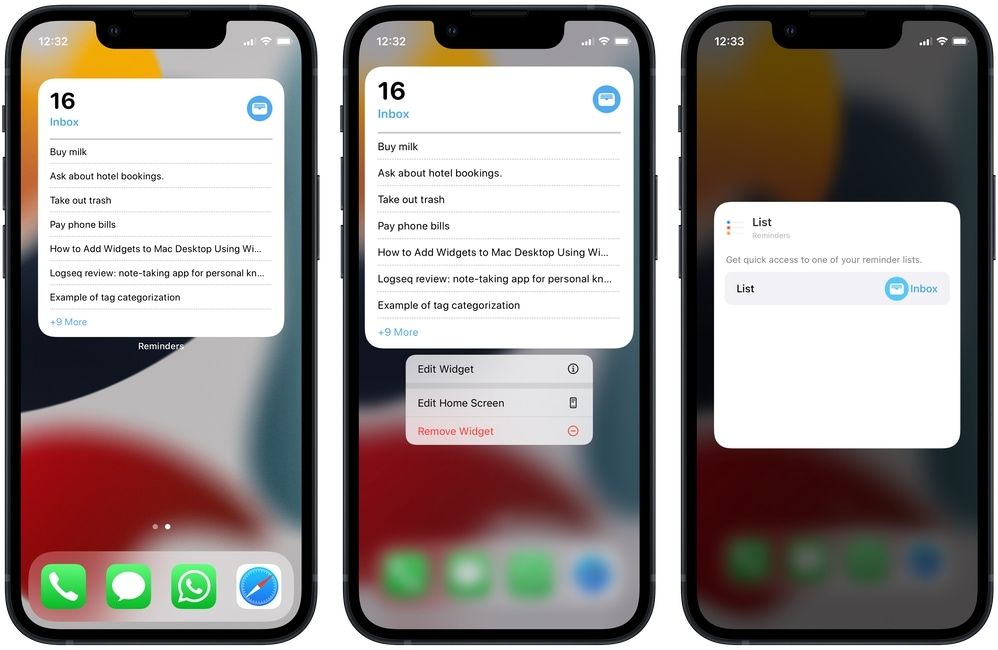
Use widgets
The final Reminder tip that I want to share is to use iPhone widgets. iPhone widgets are a great way to check your tasks in reminders, and I use widgets to quickly look at my upcoming tasks. You can edit the widgets to show any list you want. Sadly, you can’t add desktop widgets on Mac for reminders, but you can add them to the widgets panel, which can be accessed by swiping from the right edge of the trackpad.
Apple Reminders Guide: Final Thoughts
Well, this has turned out to be quite a long article. But if you read the entire article, you now know that the built-in Reminders app is powerful and deserves much more credit than people give it. I am managing all my work and personal tasks using Reminders, and it has not let me down.
I hope you enjoyed reading this article and got something new to learn. If you have any questions, you can reach us on Twitter or send us an email using the contact us page.